Customize Dynamic Related Lists
Learning Objectives
After completing this unit, you’ll be able to:
- Customize a dynamic related list in Lightning App Builder.
- Filter a dynamic related list to show only the records your users need.
- Describe how dynamic related lists can make your pages more useful for your users.
Customize the Dynamic Related List
You've learned what dynamic related lists are and how to create one. Now let's focus on some other useful ways you can customize dynamic related lists.
- If you’re not already on the Account Record Page in the Lightning App Builder, from Setup, enter App Builder in the Quick Find box, then select Lightning App Builder.
- Click Edit next to Account Record Page.
- In the Related tab on the canvas, click the list.
This selects the Dynamic Related List–Single component and shows its properties in the properties pane. If you’ve worked in the Lightning App Builder before, you’re familiar with component properties.
Let’s start to customize the dynamic related list by defining how the list appears.
- In the Dynamic Related List–Single properties pane, leave the Related List Type as List.
(Note that in Tile view, you see each record as a tile in the list, but the fields that you can see are limited.)
- In the Number of Records to Display field, enter
6.
Now, let’s update the list columns and define the list’s sort order.
- In the Dynamic Related List–Single properties pane, scroll down to the Related List Fields section.
- Click
 to remove the Close Date field.
- Click Add Field, search for and select the Type field, and then click Done.
- Click Add Field, search for and select the Probability (%) field, and then click Done.
- Drag to move the Probability (%) field above the Type field.
- In the Sort Field dropdown menu, select Stage.
- In the Sort Order dropdown menu, select Descending.
Now, let’s update the actions on the list. In order for users to see the actions that you add on the related list, you also need to make the action bar visible.
- Scroll down to the Actions section and click Add Action.
- Search for and select New action and click Done.
- Scroll back up in the properties pane and verify that the Show list view action bar box beneath the Number of Records to Display field is checked.
- Save the page.
Filter the Dynamic Related List for Your Users
There’s one more step to customizing the list: Filtering the list to show only the records that your users need. If you needed another reason to upgrade to dynamic related lists, this is it. And the only way to customize related list filters is to use the Dynamic Related List-Single component. You can’t add custom filters to a related list that you add from the page layout editor.
- In the Dynamic Related List–Single properties pane, scroll down to the Related List Filters section and click Add Filter.
- Create a filter:
- Field: Stage
- Operator: not equal to
- Value: Select
Closed WonandClosed Lost
- Click Done.
Now that the list is filtered to only show open opportunities, let’s give it a descriptive name so users know what records to expect.
- Scroll back up to the top of the Dynamic Related List–Single properties pane.
- In the Related List Label field, enter:
Open Opportunities by Stage - Save the page.
That’s it! We created a new dynamic related list, customized how it looks on the page, and filtered it to show only the most relevant related records. But what does it look like to our users? Before we find out, we need to activate the page.
Activate the Page
There are a few different options for activation, but we’re going to make this page the org-wide default for all opportunity pages on desktop.

At the top of the Dynamic Related List–Single properties pane, click Activation.
- Click Assign as Org Default.
- Make the page available for desktop.
- Click Next, then click Save.
- Save the page.
Simple! Now the page is available to users on the desktop form factor. Let’s go see the finished result.
See What Your Users See
- From the Lightning App Builder header, click Back (
 ).
).
- If you’re directed to the United Oil & Gas Corp. account page, refresh the page to see the changes.
- If you’re not directed back to the United Oil & Gas Corp. account page, from the App Launcher (
 ), select the Sales app.
- Click the Accounts tab.
- Select the All Accounts list view.
- Click United Oil & Gas Corp.

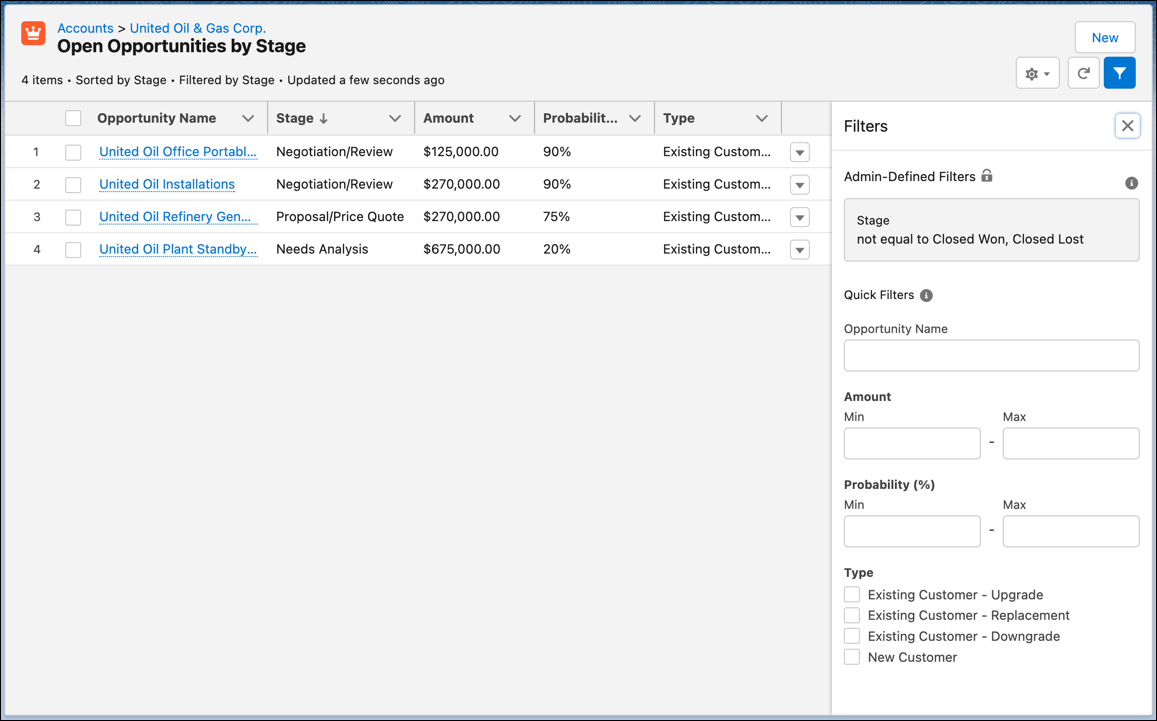
Nice! In the Related tab you can see the related list that we added, filtered to show open opportunities and sorted by stage. We also added the New button, so your users can create a new opportunity right from the account record.
And, if you click the View All link, you can use quick filters to further filter the records in the list. You can also see the filters that you defined in the Lightning App Builder. Note that your users can’t remove these filters, but you can always configure them differently based on their feedback.
Now that you know something about what dynamic related lists can do, give it a try in your own org! To take it one step further, you can even add a second related list on the account record page that’s filtered to only show Closed–Won opportunities. Once you start using dynamic related lists, it won’t take you long to see all the benefits it provides!
Resources
- Salesforce Help: Activate Lightning Experience Record Pages
- Salesforce Help: Standard Lightning Page Components