Add Nodes to Complete the Data Processing Engine Definition
Join Active Orders with Loyalty Program Members
From the orders and contacts, you get the account ID of the customer. Based on this common criteria, join the records of the orders and the members.
- Click New Node and add the following details.
- Node Type: Join
- Name:
Join Active Orders with Loyalty Program Members - API Name: Auto-populates with
Join_Active_Orders_with_Loyalty_Program_Members
- Node Type: Join
- Click Save.
- Select Join Type as Inner.
- Add the following details under First Node.
- Source Node: Filter Active Orders
- Select Fields: Select all
- Source Node: Filter Active Orders
- Add the following details under Second Node.
- Source Node: Filter Active Loyalty Program Members
- Select the following fields:
-
AccountId
-
Id
-
MembershipNumber
-
MemberStatus
-
ProgramId
-
AccountId
- Source Node: Filter Active Loyalty Program Members
- Add the following details under Mapped Fields.
- First Node Field: Order_AccountId
- Second Node Field: AccountId
- First Node Field: Order_AccountId
- Click Save, and then save all your work.

You now have all the necessary information about members and their orders. But for DPE to start doing its magic, you must bring in more information to trigger loyalty processes.
Add Journal Details and Order Status
To trigger relevant loyalty processes, the loyalty system uses data from the transaction journal. The information you need depends on the process.
The Cloud Kicks Inner Circle program rewards members for accruals related to partner purchases. So you need the journal type, journal subtype, and partner details. Use a formula node to fetch this information. The node stores these values in input variables and passes on the information to writeback nodes.
Additionally, use the formula node to mark the Order Status Copy field as Processed so that these orders aren't used to accrue loyalty rewards more than once.
First, create the three input variables.
- Click
 .
.
- Click the Input Variables tab.
- Click New Input Variable.
- Add the following details.
- Name:
JournalTypeId - API Name: Auto-populates with
JournalTypeId - Type: Text
- Name:
- Click Save.
- Repeat steps 3 to 5 with the following details. When finished, be sure to save your work.
Name |
API Name (auto-populated) |
Type |
|---|---|---|
JournalSubtypeId |
JournalSubtypeId |
Text |
PartnerId |
PartnerId |
Text |
Next, create a formula node to update the order status copy, and insert the values for the three variables.
- Click New Node and add the following details.
- Node Type: Formula
- Name:
Add Journal Details and Order Status - API Name: Auto-populates with
Add_Journal_Details_and_Order_Status
- Node Type: Formula
- Click Save.
- Click the Add Journal Details and Order Status node and select Configure.
- Select Source Node as Join Active Orders with Loyalty Program Members.
- Add the following details under Formulas.
- Alias:
CopyOrderStatus - Field Type: Text
- Length:
40 - Enter formula in the text box:
"Processed"
- Alias:
- Click Validate Syntax.
- Click Add Formula.
- Repeat steps 5 to 7 with the following details. Be sure to save your work when finished.
Alias
Field Type
Length
Search fields
JournalSubtypeIdText
40{$JournalSubtypeId}
JournalTypeIdText
40{$JournalTypeId}
PartnerIdText
40{$PartnerId}
DPE has transformed the data, so now it’s time to move it into target objects. You need two writeback object nodes to create transaction journals and update the order status.
Create Transaction Journal
The first writeback object node inserts a new record with the transformed data. In other words, the DPE creates a new record in the Transaction Journal object with the transformed data.
- Click New Node and add the following details.
- Node Type: Writeback Object
- Name:
Create Transaction Journal - API Name: Auto-populates with
Create_Transaction_Journal
- Node Type: Writeback Object
- Click Save and add the following details.
- Source Node: Add Journal Details and Order Status
- Target Type: Salesforce Object
- Action Type: Insert
- Target Object: Transaction Journal
- User with Writeback Permission: Select your name
- Writeback Sequence:
1
- Source Node: Add Journal Details and Order Status
- Add the following details under Field Mapping. Click Add Row after mapping each field. When finished, be sure to save your work.
Source Node Field
Target Field
ActivatedDate
Activity Date
JournalTypeId
JournalTypeId
JournalSubtypeId
JournalSubTypeId
TotalAmount
TransactionAmount
ActivatedDate_c
InvoiceDate
Id
MemberId
ProgramId
LoyaltyProgramId
PartnerId
PartnerId
Here’s the completed configuration.

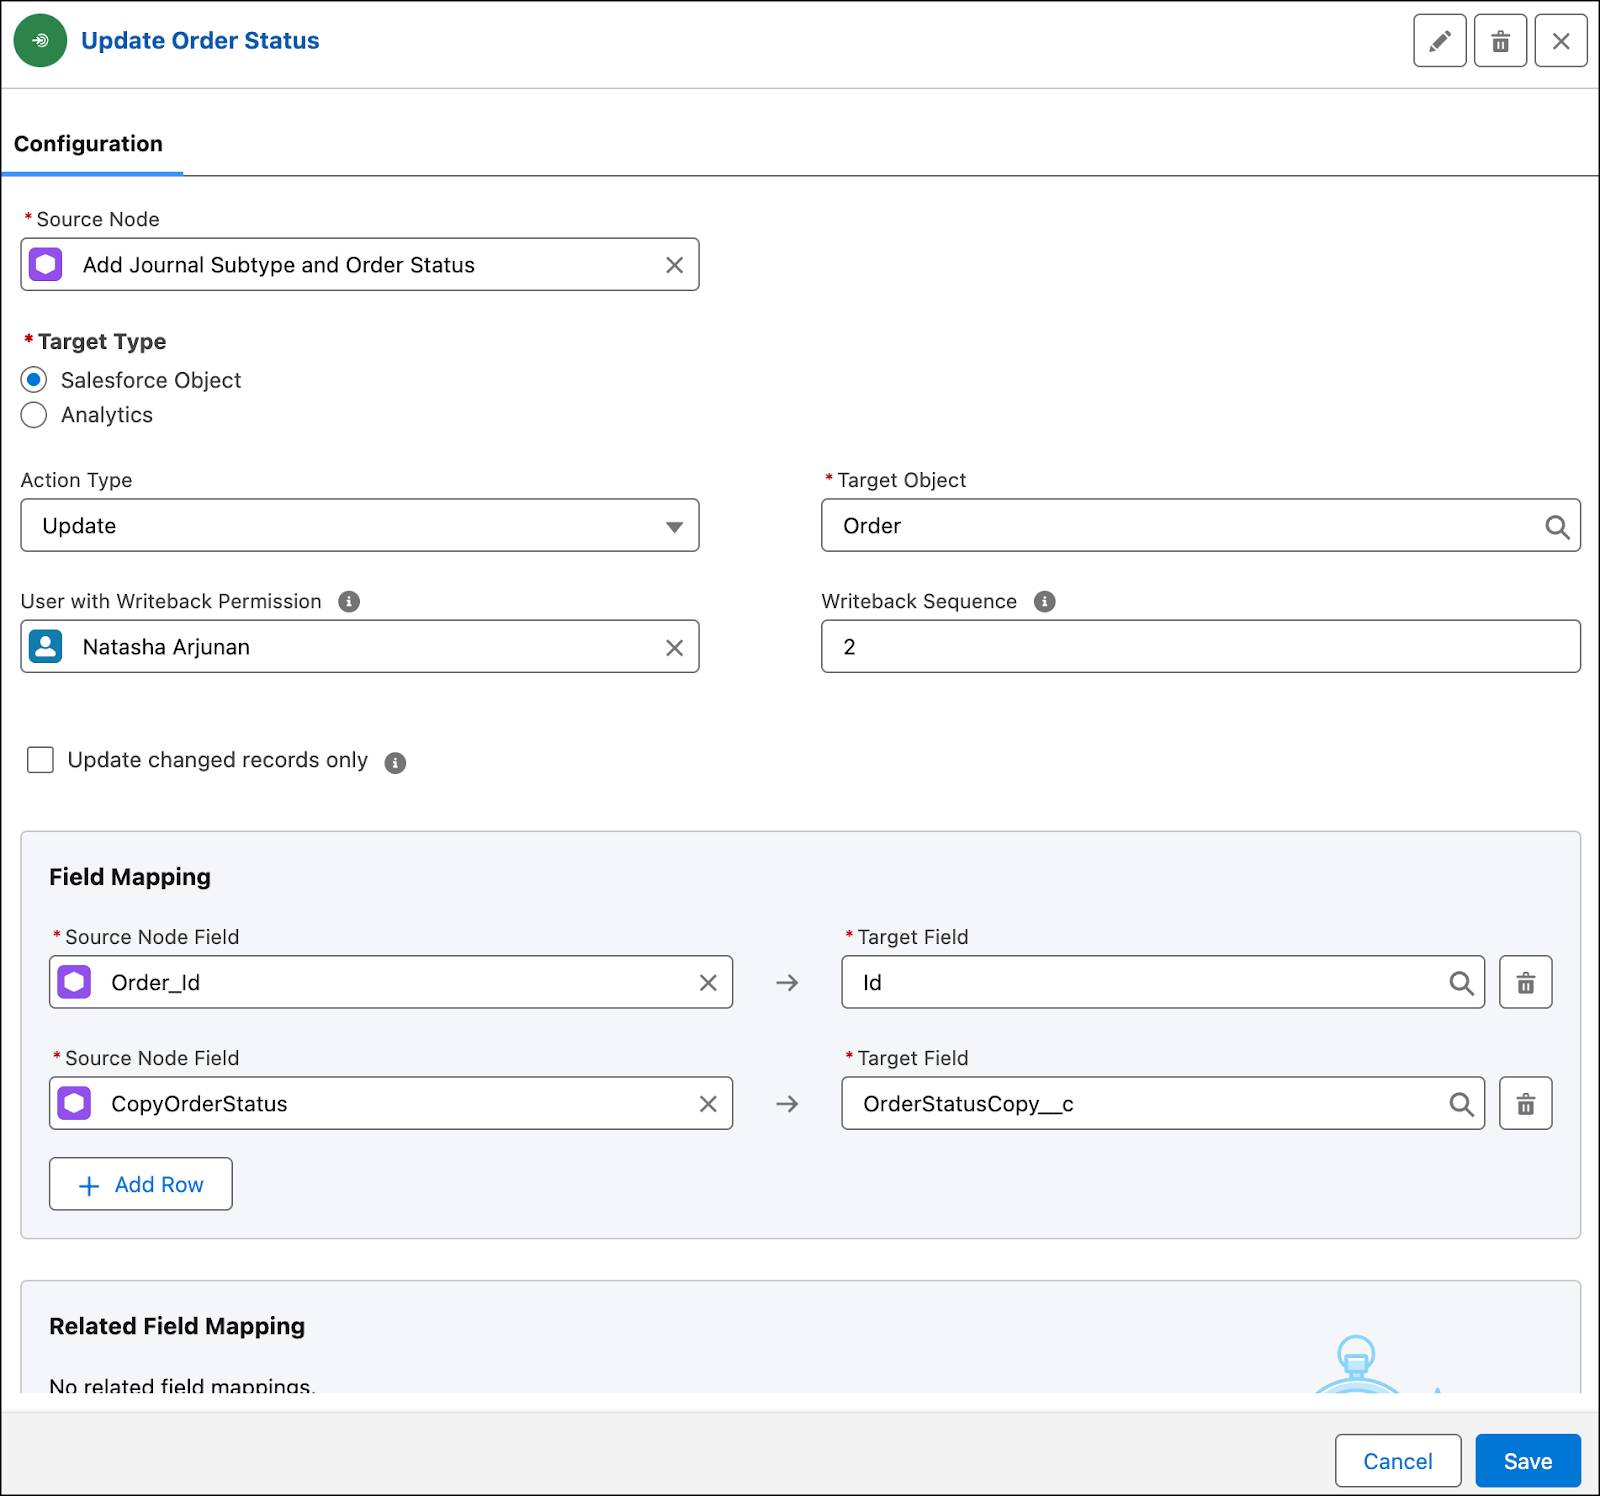
Update Order Status
The second writeback object node updates the order status copy field. The formula field only holds the value of the field. This node performs the action of updating the field from Pending to Processed.
- Click New Node and add the following details.
- Node Type: Writeback Object
- Name:
Update Order Status - API Name: Auto-populates with
Update_Order_Status
- Node Type: Writeback Object
- Click Save and add the following details.
- Source Node: Add Journal Details and Order Status
- Target Type: Salesforce Object
- Action Type: Update
- Target Object: Order
- User with Writeback Permission: Select your name
- Writeback Sequence:
2
- Source Node: Add Journal Details and Order Status
- Add the following details under Field Mapping. Click Add Row after mapping each field. Be sure to save your work.
Source Node Field
Target Field
Order_Id
Id
CopyOrderStatus
OrderStatusCopy__c
Here’s the completed configuration.
You’ve added all the required nodes, so here’s your chance to activate the definition.
Activate the DPE Definition
In the Create Transaction Journals From Orders DPE definition, click Activate.

You created all the necessary nodes to transform data from orders to actionable data for creating transaction journals. In the next step, you learn how to run and monitor a DPE definition.