Create Attributes for Watch Band Styles
A Band for Any Occasion
AW Computing wants to offer watch bands in four different materials, in 12 possible colors, and with three accent colors for the metal pieces of the band. The company knows it would be best to make attributes to capture this information during configuration. However, instead of using configuration attributes, AW Computing wants to use three global attributes. Global attributes are like configuration attributes, with a few important distinctions.
Differences |
Configuration Attributes |
Global Attributes |
|---|---|---|
Appearance |
Visible above, below, or inside features. |
Visible in an expandable drawer on the option. |
Reusability |
May be related to a single bundle. |
May be related to as many options as you’d like, even across bundles. |
Construction |
Requires only one record related to the product. |
Requires four records across four objects. |
Behavior |
May be configured to use a default value, show or hide picklist values, be required, and more. |
Currently, cannot be configured with any of the special behaviors such as default values. |
The biggest advantage of a global attribute is that you can attach it to as many options as you like. (Even options in different bundles.) This is important for AW Computing because the company intends to offer two watch bands in the bundle, and wants to use the same attributes for each option.

Like configuration attributes, making Global Attributes begins with creating the fields that they’re based on. You start by navigating to the Product Options object.
- Click
 and click
 Setup. The Setup page opens in a new tab.
- Click Object Manager.
- Click Product Option.
- Click Fields & Relationships.
- Click New.
- Click Picklist.
- Click Next.
- For Field Label, enter
Material.
- Click the radio button to Enter values, then enter each of these values on a separate line:
Silicone
Canvas
Stainless Steel
Leather
- Click Next.
- Click Next to keep field-level security as is.
Good, now you can save and start making the Color field.
- Click Save & New.
- Click Picklist.
- Click Next.
- For Field Label, enter
Color.
- Click the radio button to Enter values, then enter each of these values on a separate line:
Light Gray
Dark Gray
Gold
Black
White
Brown
Red
Blue
Green
Purple
Pink
Yellow
- Click Next.
- Click Next to keep field-level security as is.
- Click Save.
Great, Material and Color are ready to go. You don’t have to create an Accent field because it already exists from when we created the Accent configuration attribute in an earlier step.
Now you must add the API names into the Target Field picklist.
- Click Object Manager.
- Click Configuration Attribute.
- Click Fields & Relationships.
- Click Target Field.
- In the Values list, click New.
- Enter these two values on separate lines:
Material__c
Color__c
- Check the box next to Record Type Name.
For this example we really only need Global Attribute checked, but it doesn’t hurt to have them both checked.
- Click Save.
Close the Setup tab to get back to the Salesforce CPQ tab.
Great, now you can create some global attributes for Material, Color, and Accent. Since global attributes are, well, global, they’re not associated directly with a product. To create one, you start by navigating directly to the Configuration Attributes tab.
- In the navigation bar, click Configuration Attributes.
- Click New.
- Click the Global Attribute record type.
- Click Next.
- For Attribute Name, enter
Material.
- For Target Field, choose Material__c.
Global attributes only need these two pieces of information, so you’re ready to save and begin making your next attribute.
- Click Save & New.
- Click the Global Attribute record type.
- Click Next.
- For Attribute Name, enter
Color.
- For Target Field, choose Color__c.
And now for the final attribute.
- Click Save & New.
- Click the Global Attribute record type.
- For Attribute Name, enter
Accent.
- For Target Field, choose Accent__c.
- Click Save.
Now you have three global attributes, but they’re kind of floating out there, with no home. To give them a little structure, you’re going to put them together into what is called an attribute set. Attribute sets are collections of global attributes that have something in common. In this example, the attributes are all necessary for setting the style of the watch band.
Global attributes are related to attribute sets through a junction object called an attribute item, which has lookups to each of the other objects.
 [Alt text: Relationship diagram inclu
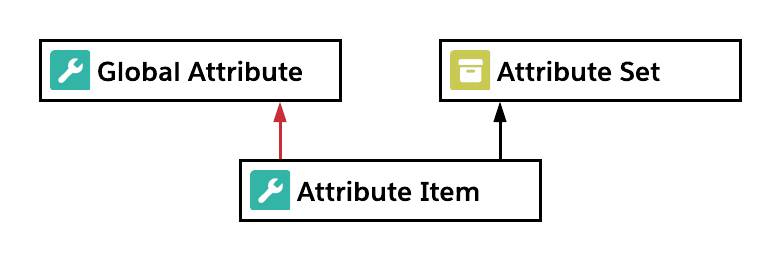 ing global attribute, attribute item, and attribute set]
This kind of relationship allows you to create more than one attribute set from the same collection of global attributes. Think of an attribute set as a playlist. One playlist has your favorite workout songs, another your favorite dance songs. Both draw from the same library, and some songs appear in both lists. The attribute item is like a playlist entry.
An attribute item does more than just connect a global attribute to an attribute set. It also determines which should appear first from left to right. So if you want Material shown first, make its Sequence field 10. Color will be 20, and Accent will be 30. CPQ displays only three attributes on a single row. So, if you had a fourth attribute, CPQ would place it in a new row beneath the first.
Let’s create an attribute set, then three attribute items for your global attributes.
- In the navigation bar, click Attribute Sets.
- Click New.
- For Attribute Set Name, enter
Watch Band Style.
- Click Save.
The attribute set is now like an empty container, ready to hold attribute items.
- Click the Related tab.
- In the Attribute Items related list, click New.
- For Configuration Attribute, find and select the Material configuration attribute.
- For Sequence, enter
10.
- Click Save & New.
- For Configuration Attribute, find and select the Color configuration attribute.
- For Sequence, enter
20.
- Click Save & New.
- For Configuration Attribute, find and select the Accent configuration attribute.
- For Sequence, enter
30.
- Click Save.
Great, your Watch Band Style attribute set is looking good! Now you need to associate the attribute set to both watch band product options. You do this using another junction object named Product Attribute Set.
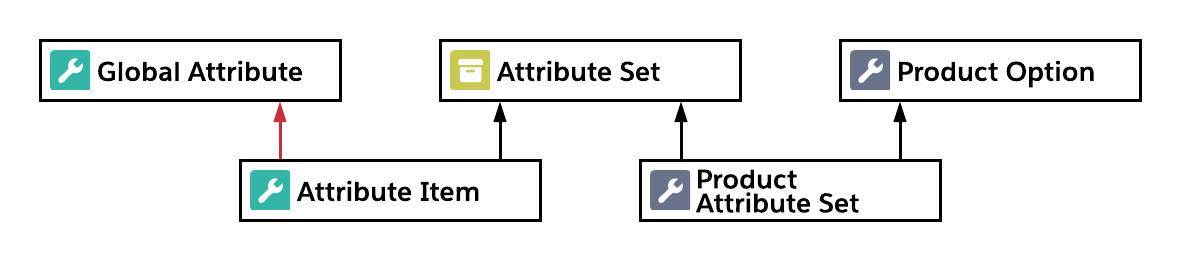
The product attribute set junction object allows you to relate an attribute set to more than one product option, which is exactly what AW Computing needs. Also, it allows you to associate more than one attribute set to the same product option.

It also has a Sequence field, which orders sets from left to right. In this example you include one set per option, so it doesn’t matter how you number it.
You need to create two product attribute set records, one for each watch band option. It’s easiest to make these by navigating to the product option records that are affected. You also need to choose the default values for the global attributes in each option. You start by navigating to the Smartwatch product.
- From the navigation bar, click Products.
- Click Smartwatch.
- Click the Related tab.
- From the Options related list, click PO-00076.
- Click the Related tab.
- From the Product Attribute Sets related list, click New.
- For Attribute Sets, find and select Watch Band Style.
- For Sequence, type
10.
- Click Save.
All three global attributes will appear in the first smartwatch band option. While you're on the Product Option record, choose the default values for material, color, and accent for this first option. Let’s say you want to create a band with athletic styling.
- Click Edit for the Product Option record (not the Product Attribute Set).
- For Material, choose Silicone.
- For Color, choose Dark Gray.
- For Accent, choose Light Gray.
- Click Save.
You want the attribute set to appear in the spare watch band option too, so let’s associate the set with that option.
- From the navigation bar, click Products.
- Click Smartwatch.
- Click the Related tab.
- From the Options related list, click PO-00077.
- Click the Related tab.
- From the Product Attribute Sets related list, click New.
- For Attribute Sets, find and select Watch Band Style.
- For Sequence, enter
10.
Remember, the sequence is relative to this specific product option, so it’s OK to start with 10 again.
- Click Save.
For the second smartwatch band, you want a watch band that goes with formal wear.
- Click Edit for the Product Option record (not the Product Attribute Set).
- For Material, choose Leather.
- For Color, choose Brown.
- For Accent, choose Gold.
- Click Save.
Now sales reps can configure the properties of the watch band exactly to their customer’s liking. If you want to test it yourself, go back to Q-00045 and add the Smartwatch. In the Product Configuration page, click the arrow on the smartwatch band option to open the Product Option Drawer, revealing the global attributes in the attribute set.

Now that you have a few global attributes, you can be your own CPQ DJ, making mix tapes of attributes that you connect to other product options.
Resources
- Salesforce Help: Global Attributes
- Salesforce Help: Create a Global Attribute
- Salesforce Help: Considerations for Global Attributes