Set Up Your Android Development Environment
What You’ll Learn
In this step, you’ll learn:
- The software setup required for Android development.
- How to check for preinstalled software.
- How to install missing software.
Prerequisites
- A Mac OS X or Windows development machine.
- Successful completion of step 1, Install Common Components.
About the Android Development Environment
Android development components include:
- Java Development Kit (JDK)
- Android Studio with Gradle
- Android SDK
You install the JDK and Android Studio, and then you install the Android SDK from within Android Studio. The Android Studio installer also installs the Gradle command line build tool.
The minimum versions Mobile SDK 13.0.0 requires are:
- JDK 17
- Android Studio (latest version) with Gradle 8.7.0
- Android SDK level 28 (minimum API) through 35 (target API)

Install Java Development Kit
- To check if it is already installed, at the OS command prompt, type:
java -version
- If this command reports Java version 11.x or later, you’re done—proceed to the next installation. If the reported version is earlier than 11.x, continue to step 2.
- If you get a “command not found” error message, continue to step 2.
- Go to oracle.com/java.
- Download and run the installer for your operating system.
- When the installer finishes, return to step 1.
Install Android Studio (Latest) with Gradle 7.0.2
You download installers for Android Studio tools from developer.android.com/studio.
- To check if it’s already installed, look for the program file: Android Studio.app on Mac OS; studio.exe or studio64.exe (or a shortcut to Android Studio) on Windows.
- If you can’t find the program file, continue to step 2.
- If you found the program file, run it, and then click About Android Studio in the menu. If the dialog box lists version 3.5.3 or later, you can skip ahead to Install Required Android SDK Versions. If it’s earlier than that version, continue to step 2.
- Go to developer.android.com/studio.
- Download and run the installer for your operating system.
- Step through the Android Studio Setup Wizard, then click Finish.
Install Required Android SDK Versions
Android apps specify different API levels. According to the Android documentation:
- “Minimum API level” is the lowest API level with which your app is compatible
- “Target API level” is the highest API level against which you’ve designed and tested your app
.
Mobile SDK 13.0 uses Android 9 Pie (API 28) as its minimum and Android 15 (API 25) as its target.
- Open Android Studio.
- On the Welcome screen, open the configuration menu and click SDK Manager. (On older Android Studio versions, click Configure to access this menu.)
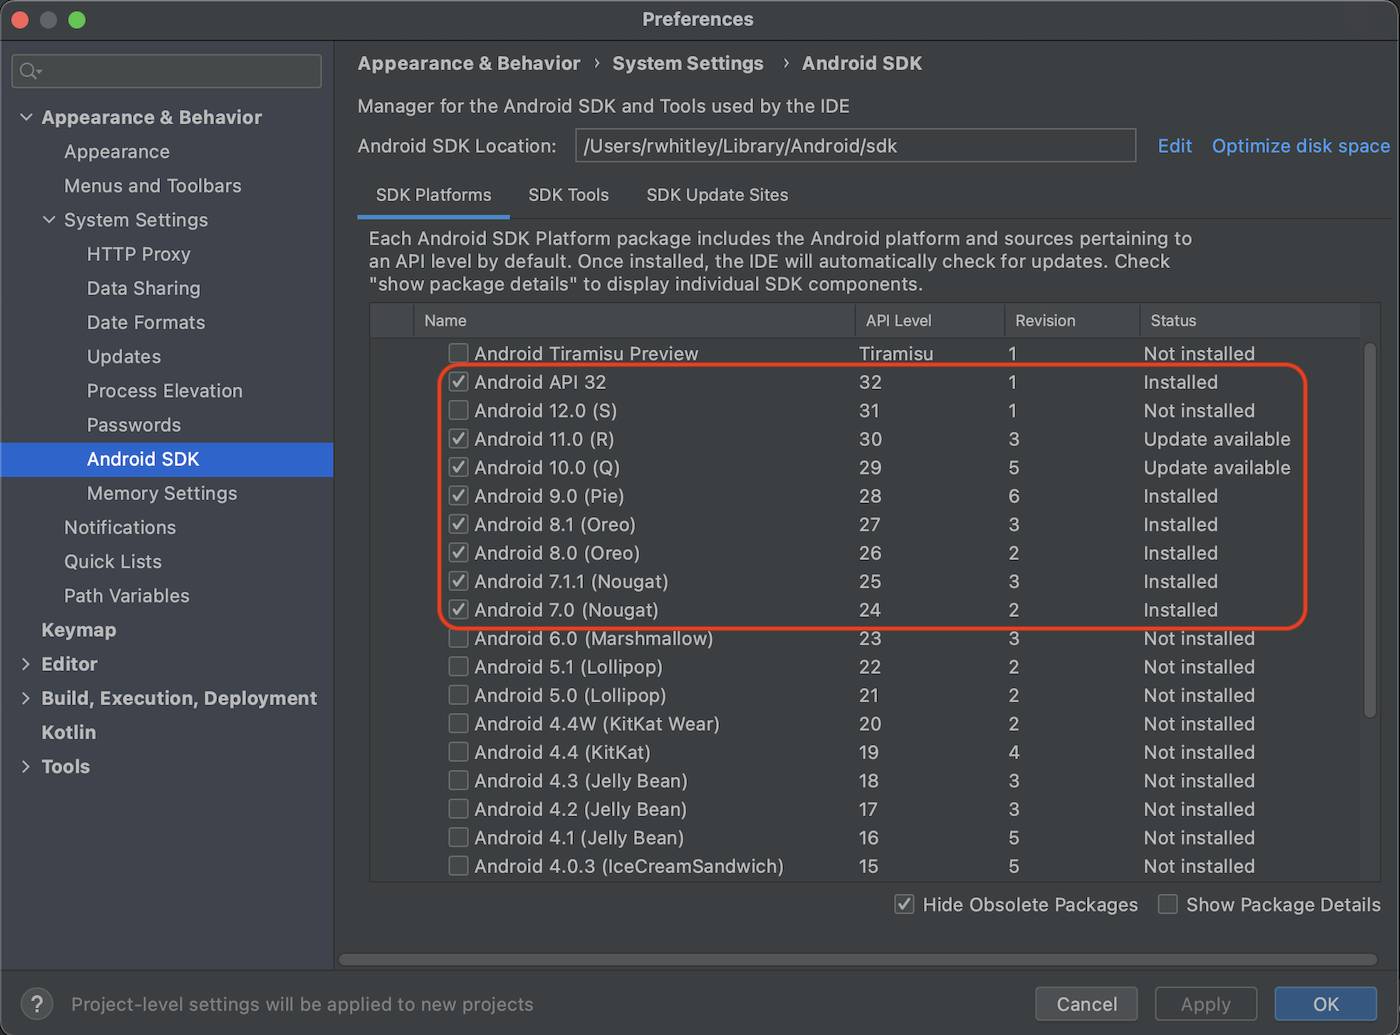
 The Android SDK Manager appears. In a new Android Studio installation, the SDK Manager shows a check for only the latest API level. For Mobile SDK, it’s common practice to add all versions from the minimum API to the target API.
- Select API Levels from 24 to 32, then click OK. If prompted, confirm your download, then accept the license agreement and click Next.
 Installing the new API versions can take several minutes. Relax, and perhaps enjoy a refreshing beverage.
- When the downloads are finished, dismiss the SDK Manager. Now that you’ve installed the SDK, create an emulator for testing and debugging your apps. It’s a good idea to test your Mobile SDK apps against the minimum supported API target. Let’s choose a system image that supports API 24. To get into Android Studio, create a throwaway project from the Welcome screen.
- From the Android Studio Welcome screen, select New Project.
- In the wizard, click Next as prompted to accept all defaults, then click Finish.
- If prompted, click Allow to accept incoming network connections.
- In Android Studio, click the AVD Manager tool.

- In the Device Manager, click Create Device.
- Select a device definition, and click Next.
- Under Select a System Image, click x86 Images. In a new Android Studio installation, none of the images are downloaded.
- Scroll down to an image that supports API level 24, and click Download next to the image’s name.
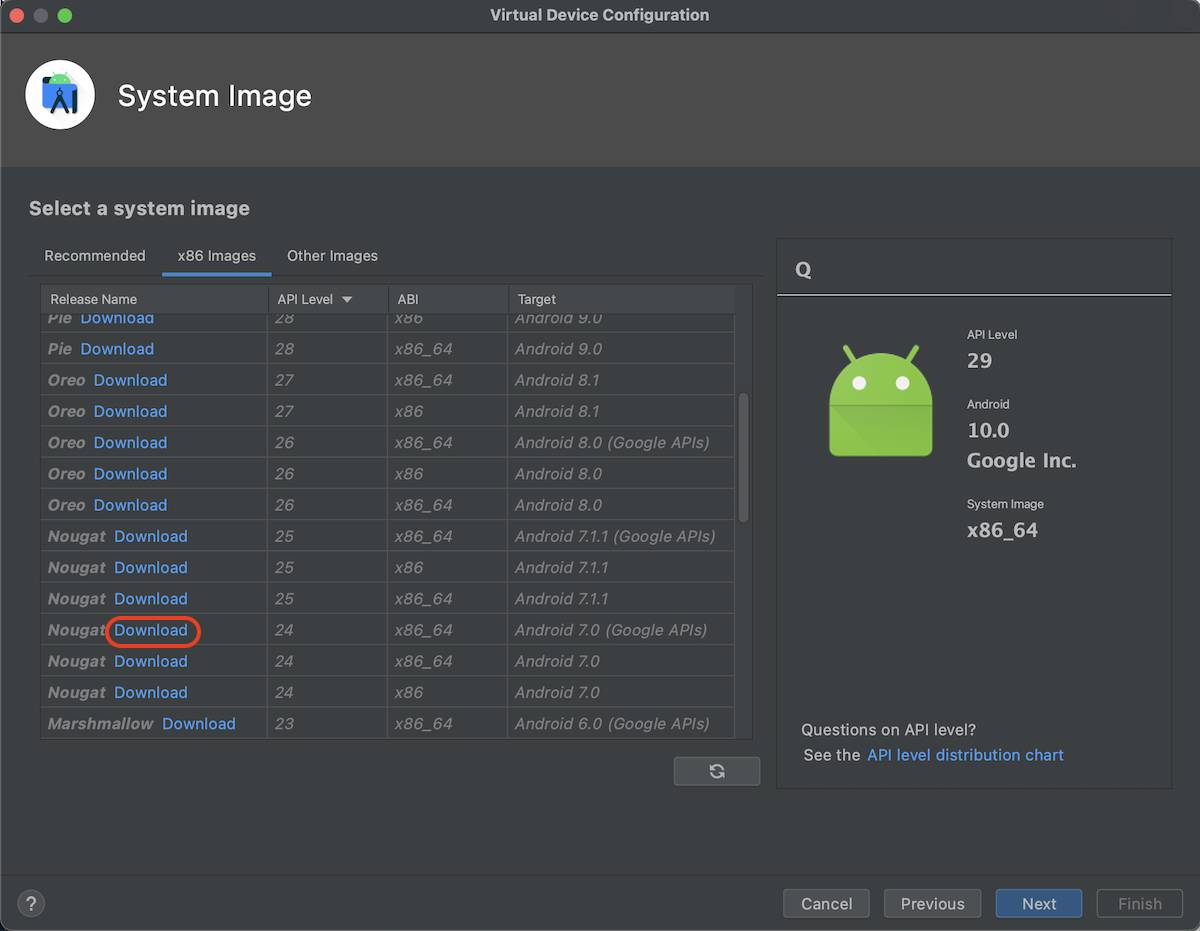
- After the download completes, select the image and click Next. If you like, you can change the AVD Name field to any value that helps you identify the AVD configuration. Leave the other values set to their defaults.
- Click Finish.
Good job! Now, when you create an Android app for Mobile SDK, you can load it into Android Studio, build it, and run it in an emulator. If Android Studio prompts to upgrade build tools or gradle files, it’s a good idea to accept. But how do you create an Android app for Mobile SDK? Read on.
Install Forcedroid
To create Android apps that are compatible with Mobile SDK, you use a node.js command-line utility named forcedroid. Forcedroid is the quickest and easiest way to create all types of Mobile SDK apps for Android. You just enter some metadata as prompted, and a few minutes later you have a fully configured Gradle project that you can open in Android Studio.
To install forcedroid, you use the npm install command.
- Open the Terminal app on Mac, or the command prompt on Windows.
- Define an
ANDROID_HOMEsystem variable that points to your installed Android SDK. For example, on a Mac, the path is typically/Users/<username>/Library/Android/sdk. Be sure to store the variable in your persistent environment settings so that you don’t have to keep retyping it.
- To install forcedroid:
- On a Mac, type
sudo npm install -g forcedroidand press Return. If prompted, enter your system password.
- On Windows, type
npm install -g forcedroidand press Return.
- To verify your installation, type
forcedroid versionand press Return. For example:$ forcedroid version forcedroid version 13.0.0
- Your command-line printout should reflect the Mobile SDK version—currently, forcedroid version 10.x.x.
- To view forcedroid usage information, type forcedroid and press Return.
You’re finished! Your Android development environment is ready for Mobile SDK native app development. If you’re interested, you can now continue either to the iOS, hybrid, or React Native installation step.
That’s it. We won’t check any of your setup. Click Verify Step to proceed to the next step in the project.