Create and Customize Products
Learning Objectives
In this project you'll:
- Create and customize products.
- Create and customize Price Books.
- Add a product to an order.
- Control access to products and Price Books.
- Create quotes and orders.

Introduction
Ursa Major Solar, a Southwest US-based supplier of solar components and systems, has expanded to global markets and just hired Ian Lin as its new VP of International Sales. Right out of the gate, Ian has been given quotas for his sales team to sell the company’s new ground-mounted solar panels.
Ian wants to employ Salesforce so his team can start selling internationally. To do this, he must set up himself and his team as users. He then needs to turn on and add multiple currencies so his team can sell outside the US. He also needs to define the products and pricing in the system so his team can sell more effectively, and finally create quotes and orders.
In this project, you are Ian’s proxy, so you assign him to the system administrator profile and use his account.
Create a New Trailhead Playground
For this project, you need to create a new Trailhead Playground. Scroll to the bottom of this page, click the playground name, then click Create Playground. It typically takes 3–4 minutes to create a new Trailhead Playground. Yes, we really mean a brand-new Trailhead playground! If you use an existing org or playground, you can run into problems completing the challenges.
Create Sales Role and User Accounts
Before building the framework the sales team needs, create a sales role to be used for adding the team's sales reps.
- Click
 to open Setup. Enter
 Rolesin Quick Find, and then select Roles.
- Click Set Up Roles, and then click Expand All.
- Directly under VP, International Sales, click Add Role and enter these details:
Field
Details/Action
Label
International Sales Reps
Role Name
(keep default)
This role reports to
(keep VP, International Sales)
- Click Save.
Now set up Ian's account and create a user account for one of his sales reps.
- From Setup, enter
Usersin Quick Find, and then select Users.
- On the All Users screen, find your username (current System Administrator), click Edit, and enter these details:
Field
Details/Action
First Name
Ian
Last Name
Lin
Alias
ILIN
Email
(keep your own email address)
Username
(keep existing username)
Nickname
ILIN
Title
VP, International Sales
Company
Ursa Major Solar, Inc
Role
VP, International Sales
User License
(keep Salesforce)
Profile
(keep System Administrator)
Make Setup My Default Landing Page
Deselect
Time Zone
(GMT -07:00) Mountain Standard Time (America/Phoenix)
Locale
English (United States)
- Click Save & New.
- Create a user record for Ian’s new sales rep with these details:
Field
Details/Action
First Name
Alek
Last Name
Wozniak
Alias
AWozniak
Email
(enter your own email address)
Username
(enter a unique username in email format)
Nickname
AWozniak
Title
International Sales Rep
Company
Ursa Major Solar, Inc
Role
International Sales Reps
User License
Salesforce
Profile
Custom: Sales Profile
Time Zone
(GMT -07:00) Mountain Standard Time (America/Phoenix)
Local
(keep English (United States))
Language
(keep English)
Generate new password and notify user immediately
Uncheck
- Click Save.
Set Up New Currencies
Because Ursa Major’s new solar panels are sold both internationally and in the US, it’s necessary to assign more than one currency to the products. Before you can do this, you must enable the Multiple Currencies feature.
- From Setup, enter
Companyin Quick Find, and then select Company Information.
- Under Organization Detail, click Edit.
- Under Currency Settings, select Activate Multiple Currencies.
- While you are editing company information, change the Organization Name to
Ursa Major Solar, Incand the Default Time Zone to Mountain Standard Time (America/Phoenix). Ensure Currency Locale is set to English (United States) - USD.
- Click Save. You should now see the Currency Setup button. (You may need to refresh the page to see it.)
Now that you’ve enabled the ability to create multiple currencies, set up the required new currencies. Note: If the corporate currency is not set to USD, then change it to this using the Change Corporate button in Currency Setup.
- Under Organization Detail, click Currency Setup.
- If the corporate currency is not set to USD, then change it to this using the Change Corporate, otherwise continue to the next step.
- Under Active Currencies, click New.
- For Currency Type, select GBP - British Pound.
- For Conversion Rate, enter
.78.
- Click Save & New.
- Enter the remaining currencies. (After setting up the last currency, click Save instead of Save & New.)
Currency
Conversion Rate
EUR - Euro
.88
JPY - Japanese Yen
113
SGD - Singapore Dollar
1.4
Now you can see all your active currencies and also the corporate currency.
Create New Product Families
Next, create product families to help categorize and organize Ursa Major’s services and products.
Create a product family for Service Packages and Panels, keeping in mind that you need to assign a standard price in multiple currencies.
- From Setup, click Object Manager.
- Select Product, then click Fields & Relationships.
- Select Product Family.
- Under Product Family Picklist Values, click New.
- In the Product Family field, enter
Service Packagesand on the next line, enterPanels.
- Click Save.
Add New Products
You’ve set up multiple currencies and created product families. Now you’re ready to add products.
First add the service product, which is a cleaning service for residential solar panels.
- Click
 to open the App Launcher and select Products.
- Click New and enter these details:
Field
Details/Action
Product Name
UMS Solar Panel Cleaning Residential
Active
Check the box.
Product Code
SPC-R01
Product Family
Service Packages
Product Currency
USD - U.S. Dollar
Product Description
Residential solar panel cleaning service package
- Click Save & New.
- Create another new product and enter these details:
Field
Details/Action
Product Name
SunPower Ground
Active
Check the box.
Product Code
SPG-01
Product Family
Panels
Product Currency
USD - U.S. Dollar
Product Description
80-cell ground-mounted solar panel
- Click Save & New.
- Create one more new product and enter these details:
Field
Details/Action
Product Name
GreenSun Ground
Active
Check the box.
Product Code
SPG-02
Product Family
Panels
Product Currency
USD - U.S. Dollar
Product Description
60-cell ground-mounted solar panel
- Click Save.
Create Standard Price Books
When you create a product in Salesforce, you add a standard selling price to it using price books. These keep track of your company’s products and their prices. You can add products and prices to the standard price book, or you can create custom ones.
Since the products that Ian’s team is selling are sold internationally, there are multiple currencies to manage. So instead of one Standard Price Book, Ian needs five—one for each currency.
Set up standard price books for the three products you created. But first, set the standard price for five currencies for the UMS Solar Panel Cleaning Residential product.
- Click
 to open the App Launcher and select Products.
- Under Product Name, click UMS Solar Panel Cleaning Residential.
- Click the Related tab.
- In the Price Books section, click Add Standard Price.
- In the List Price field, enter
450.
- In the Currency picklist, if not already selected, select USD – U.S. Dollar.
- Click Save & New.
- Repeating these steps, add the standard price for the remaining four currencies. (After setting up the last currency, click Save instead of Save & New.)
List Price
Currency
397
EUR - Euro
355
GBP - British Pound
52744
JPY - Japanese Yen
637
SGD - Singapore Dollar
- Click the Products tab.
- Under Product Name, click GreenSun Ground.
- Click the Related tab.
- Set the standard price for five currencies for the GreenSun Ground product.
List Price
Currency
900
USD - U.S. Dollar
1900
EUR - Euro
1450
GBP - British Pound
250000
JPY - Japanese Yen
3200
SGD - Singapore Dollar
- Click the Products tab.
- Under Product Name, click SunPower Ground.
- Click the Related tab.
- Finally, set the standard price for five currencies for the SunPower Ground product.
List Price
Currency
1200
USD - U.S. Dollar
1100
EUR - Euro
1000
GBP - British Pound
140000
JPY - Japanese Yen
1800
SGD - Singapore Dollar
Create a Custom Checkbox
Ian needs to find a way to distinguish ground-mounted panels from roof-mounted ones. To accomplish this, create a custom checkbox that’s visible in product details and on the new product creation window.
- From Setup, click Object Manager.
- Select Product, then click Fields & Relationships.
- Click New.
- For Data Type, select Checkbox.
- Click Next, and enter these details:
Field
Details
Field Label
Ground-mount
Default Value
Unchecked
Description
Identifies non-roof panels
- Click Next.
- Keep the default field-level security and click Next.
- So that this field is added to the Product Layout window, ensure the Add Field and Product Layout checkboxes are selected.
- Click Save. You can see that you’ve created a custom field because of the added extension “_ _c” in the Field Name column.
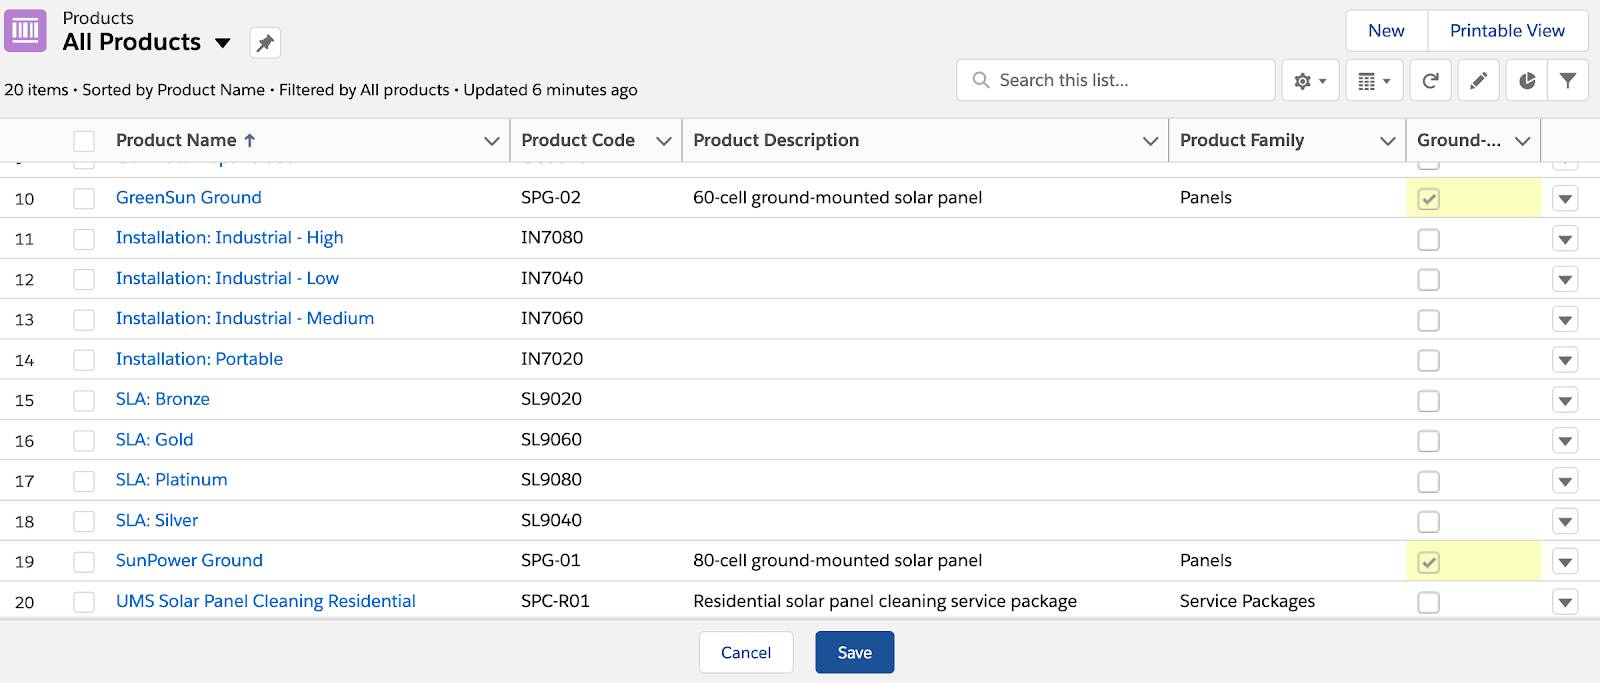
Now that you’ve created the checkbox, set up a product list view so you can see at a glance which of your products are ground-mounted.
- Click
 to open the App Launcher and select Products.
- From List View picklist, select All Products.
- Click
 to access the List View Controls and select Select Fields to Display.
- In the Available Fields list, select Ground-mount and click
 to move it to the Visible Fields list.
- Click Save. The column with the Ground-mount checkboxes should now be visible in the All Products view.
Now select which products are ground-mounted. You can select each one individually, or save time by checking multiple products simultaneously.
- Select the checkbox for the two ground-mounted products by double-clicking and checking the box, or clicking the edit pencil and checking the box.
- When both ground-mounted products are checked, click Save at the bottom of the window.
With the initial modifications you implemented—creating product families to organize products, adding products with standard prices in multiple currencies, and giving users the ability to distinguish ground-mounted solar panels easily—the International Sales team is on its way to having the streamlined, efficient tools it needs for successful selling. You’re not done helping, though. Continue on and create price books that allow the team to sell products at different prices depending on the region.
Resources