Create Validation Rules
Validation rules verify that the data a user enters in a record meets the standards you specify before the user can save the record. A validation rule can contain a formula or expression that evaluates the data in one or more fields and returns a value of True or False. They can also include an error message to display to the user when the rule returns a value of True due to an invalid value.
You can use validation rules to improve data integrity, make a field conditionally required, prevent the entry of invalid data values directly by users and other systems, and enforce role-specific, profile-specific, or user-specific constraints.
Ling Wu wants to be sure AW Computing recruiters list a hiring manager every time they set up a position in the recruiting app. It’s also come to Ling’s attention that some candidates’ zip code and state don’t match. She’d like a fix for both these issues, which you can accomplish by creating validation rules.
Set Up the First Rule
First create a validation rule requiring a hiring manager be included with each position listing in the recruiting app.
- From Setup, click Object Manager and select Position.
- Click Validation Rules, then click New.
- For the Rule Name, enter
Every_Position_Must_Have_a_Hiring_Mgr - Select Active.
- Enter this Description:
Every position record must have a hiring manager.
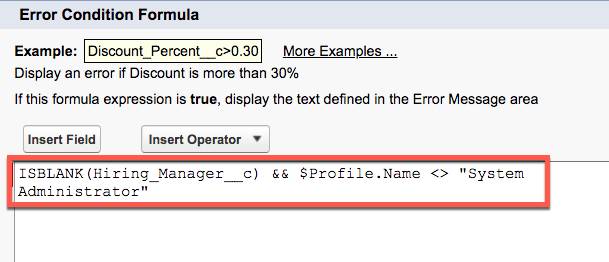
- Enter the Error Condition Formula:
ISBLANK (Hiring_Manager__c) && $Profile.Name <> "System Administrator" - Ensure your screen looks like this:
- Click Check Syntax to verify there are no errors.
- Enter this Error Message:
Every Position must have a Hiring Manager. - For Error Location, select Field, then select Hiring Manager from the dropdown.
- Click Save.
Create Custom Objects
Ling’s mismatched state and zip code issue requires a little work before setting up the validation rule. First, create a custom object for zip code, and add fields.
Let’s start with the Zip Code custom object.
- From Setup, click Object Manager, click Create, then select Custom Object and enter the details.
- Label:
Zip Code - Plural Label:
Zip Codes - Record Name:
Zip Code - Data Type: Text
- Allow reports: Select
- Label:
- Click Save.
Now add a field to the Zip Code object.
- While still viewing Zip Code in Object Manager, click Fields & Relationships, then click New.
- Select Text as the Data Type, click Next, and enter the details.
- Field Label:
State - Length:
2
- Click Next.
- Ensure the field is visible for the Recruiter: Nontechnical, Recruiter Technical, and System Administrator profiles, and click Next.
- Click Save & New.
Add a second field to the Zip Code object.
- Select the Text as the Data Type, click Next, and enter the details:
- Enter the details for the new custom field.
- Field Label:
City - Length:
80
- Click Next.
- Ensure the field is visible for the Recruiter: Nontechnical, Recruiter Technical, and System Administrator profiles, and click Next.
- Click Save.
Next, modify the Zip Code page layout so that the fields are displayed in a logical order.
- While still viewing the Zip Code in Object Manager, click Page Layouts.
- Click
 next to Zip Code Layout and select Edit.
- In the Information section, drag the fields to rearrange them in the order of City, State, then Zip Code.
- Click Save.
Create a Zip Code Tab
Next, create a Zip Code tab in the Recruiting app.
- From Setup, enter
Tabsin the Quick Find box, then select Tabs.
- In the Custom Object Tabs section, click New.
- From the Object picklist, select Zip Code.
- Click
 and select Map.
- Click Next.
- Leave the profile as is and click Next.
- In the Add to Custom Apps section:
- Deselect Include Tab
- Ensure Append tab to users’ existing personal customizations is selected
- Click Save.
Now create new ZIP code records.
- Click
 to open the App Launcher, then click Recruiting.
- Click the pencil icon in the top right corner of the screen.
- Click Add More Items.
- From the menu on the left, select All.
- Click the
 next to Zip Codes.
- Click Add 1 Nav Item.
- Click Save.
- Click the Zip Codes tab.
- Click New.
- Enter a city, state and zip code.
- Click Save & New and enter a new city, state and zip code.
- Click Save.
Set Up the Second Rule
Now create a validation rule that checks the zip code entered against a table to validate that the zip code and state match.
- From Setup, Click Object Manager and select Candidate.
- Click Validation Rules, click New, and fill in the details.
- For Rule Name enter
Zip Code Consistent with State.
- For Description, enter:
Validates candidate Zip/Postal Code by looking up the first five characters of the value in a custom object called Zip_Code__c. Error if the zip code is not found or the candidate State does not match the corresponding State in the object.
- Enter this Error Condition Formula:
VLOOKUP($ObjectType.Zip_Code__c.Fields.State__c, $ObjectType.Zip_Code__c.Fields.Name, LEFT( Zip_Postal_Code__c ,5) ) <> State_Province__c - Ensure your screen looks like this:

- Click Check Syntax to verify there are no errors.
- For the Error Message, enter
Candidate Zip Code does not exist in specified State.
- For Error Location, select Field, then select Zip/Postal Code from the dropdown.
- Click Save.
Now that you’ve taken steps to ensure HR has complete data for the positions they create, move on to the next step, where you use formulas and roll-up summaries to help them utilize the data they collect.