Create an Actionable List
Create an Actionable List
With a Data Processing Engine definition, an actionable list definition, and a schedule-triggered flow, you have everything to create an actionable list. Unlike the previous tasks in this module, this job isn’t strictly for admins.
You can hand an actionable list definition over to your fundraising managers and have them create actionable lists themselves. At HNMI, Elle plans on doing that eventually, but she wants to blaze the trail with this new tool to learn how it works. As your organization’s admin, you probably want to do the same to help train your users.
Here’s how to create an actionable list.
- From the App Launcher (
 ), find and select Actionable Lists.
- Click New.
- Specify these details.
- Name:
Major Donor Qualification List - Description:
Prospective major donors to work through the qualification processes. - List Definition: Major Donor Qualification
- Name:
- Click Next.

That’s a great list, but it isn’t quite helpful. You must narrow it down to only the records that are useful for fundraisers.
Set Actionable List Filters
When you create actionable lists, they initially contain all of the records included in your actionable list and Data Processing Engine definitions. To focus the list, you apply filters, similar to how you filter a Salesforce list view or report.
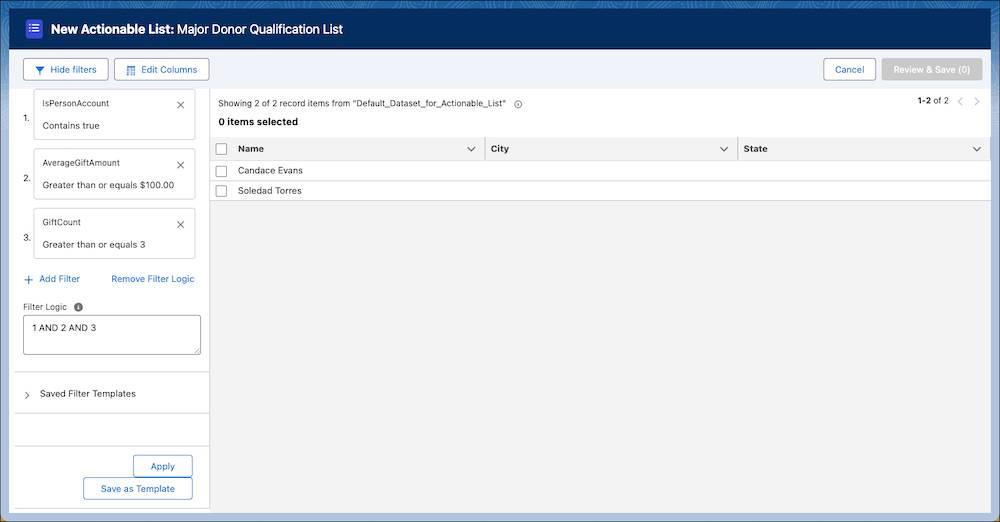
At HNMI, Elle’s fundraising team wants their qualification actionable list to include individual donors who give an average gift value of $100. They also want to make sure these donors are dedicated to the organization, so they only want to include donors who have donated at least three times. Fundraisers’ time is valuable, so the team must focus on the donors most likely to make large gifts.
Set the filters to meet that criteria.
- Select the existing filter which says Click to enter filter criteria, and specify these details.
- Field: IsPersonAccount
- Operator: Contains
- Value:
true
- Field: IsPersonAccount
- Click Done.
- Click + Add Filter and specify these details.
- Field: AverageGiftAmount
- Operator: Greater than or equals
- Value:
100
- Field: AverageGiftAmount
- Click Done.
- Click + Add Filter and specify these details.
- Field: GiftCount
- Operator: Greater than or equals
- Value:
3
- Field: GiftCount
- Click Done.
- Click Add Filter Logic to review how the filters are applied. Retain the default logic,
1 AND 2 AND 3.
- Click Apply.
The records in the list are filtered down to only a few that meet this criteria.
Your filter logic only contains AND statements in this example. That means all the filters must be true for a donor to appear in the filtered list. You can also use OR statements, meaning that one or another of the filters must be true. For example, Elle can set another list that filters donors who give an average of $100 a gift and have given either three times or have an active recurring donation.
After you set your filters, save them as a template for use again. You can use a saved template to add new members to the list and also to create another, similar list. Here’s how to save filters as templates.
- Click Save as Template.
- Specify these details.
- Name:
Major Donor Prospects - Description:
Filters person accounts with an average gift of $100 or more and a gift count of 3 of more.
- Sharing: Public
- Name:
- Save your work.
Elle and other members of her team can now quickly apply this template filter to a list.
Add Members to a List
With the filters in place, you can now add members to your list. That’s what Elle does now.
- Select the person accounts for Candace Evans and Soledad Torres.
- Click Review & Save.
- Review the details for the actionable list and members. Leave all of the defaults for now.
- Click Confirm & Save.
You’re now on the finished actionable list, shown in one of the ways your end-user fundraisers can see it. There’s a lot that fundraisers and their managers can do from this page alone.
In this step, you created an actionable list, set up filters to narrow the dataset, and then added members to the list for fundraisers. In the next unit, you explore how they can use and manage this list to build relationships with donors.