Create a Custom Channel for Order Events
Learning Objectives
In this project, you’ll:
- Create a custom channel using Tooling API.
- Define the Order_Event__e platform event.
- Create a channel member that specifies the Order Event and filter expression using Tooling API.
- Install the Streaming Monitor AgentExchange app.
- Subscribe to the channel using the Streaming Monitor app.
- Publish several order events using REST API in Postman.
- Verify the events received in the Streaming Monitor app.
Before You Begin
Before you start this project, we recommend that you become familiar with platform events and REST API. To learn about those technologies, check out these resources.
- The Platform Events Basics Trailhead module
- The Use REST API unit in the Platform API Basics module
While you can use any REST API tool or HTTP client app to make REST API calls, in this project we show you the steps to make REST API calls using Postman. If you haven't used Postman yet, visit the Quick Start: Connect Postman to Salesforce project to get set up and fork the Salesforce Platform APIs collection.
Filter Event Streams with Custom Channels
In this project, you filter an event stream to receive only the event messages you’re interested in. With fewer events delivered to your subscriber app, you optimize event processing and make more efficient use of the event delivery allocation. Your subscriber app can process a smaller volume of events faster and is less likely to hit the event delivery limit.
Let’s take a closer look at a scenario for this project.
You have subscriber apps that process 30,000 order events per geographical location per day. And you don’t want all apps to receive all the events. You want each app to receive only the events it will process.
For example, of the 30,000 order events per day, only 5,000 are for the city of San Francisco. For this project, you subscribe one of the apps to a custom channel that filters the stream for the city of San Francisco, so that the app receives and processes only those 5,000 events. By doing that, the event delivery usage that’s counted against your event delivery allocation will be 5,000 events for that app.
Stream filtering is used with event channels that Pub/Sub API and Streaming API (CometD) clients subscribe to. Stream filtering is supported for custom platform events and change data capture events. An event channel is a stream of event messages corresponding to one or more platform events defined in your Salesforce org, or one or more predefined change data capture events. You can add a filter expression in a channel member. The filter expression specifies the event fields and values you want to filter the event stream with.

Create a Custom Channel
Before you configure stream filtering, create a custom platform event channel. You can create a custom channel with Tooling API or Metadata API using PlatformEventChannel. In this project, you use Tooling API to create a custom channel. Let's get started.
Launch Your Trailhead Playground
You complete this hands-on project in your own personal Trailhead Playground. Make sure you are logged in to Trailhead, then get your Trailhead Playground by clicking Launch at the bottom of this page. Your playground opens in a new browser tab or window. After you complete the steps in your playground, click Verify step at the bottom of the page.
Connect Your Trailhead Playground Org with Postman
- Log in to your Trailhead Playground org.
- After you set up Postman by completing the Quick Start: Connect Postman to Salesforce project, open the Postman app, select a Workspace, and navigate to your fork of the Salesforce Platform APIs collection.
- On the Authorization tab, scroll to the bottom and click Get New Access Token.
- Click Allow.
- In the Manage Access Tokens dialog, copy the instance URL to your clipboard.
- Click Use Token.
- On the Variables tab, in the _endpoint row, in the Value column, paste the instance URL that you just copied.
- Test that your connection is working.
- In Collections, select your fork of the Salesforce Platform APIs collection.
- Select REST to expand the REST APIs.
- Select GET Limits, then click Send.
- In the response window, the Status field should show as Status: 200 OK. If it does not, repeat the steps to get a new token.
Make a Tooling API Call to Create a Custom Channel
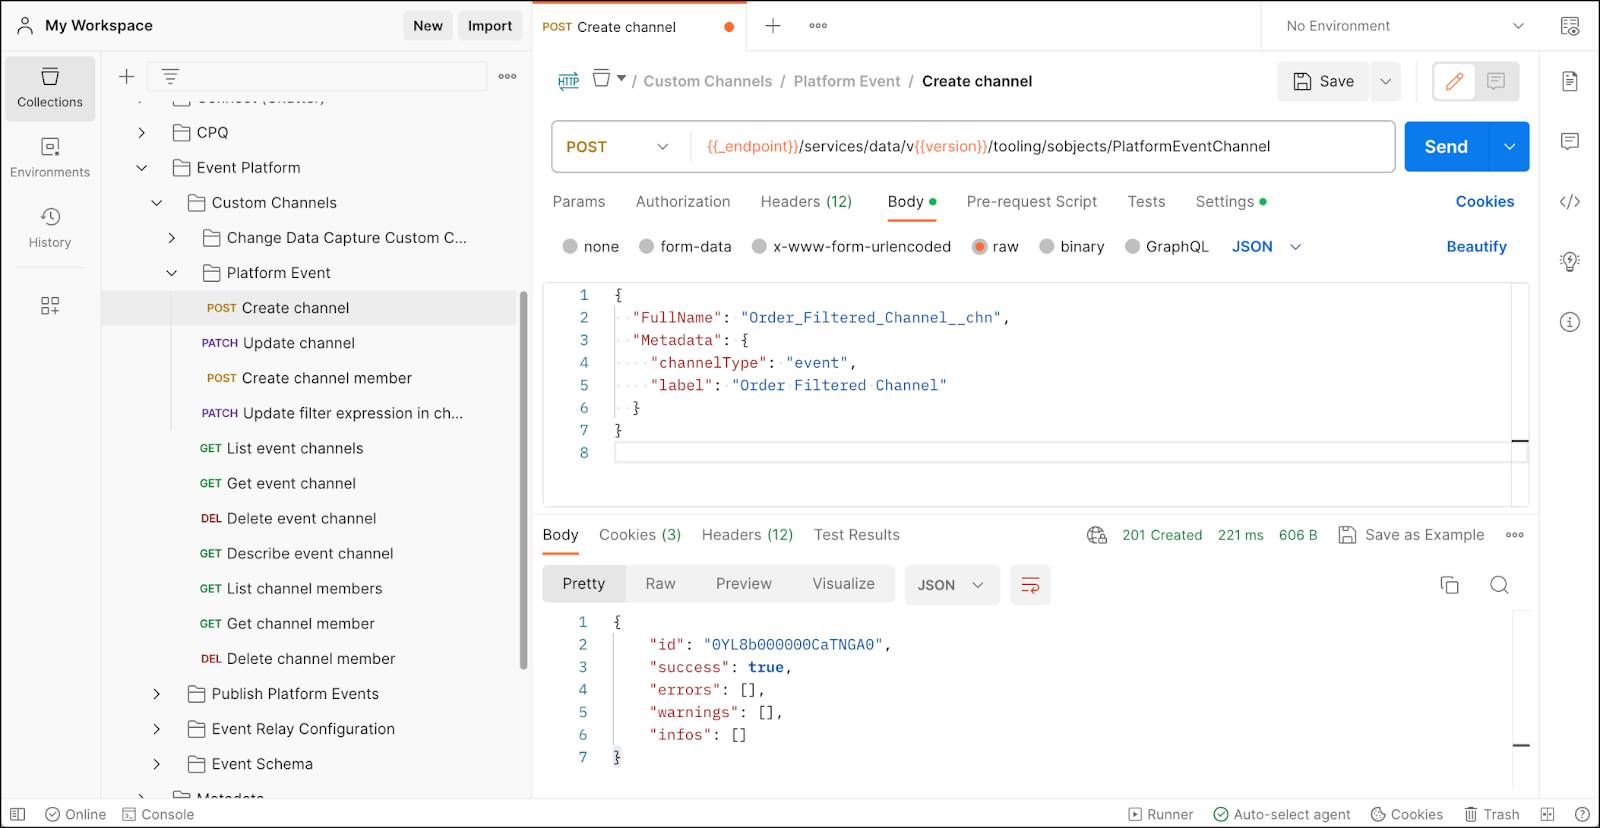
- In your fork of the Salesforce Platform APIs collection, expand Event Platform > Custom Channels > Platform Event, and click Create channel.
- Click Body and replace the body with this JSON body.
{ "FullName": "Order_Filtered_Channel__chn", "Metadata": { "channelType": "event", "label": "Order Filtered Channel" } } - Click Send.
- Verify that the response status is 201 Created.
- The response contains the ID of the new custom channel, which looks something like this.
{
    "id": "0YL8b000000CaTNGA0",
    "success": true,
    "errors": [],
    "warnings": [],
    "infos": []
}
This image shows the request and returned response in Postman.
Congratulations! You created a custom channel! You use this channel in the next step to add a channel member and configure stream filtering.
Resources
- Trailhead: Quick Start: Connect Postman to Salesforce
- Tooling API Developer Guide: PlatformEventChannel
- Platform Events Developer Guide: Filter Your Stream of Platform Events with Custom Channels
- Developer Guide: Pub/Sub API
- Developer Guide: Streaming API