Import Data to a Custom Object
Now that you have your new object created and the fields mapped, it’s time to go back into the spreadsheets and finish this import.
Update the Template
Go to the NPSP Data Importer Templates page and download the Donation Import (Individuals) template. Open it, go to the Import Wizard Template tab, and then add your new fields.
- Add a new column after Contact1 Last Name, and enter
Contact1 Preferred Languagein the header row.
- Add another column after your new Contact1 Preferred Language column, and enter
Contact1 Email Opt Outin the header row.
- Add another column before the Donation Record Type Name column, and enter
Donor Survey Statusin the header row.
- Delete the sample data in the first row.
- Save the template but leave it open. You use it in the next step.

Create Test Records
Now, create your test records.
- In the first data row of the template, enter this information:
- Contact1 First Name:
Silas - Contact1 Last Name:
Stetson - Contact1 Preferred Language:
English - Contact1 Email Opt Out:
False - Contact1 Personal Email:
silas@mailinator.com - Contact1 Preferred Email:
Personal - Donation Donor:
Contact1 - Donation Amount:
5000 - Donation Date: Set to the last day of this month. Use the date format for your locale, such as MM/DD/YY. You may first need to change the formatting of the template file.
- Donation Stage:
Pledged - Donor Survey Status:
Completed
- In the second data row in the template, enter this information:
- Contact1 First Name:
Marie - Contact1 Last Name:
Maldonado - Contact1 Preferred Language:
Spanish - Contact1 Email Opt Out:
False - Contact1 Personal Email:
marie@mailinator.com - Contact1 Preferred Email:
Personal - Donation Donor:
Contact1 - Donation Amount:
2500 - Donation Date: Set to the last day of this month. Again, use the date format for your locale.
- Donation Stage:
Closed Won - Donor Survey Status:
Thanked
- Optionally, delete any unused columns. (If you do, you should have columns through letter K.)
- Save the file as a .csv on your desktop.
Upload Your CSV to NPSP Data Import Objects
It’s time to test your work by importing it to NPSP Data Import objects.
- From the App Launcher (
 ), find and select NPSP Data Imports.
- Click Import.
- On the Custom objects tab, click NPSP Data Imports.
- Click Add new records under “What do you want to do?” and leave all of the associated settings as their defaults.
- In the “Where is your data located?” panel, either drag your CSV to where it says “Drag CSV file here to upload” or click CSV and then Choose file to select the CSV you just saved.
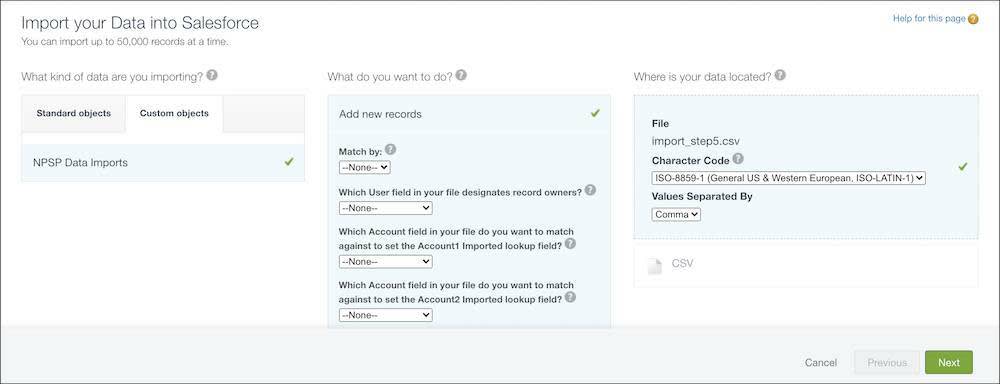
- Click Next.
- You’re now on the Edit Field Mapping page. Make sure that your column headers in your CSV and the destinations in the NPSP Data Import object match. If you didn't delete the unused columns in the spreadsheet, you may notice some unmapped fields. That’s OK. Click Next.

- On the Review & Start Import page, you should see that the import will include 11 mapped fields and 0 unmapped fields. If you didn’t delete the empty spreadsheet columns, you may see different numbers. Click Start Import.

- Click OK on the Congratulations! window.
You’ll find yourself on a Bulk Data Load Jobs page again, where you can check the results in the Batches area.
Use the App Launcher ( ) to go back to the NPSP Data Imports page, then select the To Be Imported list view. Check the first record, for Silas Stetson, and scroll down to the bottom of the page to check that the donor survey data came through.
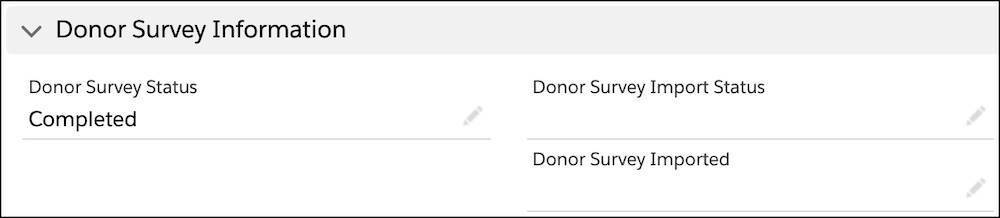
It looks like it did! You’ll notice that the Donor Survey Import Status and Donor Survey Imported fields are empty now, though, because those fields are automatically populated during the import.
Perform an Import Dry Run
Now that the records are in NPSP Data Import objects, check them by performing an optional dry run to check for problems.
- Starting on the To Be Imported list view on the NPSP Data Imports page, click Import All Data Import Records.
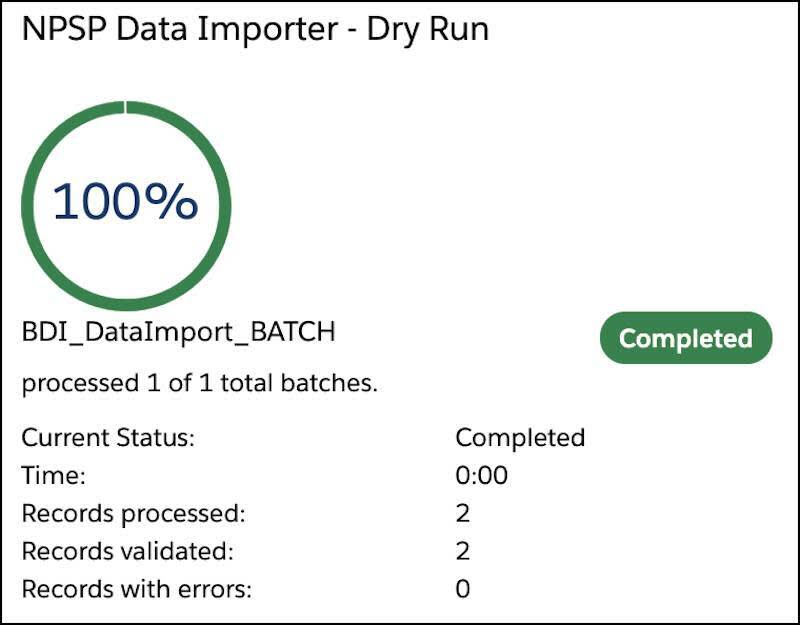
- Leave the settings as they are for now, and click Begin Dry Run.
- Wait for the dry run to complete, and then check the status. You should have 2 records processed and 2 records validated. Click Close.
- Back on the NPSP Data Imports page, change the list view to Dry Run - Validated.
Check out the records. They should both be validated and ready for import.

Import Your Data
It’s import time!
- On the Dry Run - Validated list view on the NPSP Data Import page, click Import All Data Import Records.
- On the next page, leave the Configuration Options as they are and click Begin Data Import Process.

- Wait for the import to complete—this might take a minute—and then check the status. You should have 2 records processed and 2 records validated. Click Close.

Check the Results
Back on the NPSP Data Imports page, select the Successfully Imported list view and click into the record for Silas Stetson.
Scroll down to the very bottom of the record to see the status update for the donor survey record. The Donor Survey Import Status should be Created, and you should see a link underneath Donor Survey Imported.

Click on the link in the Donor Survey Imported field to view the donor survey record.

You’ll see that the donor survey number was automatically created, the contact record was related by NPSP Data Importer, and your status was imported.
Now, click into the contact record and click on the Related tab. You can see that the donor survey was automatically related here, as well.

When you complete an import like this and you’re happy with the results, you’ll usually delete the NPSP Data Import staging record. Don’t do that in your playground now, though, because you check those records to complete this challenge.
The Tools for the Job
In this project you created new custom objects and fields, created corresponding staging fields on the NPSP Data Import object, used Advanced Mapping to create the fields, and imported data. Pat yourself on the back—this is a HUGE accomplishment!

The example from your friends at No More Homelessness (NMH) was pretty simple. But these are the same building blocks you’ll use whether you are importing data to a standard field not included in NPSP Data Importer, to your own custom elements, or to elements you added with an AgentExchange app or other managed package.
And remember, you don’t have to go it alone. Check out the detailed documentation linked to in Resources throughout this project, and you can always turn to the Data Quality & Management group in the Trailblazer Community.
For now, celebrate this first step toward many importing adventures to come. If you’ve followed along with the instructions in this step, select your Trailhead Playground and click Verify to complete this project and receive your badge.
Resources
- Salesforce Help: NPSP Data Importer Templates
- Salesforce Help: Upload Data from the Template
- Salesforce Help: Verify Data Upload
- Salesforce Help: Verify Your Upload with Dry Run
- Salesforce Help: Process Your Import
- Salesforce Help: Delete Imported Records
- Salesforce Help: Clean and Format Your Data
- Trailblazer Community: Data Quality & Management