Create Fields and Map Your Data
Learning Objectives
In this step, you’ll:
- Create a formula field.
- Add a custom field to a data model object.
- Map fields to the Customer 360 Data Model.
Create a Formula Field
When you create a Data 360 data stream, you can choose to generate more fields, called formula fields, either during data stream creation or after. These optional fields are helpful when you want to standardize data formatting, update unique identifiers, or add flags for data that meet criteria.
For this project, you create a formula field to identify leads that are located in the United States, based on the data found in the Country field of the Lead data lake object (DLO).
- From the Data Stream tab, locate and click the Lead_Home data stream that you created.
- From the Lead_Home data stream record, select the New Formula Field from the options at the top of the screen.
- For Field Label, name your field
Is US Based.
- Confirm the Field API Name is
Is_US_Based.
- For Formula Return Type, select Text.
- Enter this formula in the Transformation Formula field:
IF(UPPER(sourceField['Country']) == "USA" || UPPER(sourceField['Country']) == "UNITED STATES", "TRUE" , "FALSE")
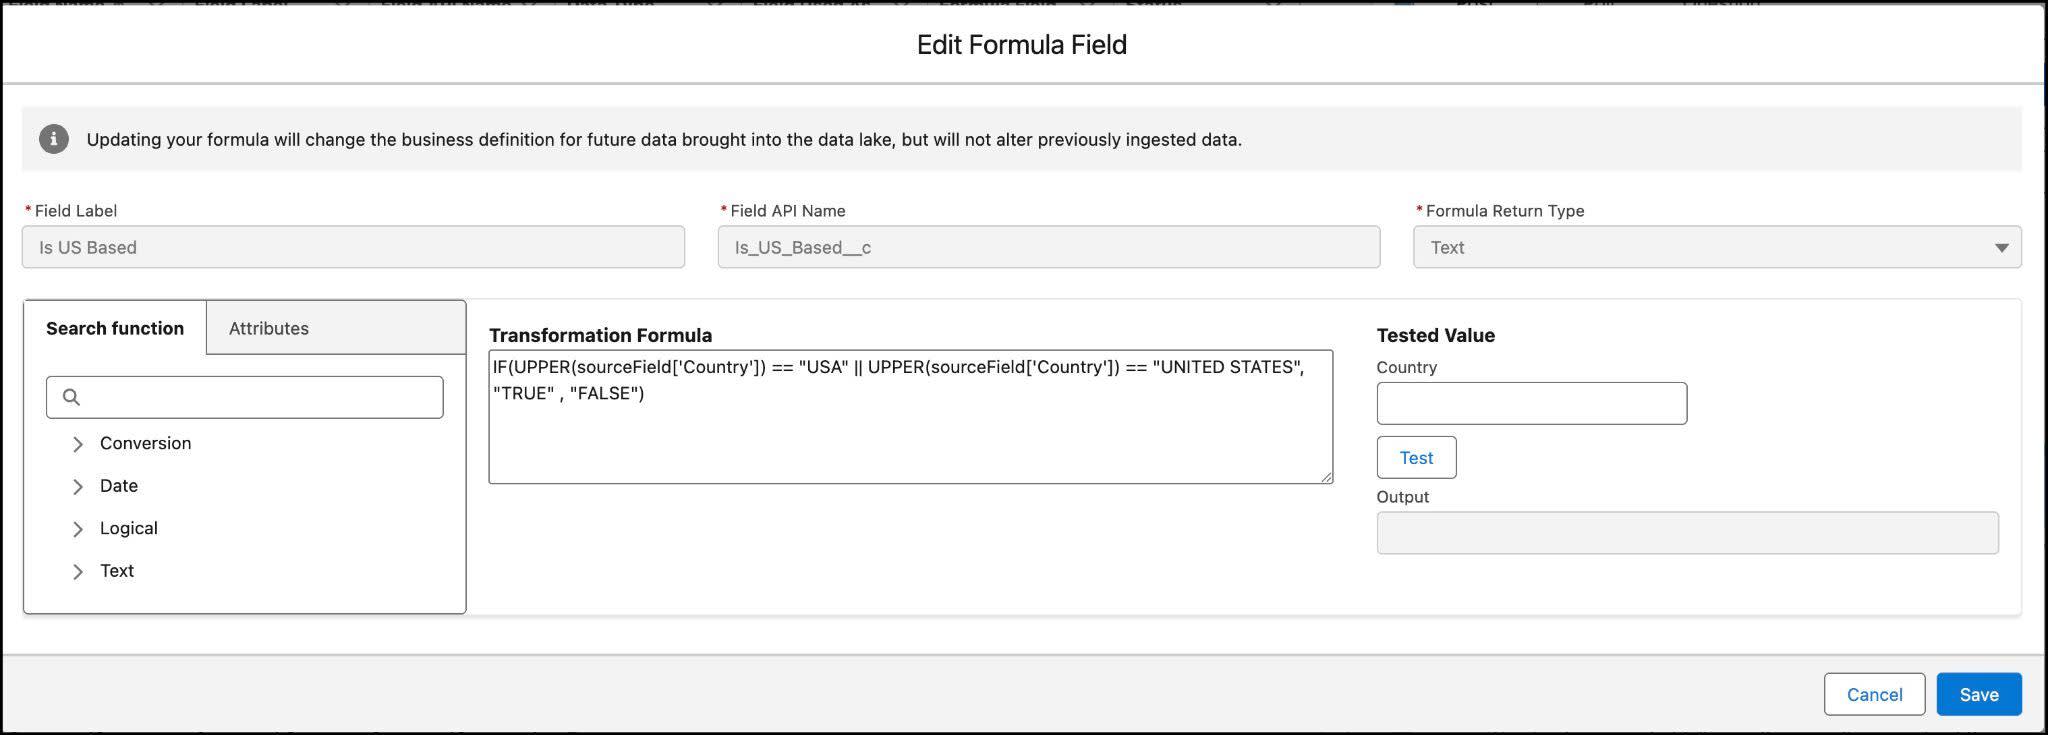
- Validate the formula using the Tested Value panel:
- Type
Japaninto the country field and then click Test.
- Output will show FALSE.
- Type
USAand then click Test.
- Output will show TRUE.
- Once you have successful validation, click Save.
Harmonize and Map
Once DLOs are created, fields from those DLOs need to map to data model objects (DMOs) found in the Customer 360 Data Model, Data 360 standard canonical data model. DMOs help organize Data 360 data. If using starter data bundles to create your data streams, many mappings are prepopulated for you. However, custom fields and some additional fields that are required for unification need to be manually mapped. Since you added a new custom formula field (and often businesses have other standard and custom objects in their data sources), this field needs to be manually mapped to the Customer 360 Data Model.
- From the data stream, Lead_Home page, click Review in the Data Mapping section.
On one side of the screen are the searchable data lake objects (1). On the other side, are the searchable DMOs (2) (called Data Model entities in-app). To search for a field within a DLO, use the DLO search bar (3) in this case, use Lead_Home.

You need to create a new DMO field and then map it to your new formula field.
- Under Data Model entities, scroll down to the Lead section and click the Unmapped dropdown.
- Click Add New Field.

- Name the field
Is US Basedand select Text as the Data Type. Keep the Enable Value Suggestion box unchecked.
- Click Save.
- On the left side of the screen, under Lead_Home, search for and select Is US Based.
- Under Data Model entities, search for and select Is US Based under the Lead section.
- After a line is drawn to connect the two fields, click Save.
Now let’s map a field that is required for unification, formatted phone number.
- Under Lead_Home, search for and select Phone.
- Under Data Model entities, search for
Formatted E164 Phone Numberunder Contact Point Phone.
- Check if a line connects Phone and Formatted E164 Phone Number. If not, select Formatted E164 Phone Number.
- After a line is drawn to connect the two fields, click Save & Close.
Map Case to a Data Model Object
Since you didn’t add the Case objects using a bundle, no mappings have been created. Let’s map these fields so they can be used in later insights and segments.
- On the Case_Home data stream, in the Data Mapping section, click Start.

- From the Data Model entities area, click Select Objects. This can take some time to load.
- Search for
Casein the Search field.
- Click the + icon to add the Case standard object. If the + icon didn’t turn green, click it again.
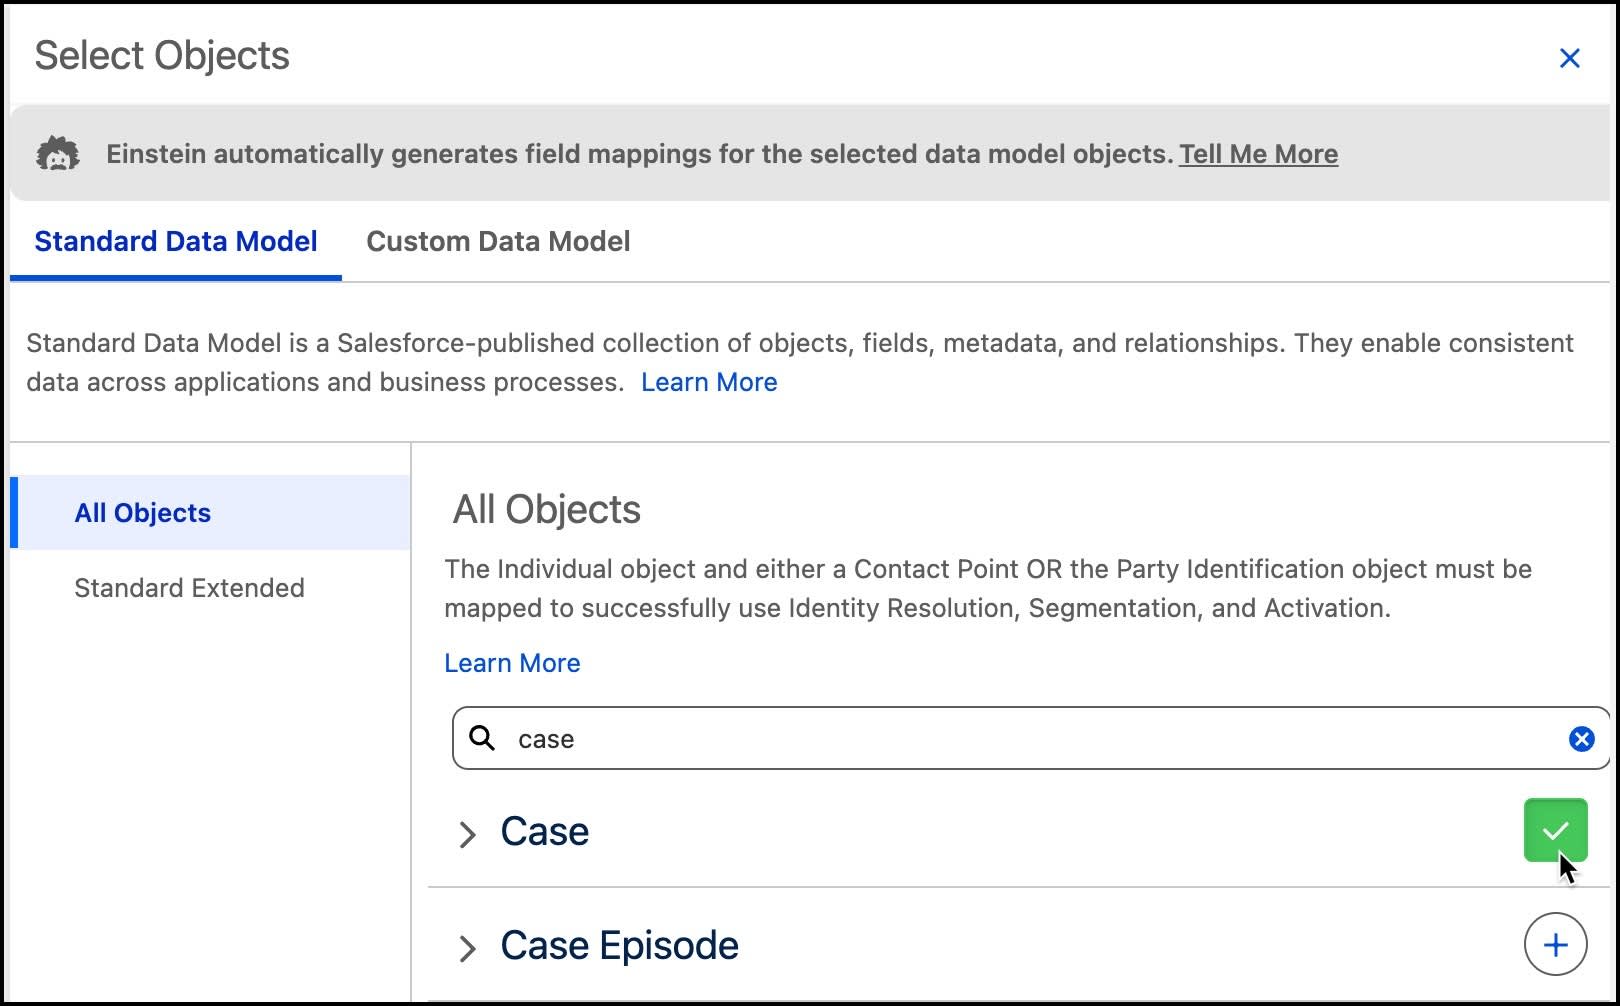
- Click Done.
This automatically maps several fields.
- There are more fields to map. Search for these fields in Case_Home and then map to the corresponding unmapped fields in the Case DMO.
-
Status to Case Status
-
Account Id to Account
-
Contact Id to Individual
- Click Save & Close.
Map Case History
Next, repeat these steps to map Case History to Case Update.
- On the CaseHistory2_Home data stream, in the Data Mapping section, click Start.
- From the Data Model entities area, click Select Objects. This may take some time to load.
- Search for
Case Updatein the Search field.
- Click the + icon to add the Case Update standard objects and then Done.
- Map these additional fields.
-
CaseHistory2 ID to Case Update Id (Primary Key)
-
Case ID to Case
-
Owner ID to Related Owner
-
Last Modified By ID to Last Modified By
-
Previous Update to Previous Update Date
-
CaseHistory2 ID to Case Update Id (Primary Key)
- Click Save & Close.
Verify Your Work
Now that you have completed these steps in your Developer Org, click Verify Step to check your work before moving to the next step in the project. This check will verify that you’ve created a custom DMO field and mapped it to your new formula field. We’ll also check that you have created the mappings for Case and Case History.
Resources