Automate Your Business Process

Create Assignment Rules
Assignment rules define conditions that determine how leads or cases are processed. Customer Support team manager Kenya Collins asked you to establish case rules so billing cases are routed to the correct queue.
Start by creating a new Billing Support Agents queue.
- Click Setup
 and select Setup.
- In the Quick Find box, search for and select Queues.
- Click New and complete the details about the new queue:
Field |
Value |
|---|---|
Label |
Billing Support Agents |
Queue Name |
(this field auto-populates) |
Send Email to Members |
Deselect |
- From the Available Objects list, select Case.
- Click Add to move Case to the Selected Objects list.
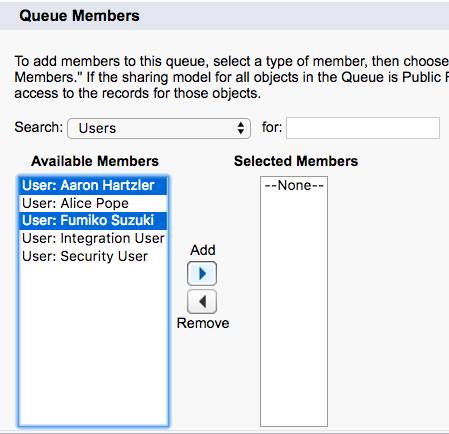
- In the Queue Members section, search Users.
- From the Available Members list, select User: Aaron Hartzler and User: Fumiko Suzuki.
- Click Add to add them to the Selected Members list, then click Save.
Then add a new rule entry to the Standard Case Assignment rule to route billing cases to the Billing Support Agents queue.
- From Setup, in the Quick Find Box, search for and select Case Assignment Rules.
- Click the Standard case assignment link, then click Edit.
- Select the Active checkbox to ensure this as the active case assignment rule, and click Save.
- Click New in the Rule Entries section and enter these details:
Field |
Value |
|---|---|
Step 1: Sort Order |
2 |
Step 2: Run this rule if the following |
criteria are met |
(1st row) Field |
Case: Status |
Operator |
equals |
Value |
New (click Lookup (New Window), select New and Insert Selected) |
(2nd row) Field |
Case: Case Record Type |
Operator |
equals |
Value |
Billing (click Lookup (New Window), select Billing and Insert Selected) |
- In Step 3, select the picklist value Queue from the list.
- Click Assignee Lookup (New Window), then search for and select Billing Support Agents.
- Click Save.
Now create a new billing support case to test the assignment rule.
- From the App Launcher
 search for and select Service.
- Click the Cases tab.
- Click New.
- Select Billing and click Next.
- Complete the inquiry case details:
Field |
Value |
|---|---|
Contact Name |
Search for and select |
Account Name |
Search for and select Edge Communications |
Product |
(choose any product from drop-down) |
Type |
Electronic |
Case Origin |
Phone |
Subject |
Renew Warranty |
Description |
Client wants to renew warranty on laptop |
- Click Save.
Create Escalation Rules
Escalation rules automatically escalate a case when it meets the criteria you choose. Kenya would like her Customer Support team to be notified whenever a case regarding an issue with performance is logged. Set that up for them.
Start by creating a new escalation rule.
- Click Setup
 and select Setup.
- In the Quick Find Box, search for and select Escalation Rules.
- Click New and fill in Rule Name:
Support.
- Click the Active checkbox and click Save.
- Choose the new Support rule from the Case Escalation Rules list.
- Click New under Rule Entries and fill in these details:
Field |
Value |
|---|---|
Step 1: Sort Order |
1 |
Step 2: Run this rule if the following |
criteria are met |
Field |
Case: Case Reason |
Operator |
equals |
Value |
Performance (click Lookup(New Window), select Performance and Insert Selected) |
- Click Save.
- Now, update the Rule Entries of the newly created Support escalation rule. Click New under Escalation Actions and set the Age Over value to
1.
- In the Auto-reassign cases section, select Assignee Lookup (New Window) then search for and select your name.
- In the Notify This User field select User Lookup (New Window) then search for and select your name.
- For the Notification Template (next to Notify This User) select Email Template Lookup (New Window), navigate to the Unfiled Public Classic Email Templates folder, and choose the Support: Escalated Case Notification template.
- Click Save.
Create a new Product Support case for Edge Communications and review the escalation actions in the Case Escalations queue.
- From the App Launcher
 search for and select Service.
- Click the Cases tab.
- Click New, then select Product Support as record type and click Next.
- Fill in the new case record details:
Field |
Value |
|---|---|
Contact Name |
Search for and select |
Account Name |
Search for and select Edge Communications |
Product |
(choose any product from the drop-down) |
Type |
Electronic |
Case Origin |
|
Case Reason |
Performance |
Subject |
Laptop not working |
Description |
Client laptop is not working |
- Click Save.
- Copy the case number of the case you just created.
- From Setup, in the Quick Find Box, search for and select Case Escalations.
- Filter the case escalations queue to show the case you just created by entering the criteria: Case To Escalate equals [case number for the case you just created].
- Click Search. Note the escalation actions in the queue and when can you expect to see an escalation alert email for this case.
Congratulations! You finished the badge and customized your org. From setting up users to creating record types and processes, with these building blocks in your toolbox, you’re well on your way to becoming an expert Salesforce admin.