Work with Standard and Custom Fields
Learning Objectives
In this project, you’ll:
- Create new custom fields to meet business requirements and facilitate accurate data entry with formulas, picklists, and lookups.
- Ensure users have access to the right fields with page layouts.
- Manage multiple business scenarios with record types and business processes.
- Maintain data quality with history tracking and data validation.

Introduction
AW Computing has established a Salesforce environment with users set up, profiles assigned, and access to records and fields configured. But they’re in need of further customization to ensure users have the necessary fields to capture the business information they need. That’s where you, the admin, come in.
To begin with, you have a request from Head of Sales Operations Yuko Ishikawa. Yuko says her Sales Op team uses the Account Rating field for sales prospecting, but they’re concerned that account owners aren’t capturing this information correctly because they don’t understand what the field is for. To help her team use the field properly and capture all the data they need, change the name of the field, provide guidance on how to use it, add an additional value, and restrict who can edit it.
Launch Your Trailhead Playground
You'll be completing this hands-on project in your own personal Salesforce environment, called a Trailhead Playground. Get your Trailhead Playground now by first logging in to Trailhead, and then clicking Launch at the bottom of this page. Your playground opens in a new browser tab or window. Keep the playground window open while you do this project. After you complete the project steps in your playground, come back to this window and click Verify step at the bottom of this page.
Customize Profiles and Objects
Before you get to those tasks, create profiles for members of the sales and support teams.
- From the Setup menu (
 ), click Setup.
- Enter
Profilesin the Quick Find box and select Profiles.
- Click Clone next to Standard User.
- For Profile Name, enter
Sales User.
- Click Save.
- Click Clone.
- For Profile Name, enter
Support User.
- Click Save.
Now change the label of the Rating field to Prospect Rating.
- From Setup, enter
Rename Tabsin the Quick Find box and select Rename Tabs and Labels.
- In the Action column, click Edit in front of Accounts.
- Click Next.
- Find Rating in the list of standard fields and change Rating to
Prospect Ratingin the Singular column.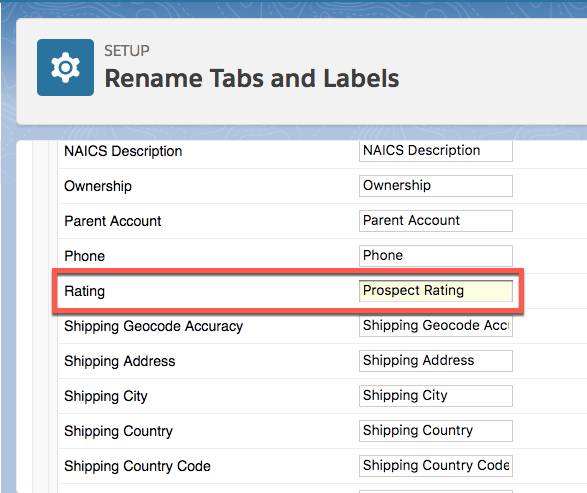
- Click Save.
Now add help text to the field, add a new value to the Account Rating Picklist, and update field-level security.
- From Setup, click Object Manager and select Account.
- Select Fields & Relationships.
- Click Prospect Rating, then click Edit.
- Enter this Help Text:
This indicates the likelihood of a sale being made to this account in the next six months. Cold indicates not likely. Warm indicates quite likely. Hot indicates very likely. - Click Save.
- In the Account Rating Picklist Values section, click New.
- Enter
Not Knownin the Add Picklist Values box and click Save.
- Click Set Field-Level Security.
- Select the checkbox in the Read-Only column header.
- Deselect the Sales User checkbox in the Read-Only column.
- Click Save.
Next, create a checkbox field called Has Support Plan, editable by sales and support users only.
- From Setup, click Object Manager and select Account.
- Select Fields & Relationships and click New.
- Select Checkbox as the Data Type, then click Next and fill in the details:
- Field Label:
Has Support Plan - Field Name:
Has_Support_Plan - Default Value: unchecked
- Description:
Sales users use this field to indicate to Support which customers have support plans.
- Help Text:
Does this customer have a current support plan? Check this box when you sell a support plan to this customer.
- Field Label:
- Click Next.
- Select the checkbox in the Read-Only column header.
- Deselect the Sales User and Support User checkboxes in the Read-Only column.
- Click Next then Save & New.
Next create a Support Expiration Date date field, editable by sales and support users only.
- Select Date as the Data Type, then click Next and fill in the details:
- Field Label:
Support Plan Expiration Date
- Field Name:
Support_Plan_Expiration_Date
- Description:
Expiration date of current support plan
- Help Text:
When is the current support plan due for renewal?
- Field Label:
- Click Next.
- Select the checkbox in the Read-Only column header.
- Deselect the Sales User and Support User checkboxes in the Read-Only column.
- Click Next and Save.
Now that you’ve helped Yuko’s Sales Ops team capture the data they need, move on to the next step where you’ll create some picklists for them.