Filter Your Reports
Follow Along with Trail Together
Want to follow along with an expert as you work through this step? Take a look at this video, part of the Trail Together series.
(This clip starts at the 22:36 minute mark, in case you want to rewind and watch the beginning of the step again.)
Use Report Filters
You can add up to 20 additional filters to a report directly in the Filters pane using the Add button or by dragging in fields from the Preview pane. In addition, you can also use filter logic using “and,” “or,” and “not” operators. Let’s meet the needs of your next stakeholder, the VP of Marketing, to see how filters and filter logic work.
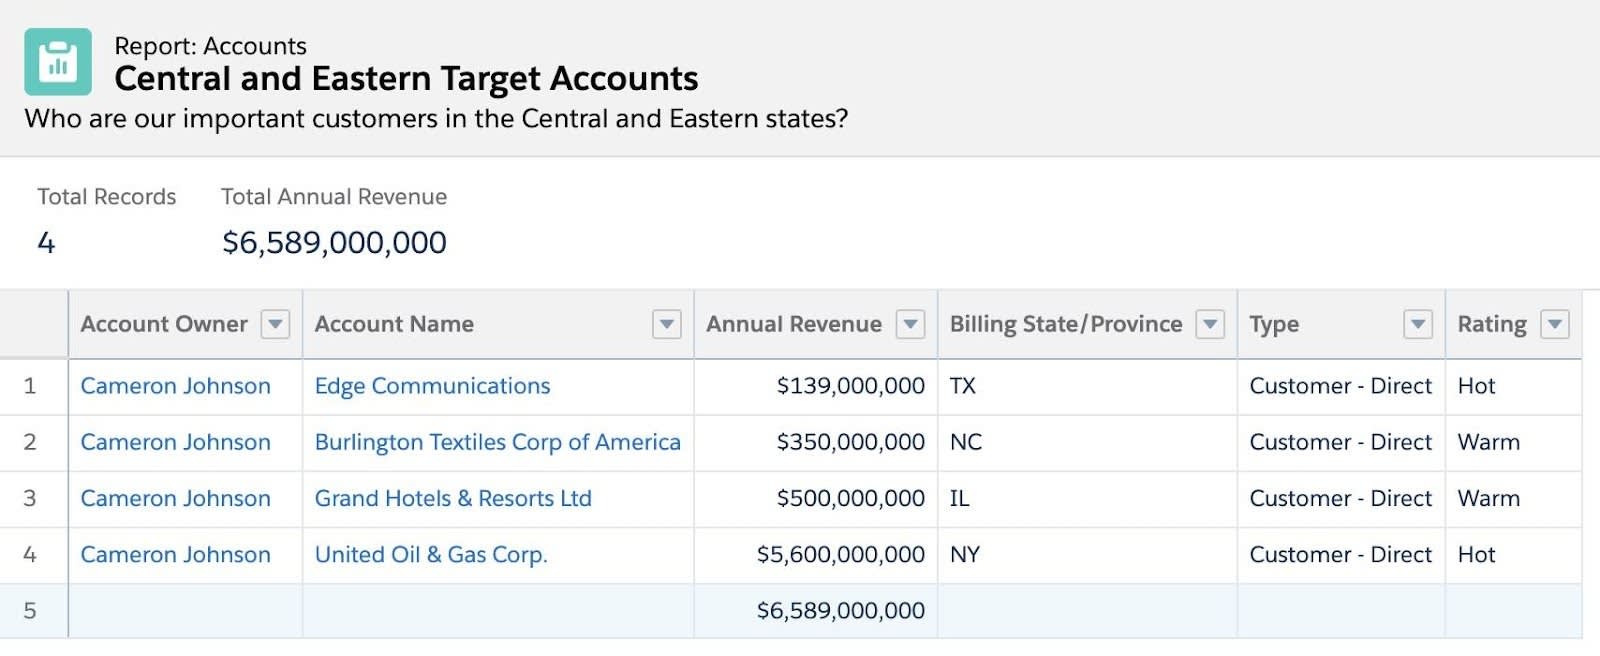
He would like to see a list of all customer accounts based in Texas, North Carolina, Illinois, and New York that have either a rating of Hot or Warm or an annual revenue of $2 million and up.
Create a new account report.
- Click Reports.
- Click New Report.
- Under Recently Used on the left, click All.
- In Search Report Types, enter
Accountsand select Accounts.
- Click Start Report.
- Ensure Update Preview Automatically is enabled in the upper-right of the Report Builder.
- Click the Filters pane.
- Click Show Me and select All accounts, then click Apply.
- Click Created Date, select All Time from the Range picklist, then click Apply.
- Click the Outline pane and select the X next to the following fields to remove these columns from the report:
- Last Activity
- Last Modified Date
- Click the Fields pane to expand the list of fields.

- Double-click Annual Revenue to add it to the report.
- Click the X to close the Fields pane.
- Click and drag the Annual Revenue column so it is placed between the Account Name and Billing State/Province columns.
Add the necessary filters and filter logic.
- Click the Filters pane.
- Search for
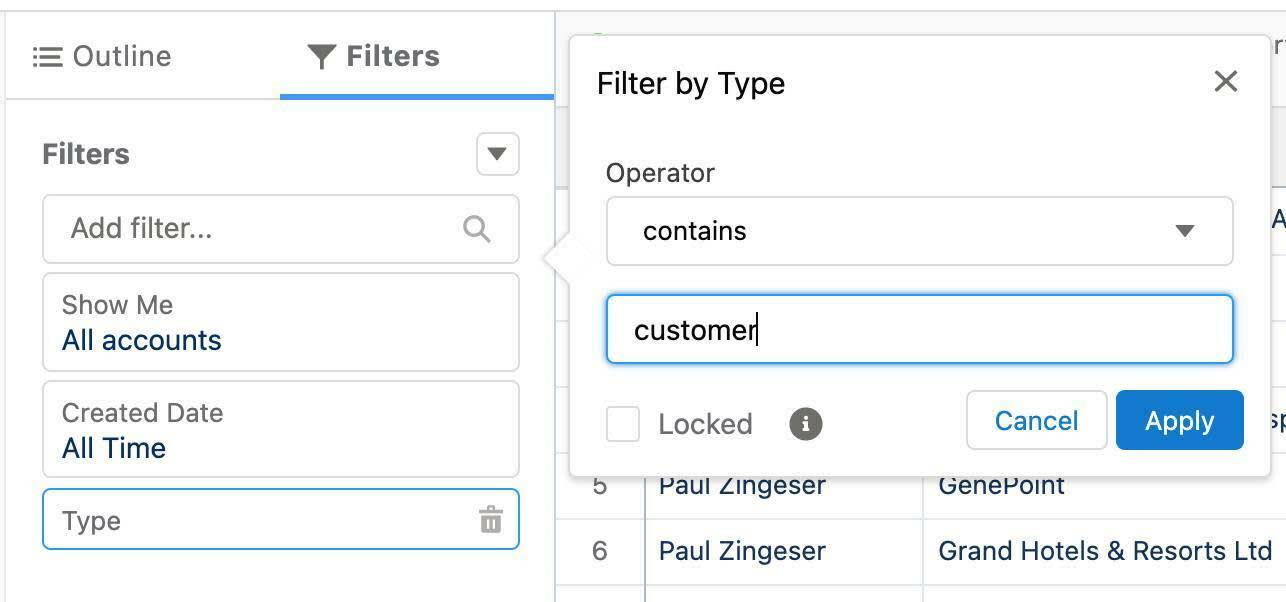
Typein Add filter... search box and select it.
- In the Operator field, select contains from the drop-down menu.
- Type
customerin the value field.
- Click Apply.

- Repeat steps 2-5 above to create the following three additional filters:
-
Field: Billing State/Province - Operator: equals - Value:
TX,NC,IL,NY -
Field: Rating - Operator: equals - Value:
Hot, Warm -
Field: Annual Revenue - Operator: greater or equal - Value:
2000000Note: Annual revenue is two million (six zeros).
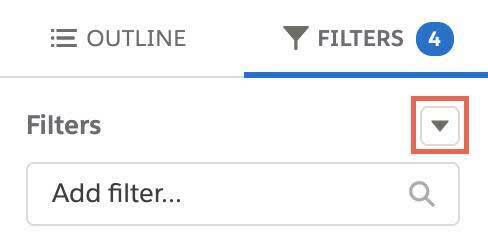
- In the Filters pane, click the arrow
 next to Filters and click Add Filter Logic.
- In the Edit Filter Logic field, change the logic to 1 AND 2 AND (3 OR 4) and click Apply.
Save the report as Central and Eastern Target Accounts in the Marketing Reports folder:
- Click Save & Run, and then complete the Save Report details:
- For Report Name:
Central and Eastern Target Accounts - Click in the Report Unique Name text box to auto-populate the unique name. Don't worry, the unique name of this report isn't checked.
- For Report Description:
Who are our important customers in the Central and Eastern states?
- Click Select Folder, select Marketing Reports from the Global Sales Reports folder and click Select Folder.
- Click Save.

Use Relative Dates
Instead of filtering data by calendar dates, such as Close Date > Jan 1, 2020, filter your report by a relative date: Close Date = THIS YEAR. Yes, Salesforce will understand this value!
Our CEO is very focused on user adoption of Salesforce and wants to ensure the company is getting the most out of its user licenses. He wants a weekly report of all users who have not logged into Salesforce in the last seven days as well as when their login access is set to expire. How would you accomplish this?
Customize the Users Report Type to display users who have not logged in during the last seven days:
- Click Reports.
- Click New Report.
- Under Recently Used on the left, click All.
- In Search Report Types, enter
Usersand select Users.
- Click Start Report.
- Ensure Update Preview Automatically is enabled in the upper-right of the Report Builder.
- Click the Outline panel.
- In the Add column... search box, enter
login access, and then select Login Access Exp. Date.
- Click the Filters pane.
- Click the Last Login Filter.
- Under Date, click Last Login and select Login Access Exp. Date from the dropdown list.
- Leave Range as All Time and click Apply.
- In the Add filter... search box, enter
Last Login, then select Last Login.
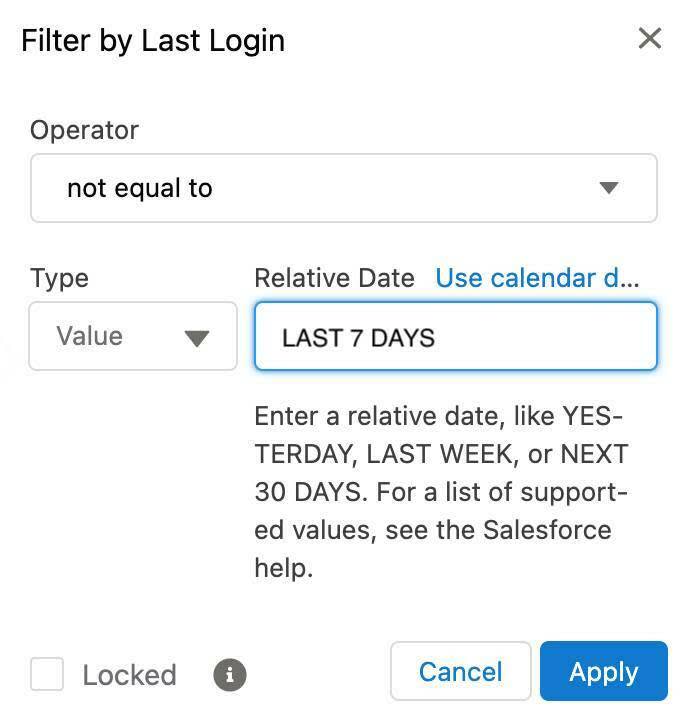
- Create the filter with these details:
- For operator, select not equal to
- Click Use relative date and enter
LAST 7 DAYS - Click Apply

- Click Save & Run.
- For Report Name, enter
Users Not Logged in Last 7 Days.
- Click in the Report Unique Name text box to auto-populate the unique name. Don't worry, the unique name of this report isn't checked.
- For Report Description, enter
Who hasn’t logged in the last 7 days? - Click Select Folder, choose Adoption Reports from the Global Sales Reports folder, and click Select Folder.
- Click Save.
