Join and Write Back Data
Join New Rollup Data with Existing Donor Gift Summary Data
You now have a calculation that generates the data to meet the HNMI fundraisers’ goal of having a count of a donor's gifts with a value of $1,000 or more.
But, remember that donor gift summary records have other, standard rollup fields with values generated by the Data Processing Engine template definition. While some donors already have gift summaries, others require the system to create a new gift summary record.
Before you can check if a donor gift summary exists, you need to bring the donor gift summary data into the Data Processing Engine definition. Use a new Data Source node to get donor gift summaries.
- In the Data Processing Engine builder, click New Node.
- Specify these details:
- Node Type: Data Source
- Name:
Get Donor Gift Summaries
- API Name: This field auto-populates with
Get_Donor_Gift_Summaries
- Node Type: Data Source
- Save your work.
- In the configuration pane for the new node, specify these details:
- Select Source and Fields: Object
- Source Object: Donor Gift Summary
- Select Source and Fields: Object
- Click Select Fields.
- Select the checkbox next to the Field column header to choose all the fields, and retain the default aliases.
- Save your work in the Select Fields pane.
- Save your work in the configuration pane.
- Save your work on the definition.
You now have existing donor gift summary data in your Data Processing Engine definition. Separately, you have your count of gifts of $1,000 or more. It’s time to combine that data into a single dataset.
To create a single dataset, add a Join node to your definition.
- In the Data Processing Engine builder, click New Node.
- Specify these details:
- Node Type: Join
- Name:
Join Donor Gift Summaries and Gift Transactions
- API Name: This field auto-populates with
Join_Donor_Gift_Summaries_and_Gift_Transactions
- Node Type: Join
- Save your work.
- In the configuration pane for the new node, specify these details:
- Join Type: Outer
- First Source Node: Aggregate Transactions
- Second Source Node: Get Donor Gift Summaries
- Join Type: Outer
- Click Select Fields for your first node, Aggregate Transactions.
- Select all fields.
- Change the alias for DonorId to
TransactionDonorId.
- Save your work in the Select Fields pane.
- Click Select Fields for your second node, Get Donor Gift Summaries.
- Select all fields.
- Change the alias for DonorId to
SummaryDonorId.
- Save your work in the Select Fields pane.
- In Mapped Fields, specify these details:
- First Node Field: DonorId
- Second Node Field: DonorId
- First Node Field: DonorId
- Save your work in the configuration pane.
- Save your work on the definition.
Notice that you joined data from two nodes—a Group and Aggregate node and a Data Source node—into one dataset. These two datasets are joined on the DonorId field, which is shared across both nodes.
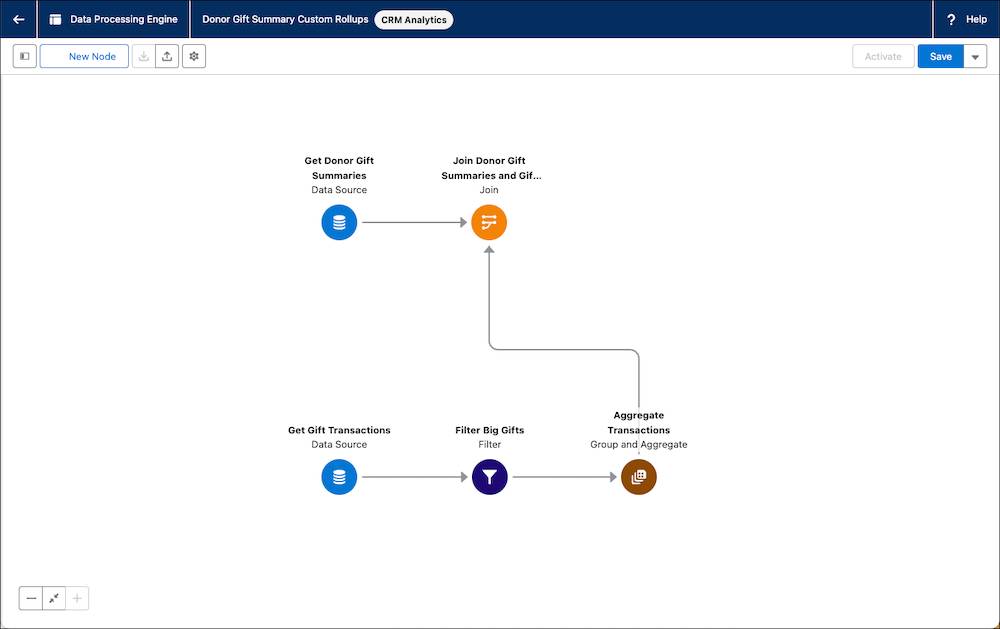
In the Data Processing Engine builder, this build node sits between two nodes and is the source node for the steps that come next.
Add Logic to Your Data Processing Engine Definition
Remember, some donors may not have a donor gift summary related to their account. In this case, a new record has to be created. For donors with a donor gift summary in place, it’s a matter of updating their existing record.
Follow these steps to create a Filter node to separate donors with gift summaries from those without. Then in subsequent steps, you’ll define the proper actions for each group.
- In the Data Processing Engine builder, click New Node.
- Specify these details:
- Node Type: Filter
- Name:
Donors Without Donor Gift Summaries
- API Name: This field auto-populates with
Donors_Without_Donor_Gift_Summaries
- Node Type: Filter
- Save your work.
- In the configuration pane for the new node, specify these details:
- Source Node: Join Donor Gift Summaries and Gift Transactions
- Select Records When: All Conditions Are Met (AND)
- Resource: Id
- Operator: Is Null
- Source Node: Join Donor Gift Summaries and Gift Transactions
- Save your work in the configuration pane.
- Save your work on the definition.
Notice that the check you perform is looking for null, or non-existent, donor gift summary IDs.
Now create a similar Filter node for donors with related donor gift summaries. Specifically, filter person accounts where the donor gift summary values aren’t null.
- In the Data Processing Engine builder, click New Node.
- Specify these details:
- Node Type: Filter
- Name:
Donors With Donor Gift Summaries
- API Name: This field auto-populates with
Donors_With_Donor_Gift_Summaries
- Node Type: Filter
- Save your work.
- In the configuration pane for the new node, specify these details:
- Source Node: Join Donor Gift Summaries and Gift Transactions
- Select Records When: All Conditions Are Met (AND)
- Resource: Id
- Operator: Is Not Null
- Source Node: Join Donor Gift Summaries and Gift Transactions
- Save your work in the configuration pane.
- Save your work on the definition.
The path your data takes now branches between the two filters.
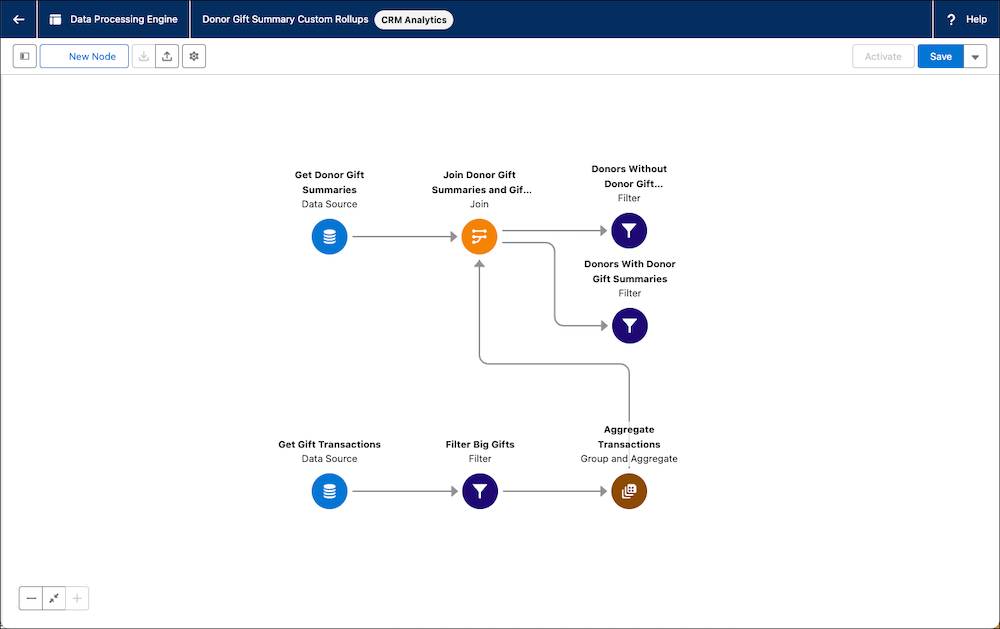
Now that your donors are sorted into different datasets, set up the actions for each group.
Create Writeback Objects
In Data Processing Engine, you use the Writeback Object node to create, update, upsert, delete, or overwrite records in Salesforce. This node is how you take all of the work you’ve done in your definition and send it to its final destination.
To meet HNMI’s requirements, you need one Writeback Object node for each of the filters you set up in the last section.
Start with the writeback object following the filter for donors without an existing donor gift summary.
- In the Data Processing Engine builder, click New Node.
- Specify these details:
- Node Type: Writeback Object
- Name:
Create New Donor Gift Summary - API Name: This field auto-populates with
Create_New_Donor_Gift_Summary
- Node Type: Writeback Object
- Save your work.
- In the configuration pane for the new node, specify these details:
- Source Node: Donors Without Donor Gift Summaries
- Target Type: Salesforce Object
- Action Type: Insert
- Target Object: Donor Gift Summary
- User with Writeback Permission: Your user account
- Writeback Sequence:
1
- Source Node: Donors Without Donor Gift Summaries
- In the first Field Mapping row, specify these details:
- Source Node Field: TransactionDonorId
- Target Field: DonorId
- Source Node Field: TransactionDonorId
- Click + Add Row.
- In the second Field Mapping row, specify these details:
- Source Node Field: BigGiftCount
- Target Field: X1_000_or_More_Gift_Count__c
- Source Node Field: BigGiftCount
- Save your work in the configuration pane.
- Save your work on the definition.
In the node for donors without a donor gift summary, you selected the Action Type of Insert to create a new record. For donors who have an existing donor gift summary, create a Writeback Object node and choose the Action Type of Upsert to update a record.
- In the Data Processing Engine builder, click New Node.
- Specify these details:
- Node Type: Writeback Object
- Name:
Update Donor Gift Summary - API Name: This field auto-populates with
Update_Donor_Gift_Summary
- Node Type: Writeback Object
- Save your work.
- In the configuration pane for the new node, specify these details:
- Source Node: Donors With Donor Gift Summaries
- Target Type: Salesforce Object
- Action Type: Upsert
- Target Object: Donor Gift Summary
- User with Writeback Permission: Your user account
- Writeback Sequence:
2
- Source Node: Donors With Donor Gift Summaries
- In the first Field Mapping row, specify these details:
- Source Node Field: Id
- Target Field: Id
- Source Node Field: Id
- Click + Add Row.
- In the second Field Mapping row, specify these details:
- Source Node Field: BigGiftCount
- Target Field: X1_000_or_More_Gift_Count__c
- Source Node Field: BigGiftCount
- Save your work in the configuration pane.
- Save your work on the definition.
Congratulations! Your Data Processing Engine definition is now complete.
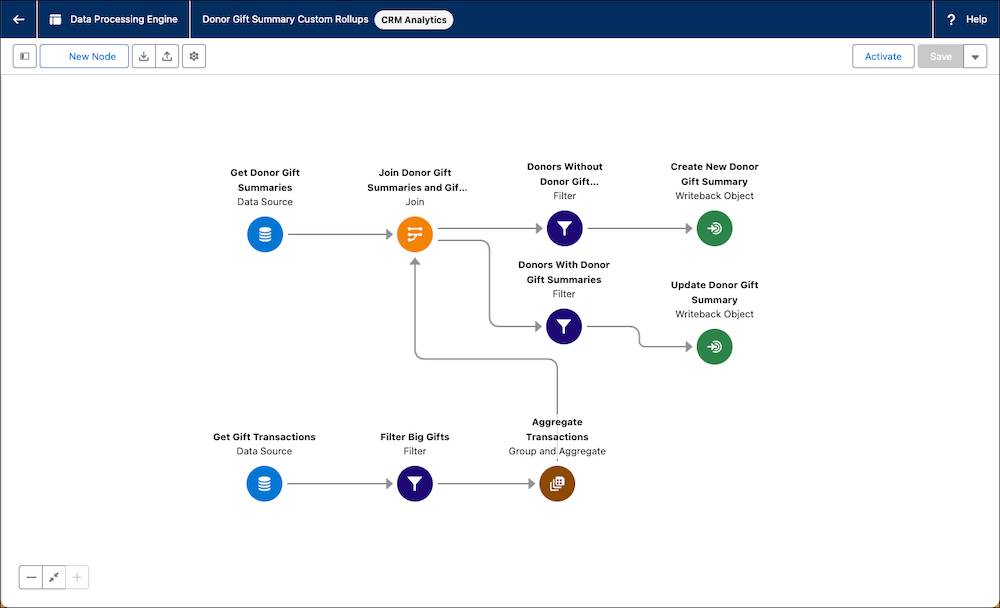
In this unit, you took the calculation for your new rollup field and joined it with existing data. You then applied logic to decide which action to take, and created nodes to take those actions. All of the nodes you need for your new rollup field are now in place in the Data Processing Engine definition.
Next, in the final step, you activate and run your definition, add it to your schedule-triggered flow, and display the value prominently on account records in the correct app.