Get Started with Agentforce DX
Learning Objectives
In this project, you’ll:
- Explain how Agentforce DX helps you build agents.
- Set up your Agentforce DX development environment.
- Clone a repo that contains a sample agent in a DX project.
Coral Cloud Resorts + Agentforce DX
Congratulations! You just got hired by the development team at Coral Cloud Resorts, and you’re excited to get coding. Your new manager explains that the team is hard at work creating agents. They’ve already started one called Local Info Agent that provides their customers with local weather updates and resort hours, and you will now take over the project. But you’ve never developed an agent on Salesforce before, so you need some training to learn the basics. Read on!
Because you’re a modern developer, you’re accustomed to using the latest development tools, such as storing the agent’s source code in a version control system like GitHub and incorporating agent development and testing into continuous integration (CI) jobs. Sounds like a job for Agentforce DX.

What Is Agentforce DX?
Until now, you might have built agents using the Agentforce Builder UI, which is the low-code way to create agents with clicks, not code. But to bring AI into a modern DevOps pipeline, you need to move beyond the browser by stepping into the pro-code world of Agentforce Developer Experience (DX). This shift allows you to treat your agent’s logic as source code, version it in a repository, and deploy it alongside your Apex and Lightning components.
If you’re a Salesforce developer, you’re probably already familiar with Salesforce DX, a set of pro-code tools to build, test, and ship applications on the Salesforce Platform. These tools include Agentforce Vibes, Visual Studio Code (VS Code) extensions, Salesforce CLI, and more. Agentforce DX extends these tools to also work with agents.
Agents are made of metadata, just like any other Salesforce customization. Agentforce DX provides pro-code tools to create, modify, preview, and test agents outside the Agentforce Builder UI. And it helps you move agent metadata between your DX project and the scratch orgs, sandboxes, and production orgs you work with. With these abilities, you can incorporate agents into your modern software development process.
Sign Up for a Developer Edition Org with Agentforce
To complete this project, you need a special Developer Edition org that contains Agentforce and our sample data. Get the free Developer Edition and connect it to Trailhead now so you can complete the challenges in this project. Note that this Developer Edition is designed to work with the challenges in this badge, and it might not work for other badges. Always check that you’re using the Trailhead Playground or special Developer Edition org that we recommend.
- Sign up for a free Developer Edition org with Agentforce.
- Fill out the form.
- For Email, enter an active email address.
- For Username, enter a unique email address (for example,
yourname@test.com). It doesn’t need to be a real account.
- For Email, enter an active email address.
- After you fill out the form, click Sign me up. A confirmation message appears.
- When you receive the activation email (this might take a few minutes), open it and click Verify Account.
- Complete your registration by setting your password and challenge question.
- Tip: Save your username, password, and login URL in a secure place—such as a password manager—for easy access. You’ll need this information later when you authorize Salesforce CLI to use your Developer Edition org.
- Tip: Save your username, password, and login URL in a secure place—such as a password manager—for easy access. You’ll need this information later when you authorize Salesforce CLI to use your Developer Edition org.
- You are logged in to your Developer Edition.
Now connect your new Developer Edition org to Trailhead.
- Make sure you're logged in to your Trailhead account.
- In the Verify Step section at the bottom of this page, click the hands-on org that’s showing, and then click Connect Org.
- On the login screen, enter the username and password for the Developer Edition you just set up.
- On the Allow Access? screen, click Allow.
- On the Want to connect this org for hands-on challenges? screen, click Yes! Save it. You are redirected back to the challenge page and ready to use your new Developer Edition to earn this badge.
Activate Agentforce in Your Developer Edition Org
To develop agents using Agentforce DX, activate Agentforce in your Developer Edition org.
- Log in to your Developer Edition org and click the Setup gear icon in the top-right corner.
- Click Setup in the dropdown menu.
- Enter
Einstein Setupin the Quick Find box, then click Einstein Setup.
- Make sure the Turn on Einstein toggle is set to On.

- Enter
Einstein Botsin the Quick Find box, then select Einstein Bots.
- Toggle Einstein Bots to On.

- Enter
Salesforce Goin the Quick Find box, then select Salesforce Go.
- In the Search features… text box, enter
Agentforceand select Agentforce (Default).
- Click Get Started.
- Click Turn On.

- Click Confirm.
Set Up Your Development Environment
Next, set up your local development environment. The Coral Cloud Resorts dev team uses both VS Code and CLI commands to build agents. VS Code is an integrated development environment (IDE) that includes a code editor, build automation tools, a debugger, and intelligent code completion.
If you’re a Salesforce developer who uses our pro-code tools, you’ve probably already installed VS Code (with the Salesforce Extensions) and Salesforce CLI on your computer. You can use the same setup, but be sure you update all the VS Code extensions to the latest release. You must also install Node.js on your computer.
Follow these steps to set up your environment.
- Install VS Code on your computer by visiting code.visualstudio.com and clicking Download.
- Install the Salesforce Extension Pack from the VS Code Marketplace. Two of the extensions that are installed automatically are Agentforce DX and Agentforce Vibes.
- Install Salesforce CLI.
- Install Node.js.
Install Node.js globally on your computer now so you can run the setup script later in this unit.
Clone the Sample Repo
As already mentioned, your dev team has started working on the Local Info Agent and have checked the source code into a GitHub repository. The source code is organized using a standard Salesforce DX project, which provides a project structure for your org’s metadata (code and configuration), sample data, and all your team’s tests. Agents are just like any other Salesforce org item in that they’re made up of metadata, so you still use DX projects to store and work with agents.

Follow these steps to use Git to clone the sample repo so you can start coding the agent.
- Open VS Code and click View | Command Palette and choose Git: Clone.
- Enter
https://github.com/forcedotcom/afdx-pro-code-testdrivefor the repository URL.
- Navigate to the directory where you want to put the source code, then click Select as Repository Destination.
- Click Open.
A standard Salesforce DX project called afdx-pro-code-testdrive displays in VS Code. Feel free to review the existing code; this badge discusses some of the agent-related artifacts later.

Authorize Your Developer Edition Org
Use your Developer Edition org username and password to locally authorize the org so VS Code and the CLI commands can work with it.
- In VS Code, click View | Command Palette and choose SFDX: Authorize an Org.
- Click Production.
- Enter
agentforcefor the org alias.
- In the browser window that opens, sign in to your Developer Edition org with your login credentials.
- Click Allow, which allows Salesforce CLI to access your org.
Check for an Authentication Successful message.
- Close the browser window.
Your Developer Edition org is now authorized and set as your default org.
Run a Script to Create and Deploy Required Org Artifacts
The sample repo that you cloned contains the source files for the artifacts that implement the new Local Info Agent, such as Apex classes, a prompt template, and a flow. Describing these artifacts is beyond the scope of this module. But you need them in your Developer Edition org to continue with this Trailhead badge, so we provide a script in the repo you just cloned.
When you run this script, it deploys the source files, assigns permissions, and creates an agent user. Agentforce agents run as a dedicated user with the Einstein Agent User profile—this user is the runtime identity for your agent.
- From the VS Code integrated terminal, run the setup script.
./setup(macOS or Linux)setup.cmd(Windows)
- The script displays the steps it's running, with a green checkmark when the step completes successfully.
Important: Save the unique username the script creates—you need it in the next unit.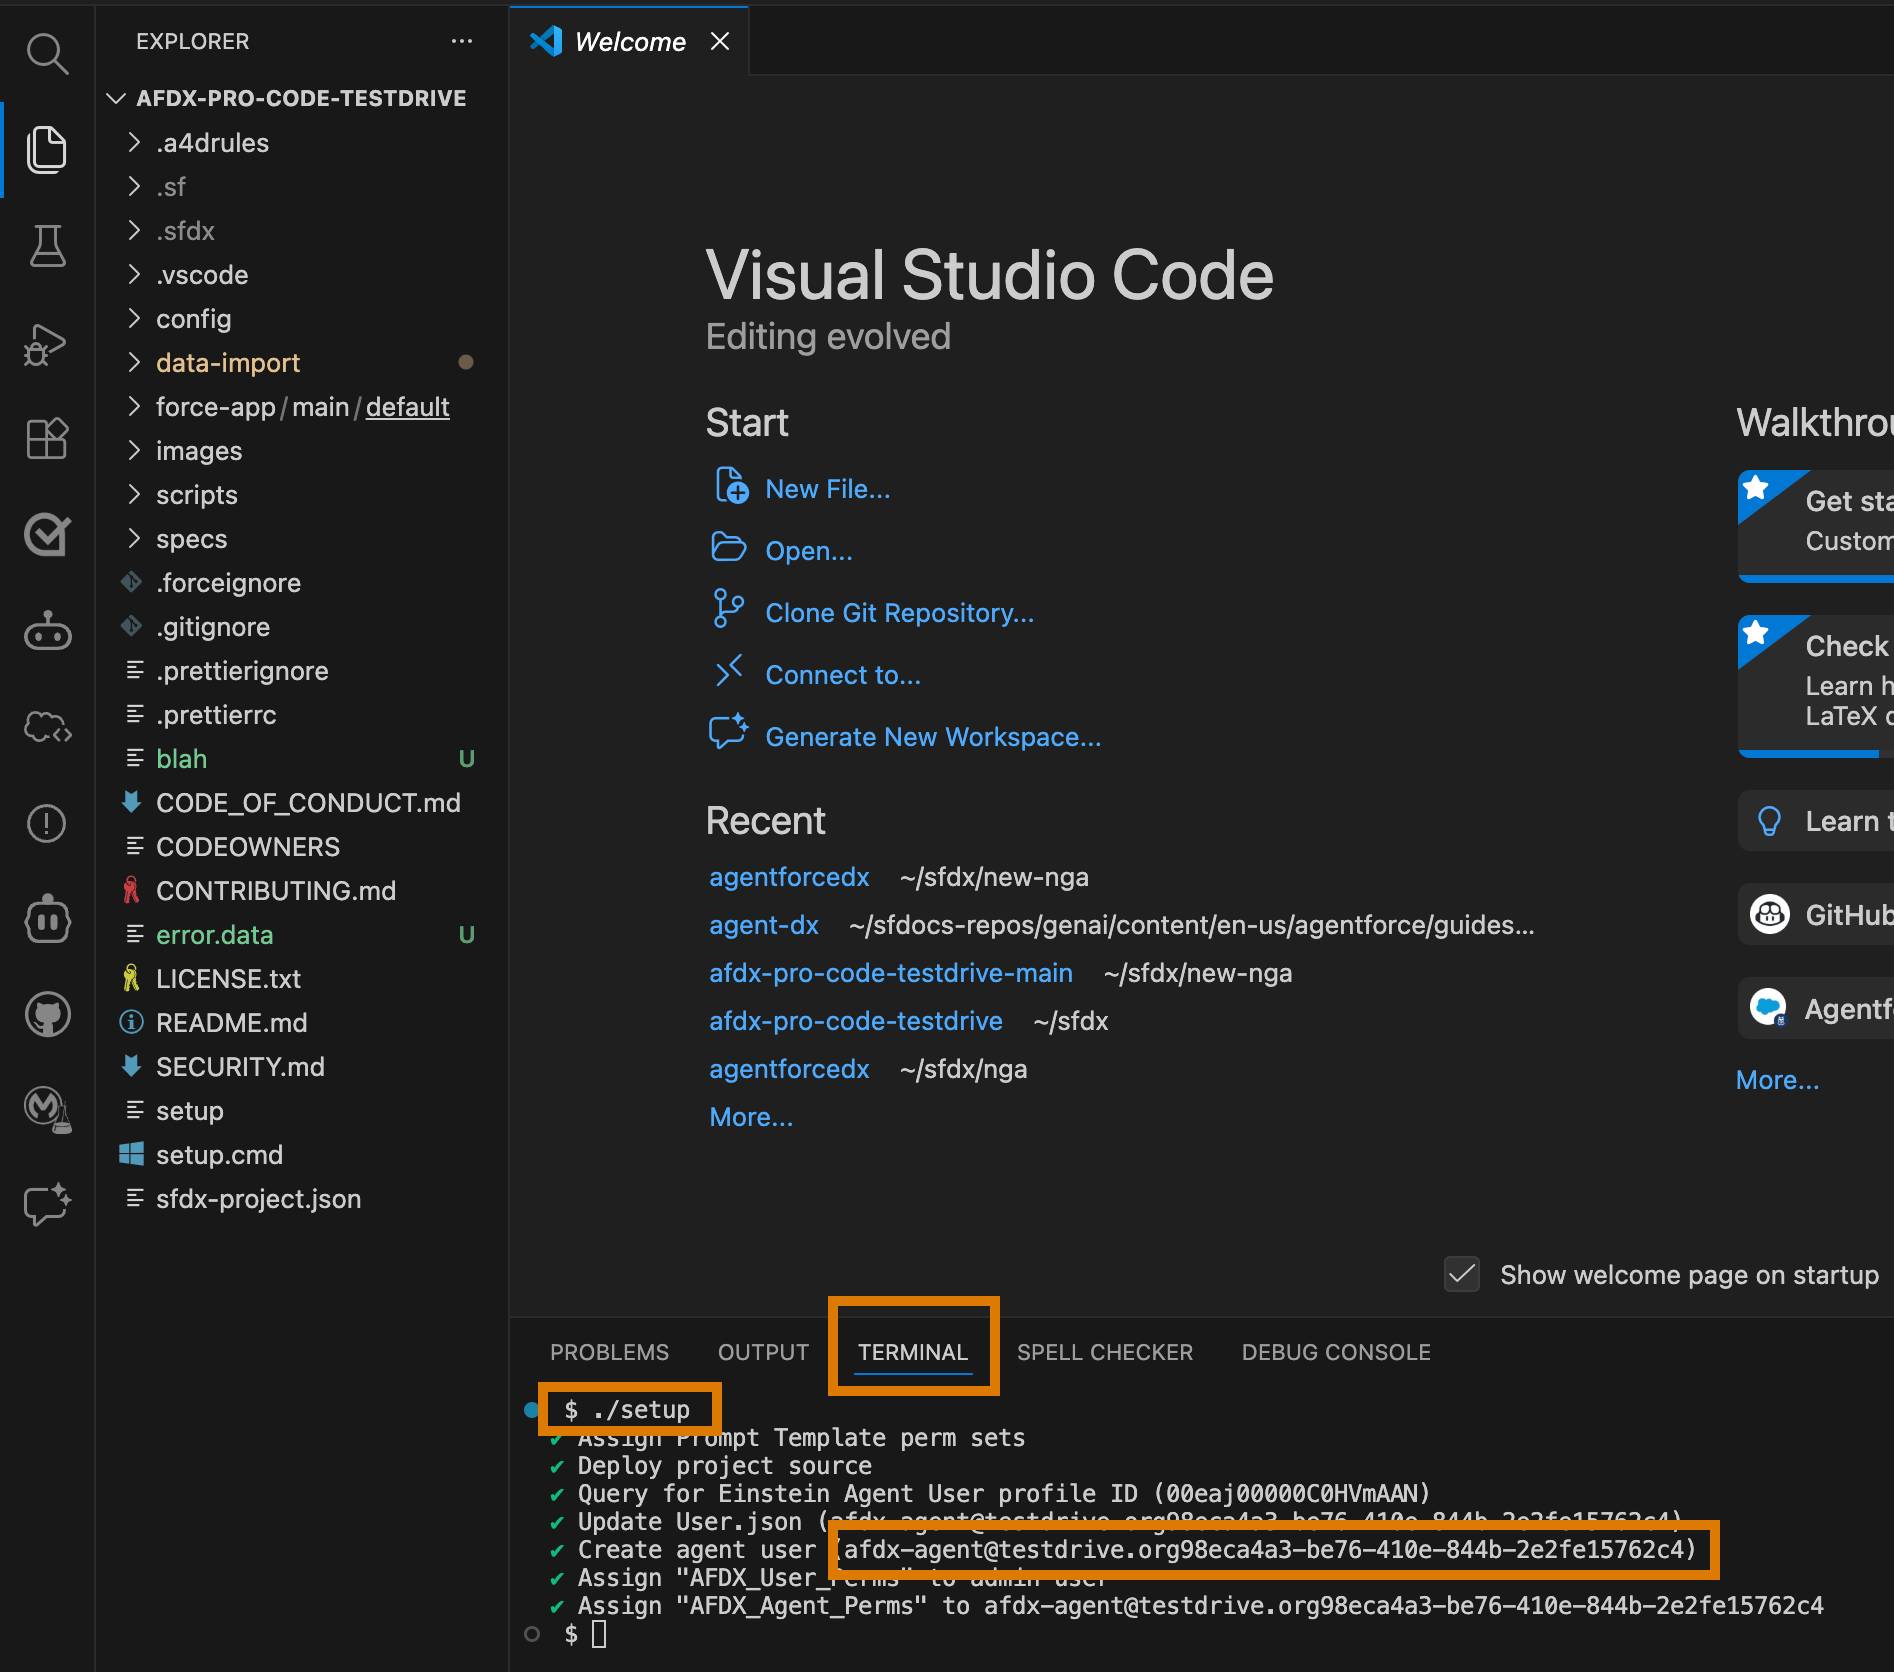
View the Agent Commands
Explore the agent commands before you start using some of them. Most of these CLI commands have VS Code command palette equivalents, which you’ll also use. It’s useful to view all the CLI commands to get a high-level idea of what Agentforce DX can do.
- From the VS Code integrated terminal, run the
sf searchCLI command to view all the available agent commands. A summary of the command displays at the bottom as you navigate through the list.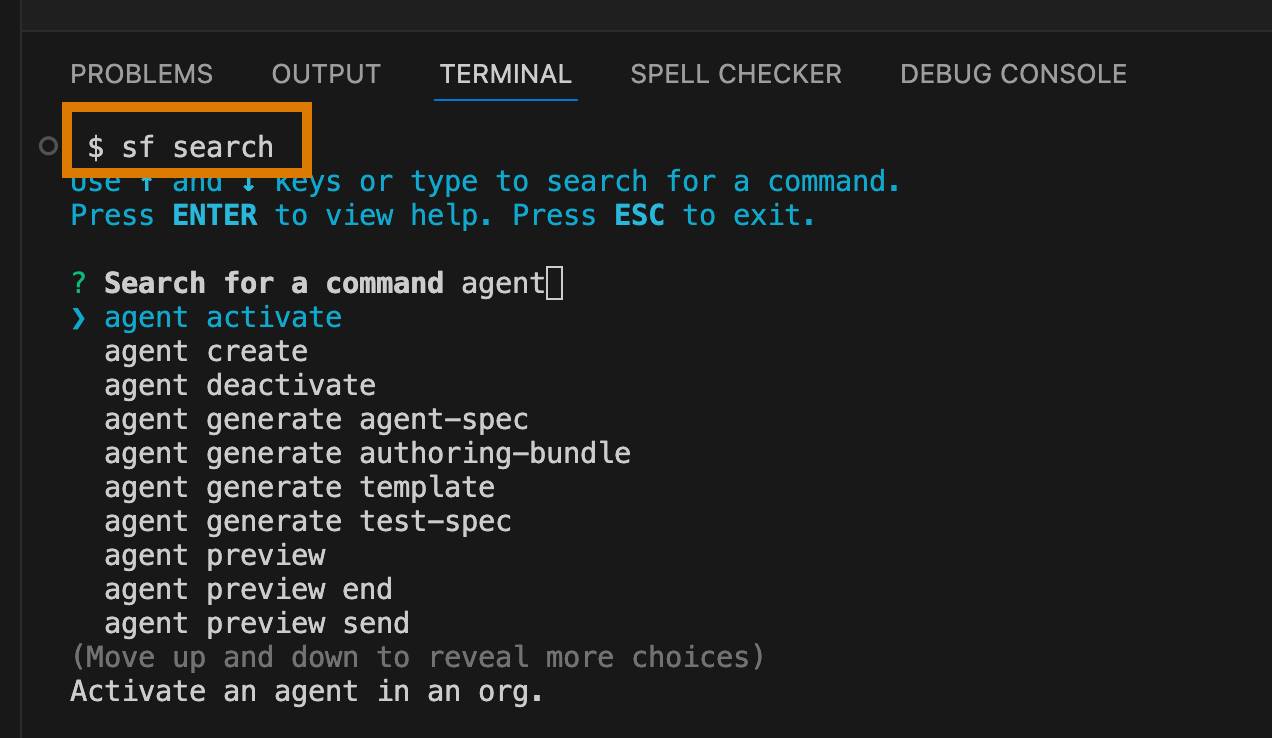
For technical information about the Salesforce CLI plugin that contains theagentcommands, run this command.sf plugins inspect agent - Run a command with the
--helpflag to view detailed information about it, such as its flags and examples of how to use it. Use-hfor concise information.sf agent validate authoring-bundle --help
This Trailhead badge emphasizes the agent validate authoring-bundle and agent publish authoring-bundle CLI commands or their VS Code equivalents.
Now that you’ve learned about Agentforce DX and set up your development environment, it’s time to get to the fun stuff: code an agent.
Resources
- Salesforce Developers: Build Agents with Agentforce DX
- Salesforce Developers: Salesforce CLI Command Reference, agent Commands
- Salesforce Developers: Agentforce Vibes Extension
- Salesforce Developers: How Salesforce Developer Experience (DX) Tooling Changes the Way You Work
- Salesforce Developers: Salesforce Extensions for Visual Studio Code
- Salesforce Developers: Salesforce CLI Setup Guide, Quick Start
- Salesforce Help: Design and Implement Agents
- Trailhead: Get to Know the New Agentforce Builder