Create a Rule and Activate the Process
Create a Rule
Mary creates a rule that gets the number of points to be debited, checks if a member has sufficient balance, and debits the balance. Additionally, since some rewards have associated vouchers, she creates a condition group and defines a set of conditions to determine whether the transaction journal is eligible for a voucher.
Let’s start with creating the rule.
- In the Cloud Kicks Inner Circle program record, click the Processes tab.
- Click the Debit Points for Redemptions program process.
- On the Loyalty Process Rules related list, click New.
- Specify the following details.
- Name:
Rule to Debit Points - Date: Current date
- Click Save.
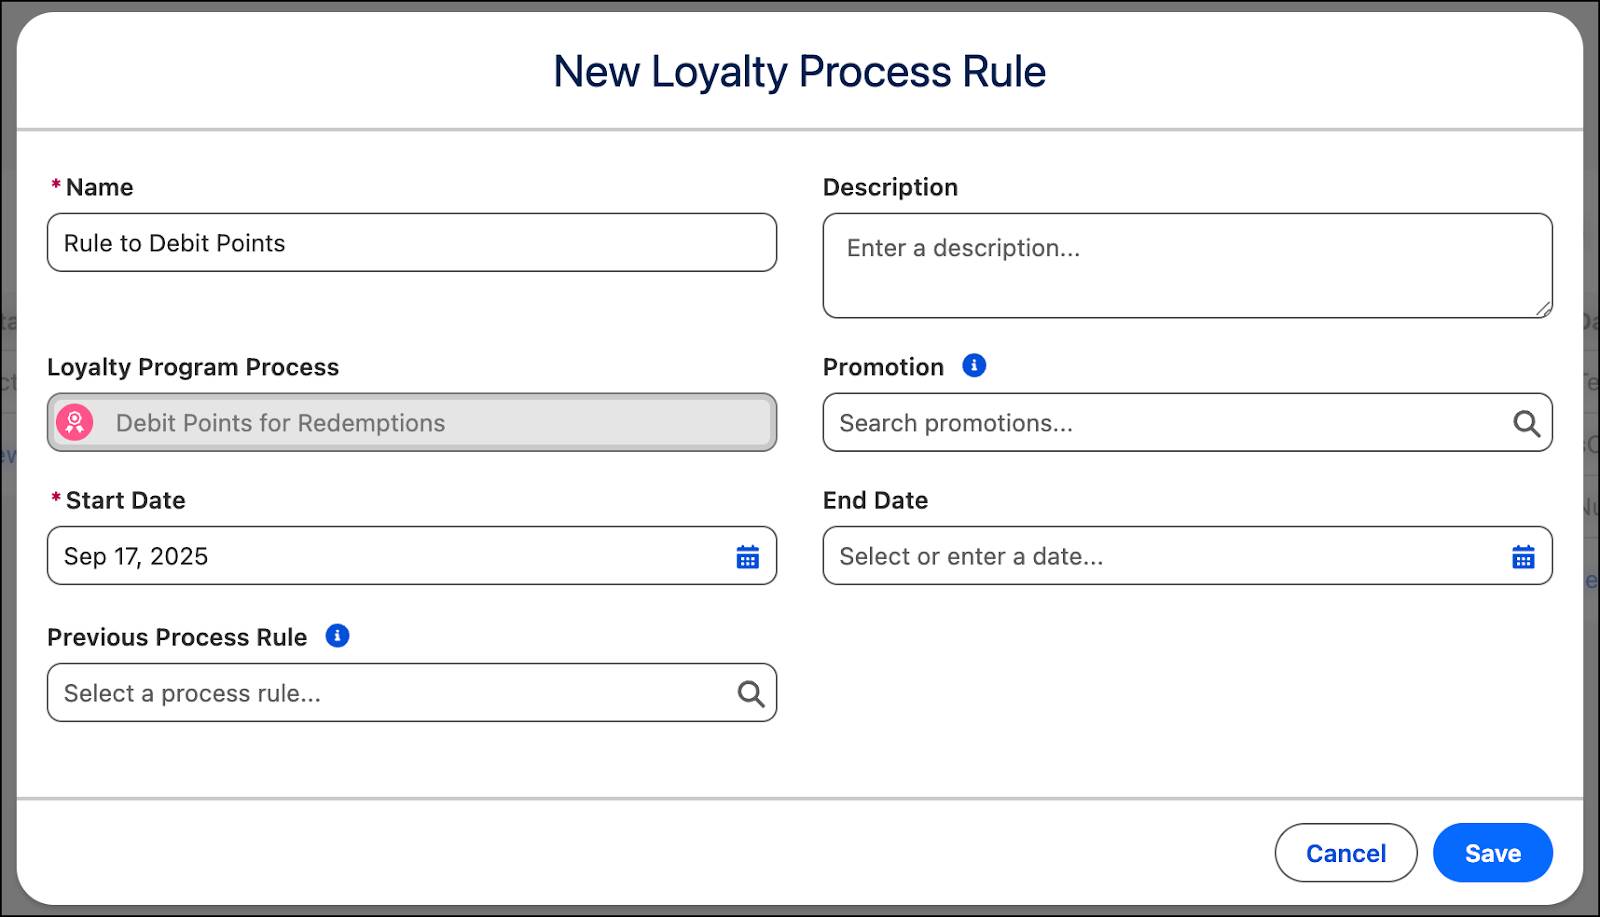
After creating the rule, Mary adds conditions and actions that will help her execute the redemption process.
Add an Action to Run the Decision Table
- In the Rule to Debit Points rule, click
 .
.
- Hover over Get Action and select Get Outputs from a Decision Table.
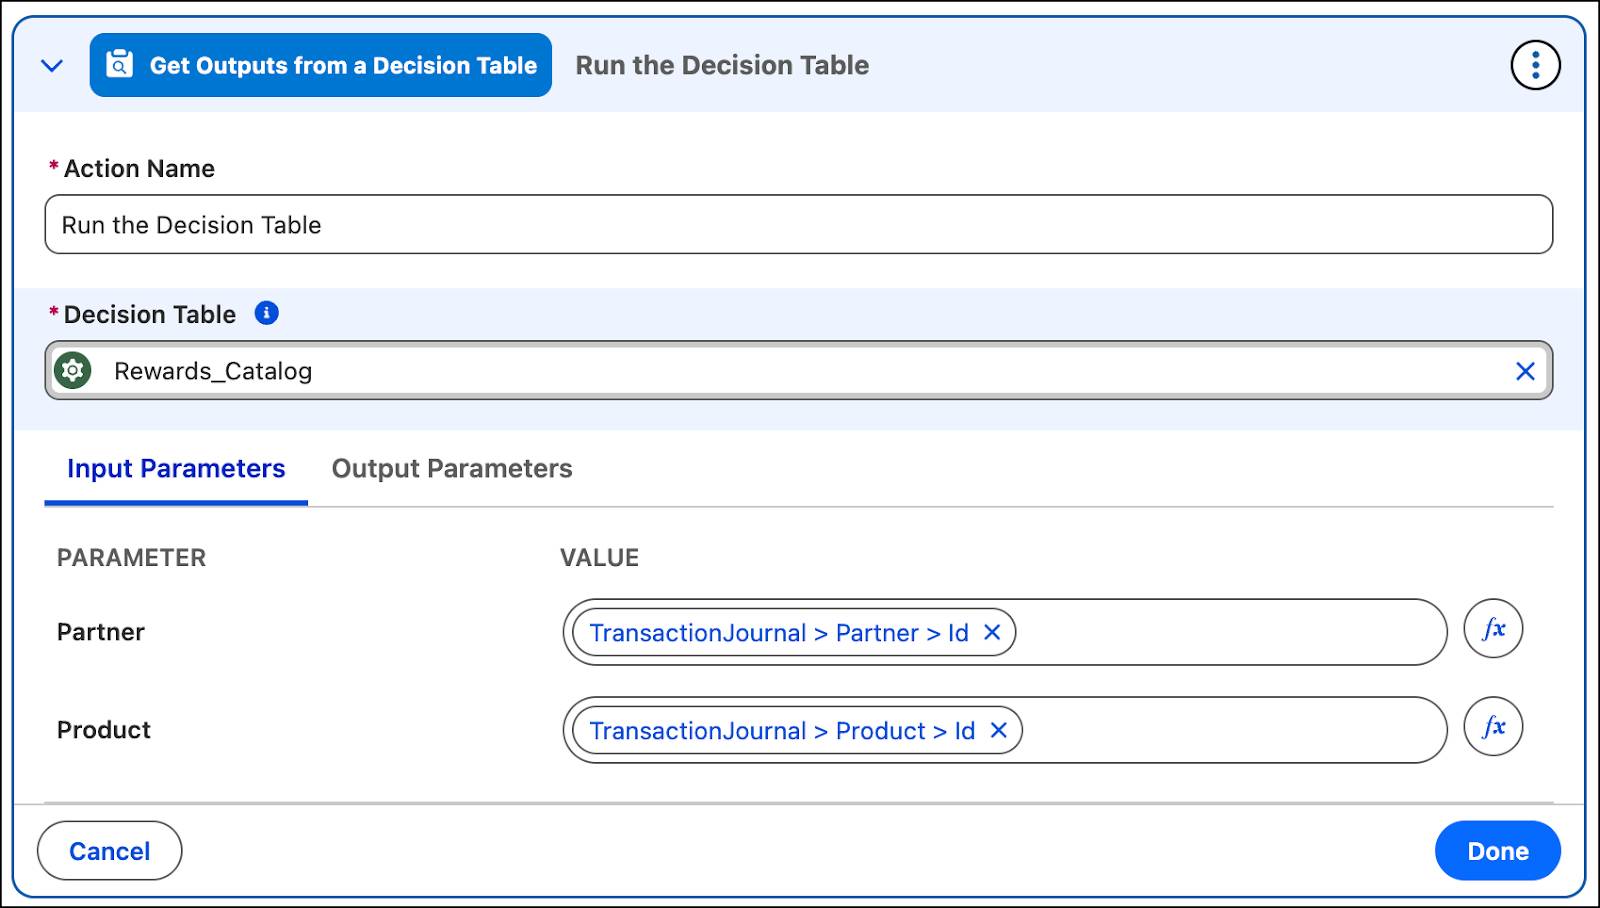
- Add the following details.
- Action Name:
Run the Decision Table - Decision Table: Rewards_Catalog
- Partner:
TransactionJournal.Partner.Id - Product:
TransactionJournal.Product.Id - Click the Output Parameters tab.
- For Outcome Type, click New Parameter and add the following details.
- Name:
DecisionTableOutcomeType - Type: Variable
- Data Type: Text
- Click Save.
- For Single Outcome, click New Parameter and add the following details.
- Name:
PointsFromCatalog - Type: Variable
- Data Type: sObject
- Object: Rewards Catalog
- Click Save.
- Click Done.
- Click Save.
Add an Action to Get Members’ Point Balance
- Click
 .
.
- Hover over Get Action and select Get Member’s Points Balance.
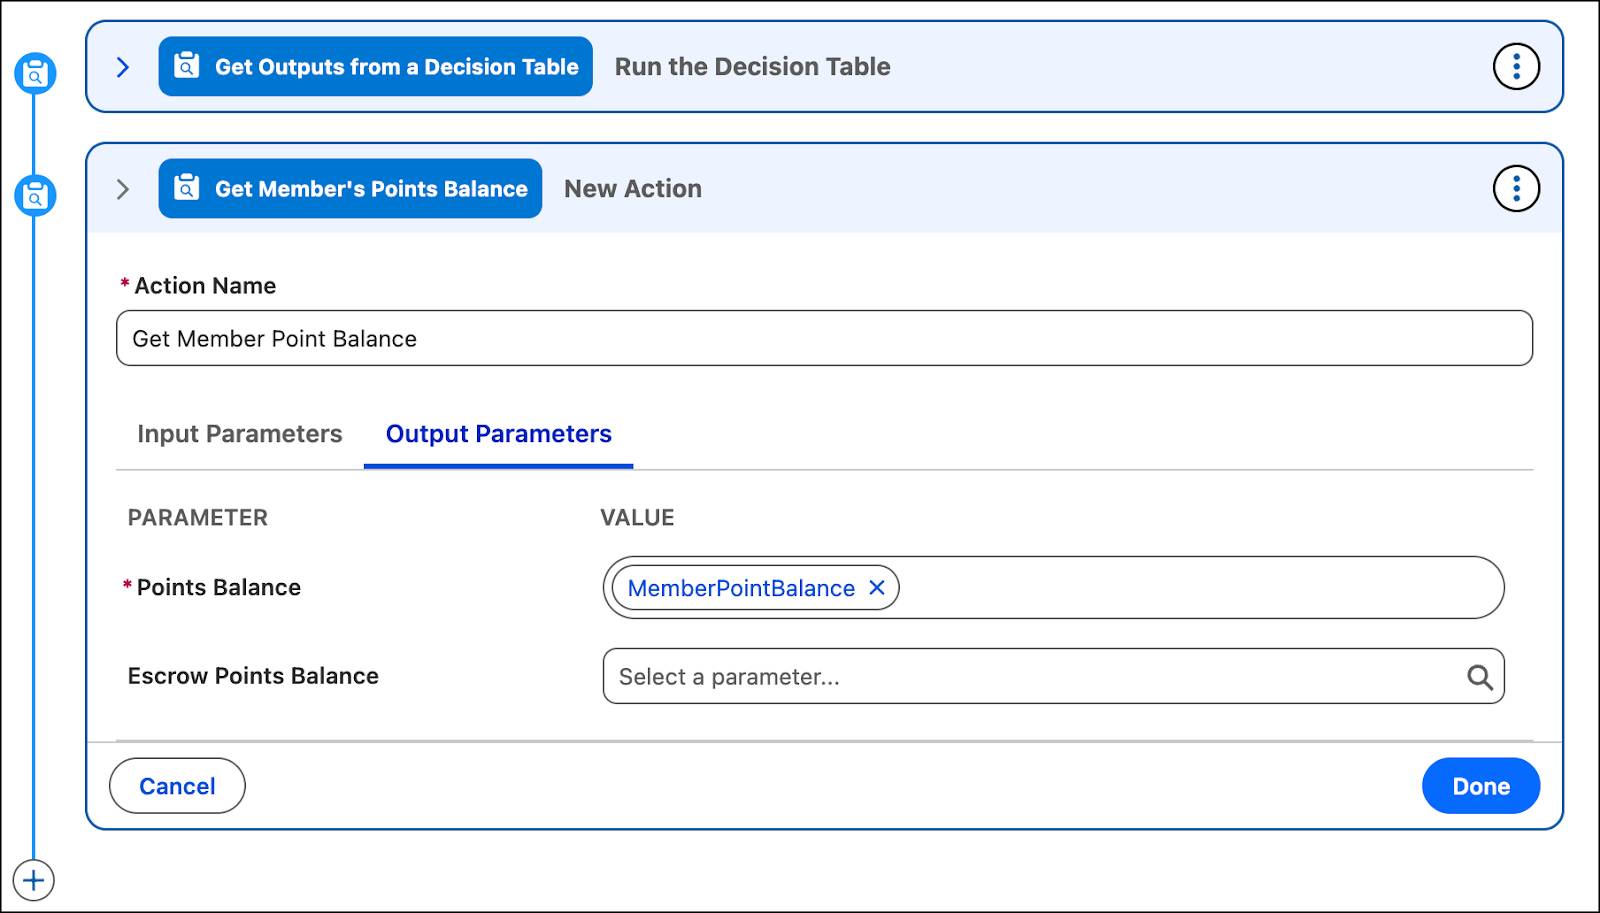
- Add the following details.
- Action Name:
Get Member Point Balance - Currency Name: Fixed Value; Regular Points
- Click the Output Parameters tab.
- For Points Balance, click New Parameter and add the following details.
- Name:
MemberPointBalance - Type: Variable
- Data Type: Number
- Decimal Places:
2 - Click Save.
- Click Done.
- Click Save.
Add a Condition to Check If the Member Has Sufficient Points Balance
- Click
 , and select Add Condition.
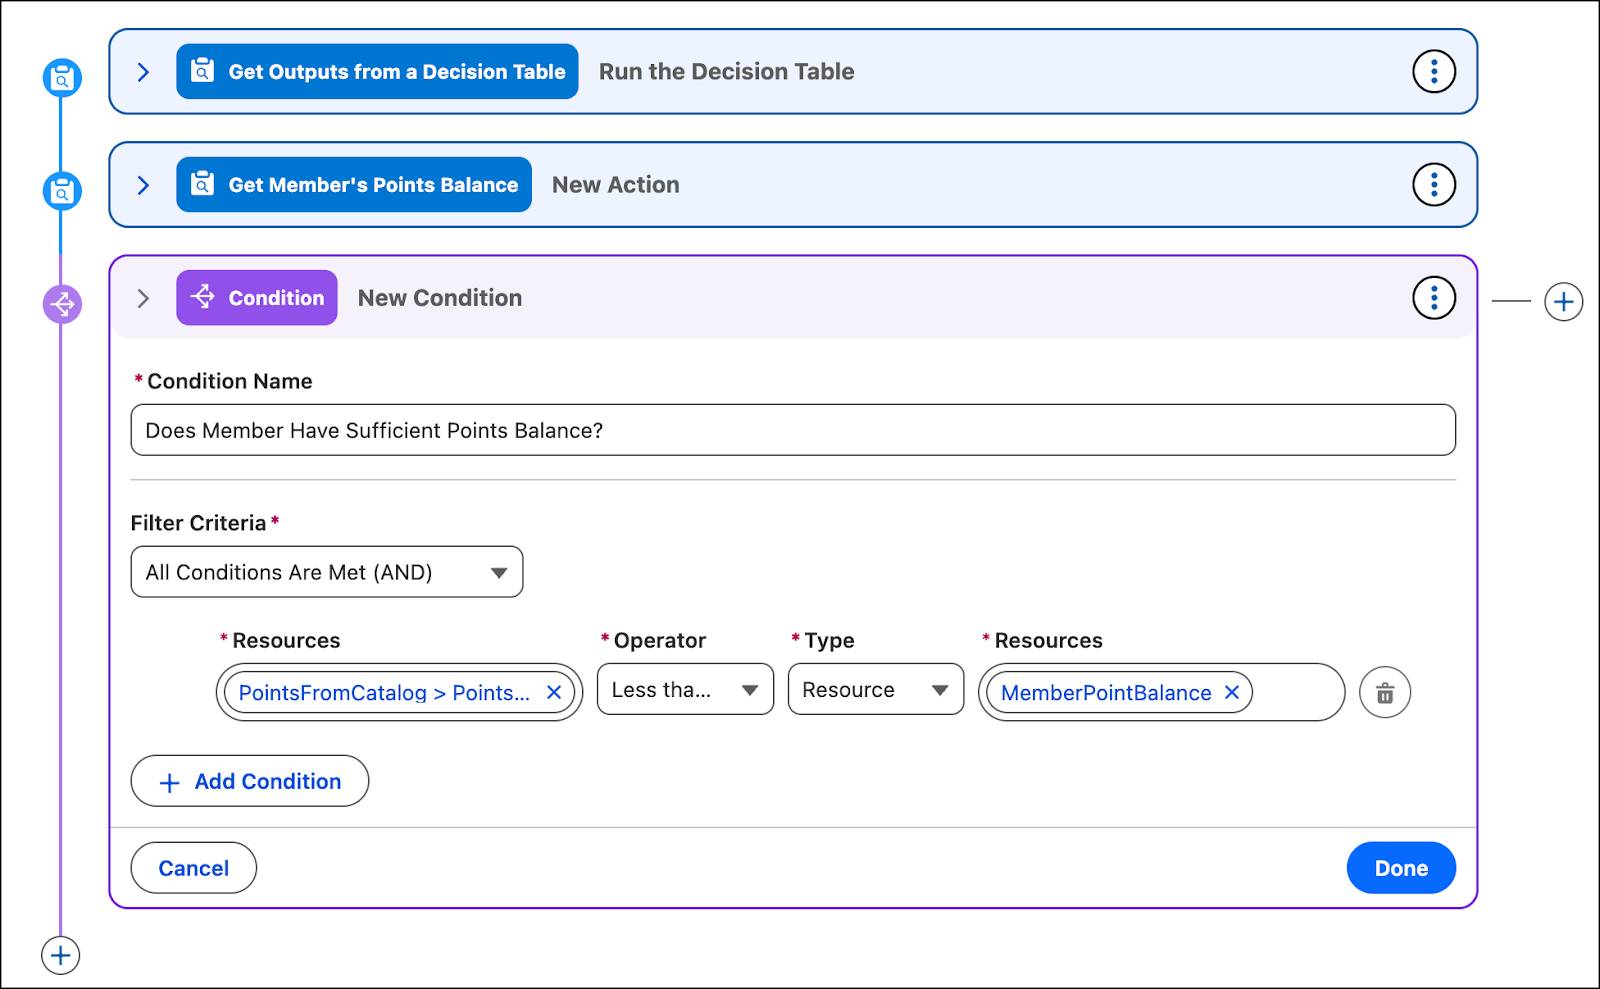
- Add the following details.
- Condition Name:
Does Member Have Sufficient Points Balance? - Resources:
PointsFromCatalog.Points__c - Operator: Less than or equal to
- Type: Resource
- Value: MemberPointBalance
- Click Done.
- Click Save.
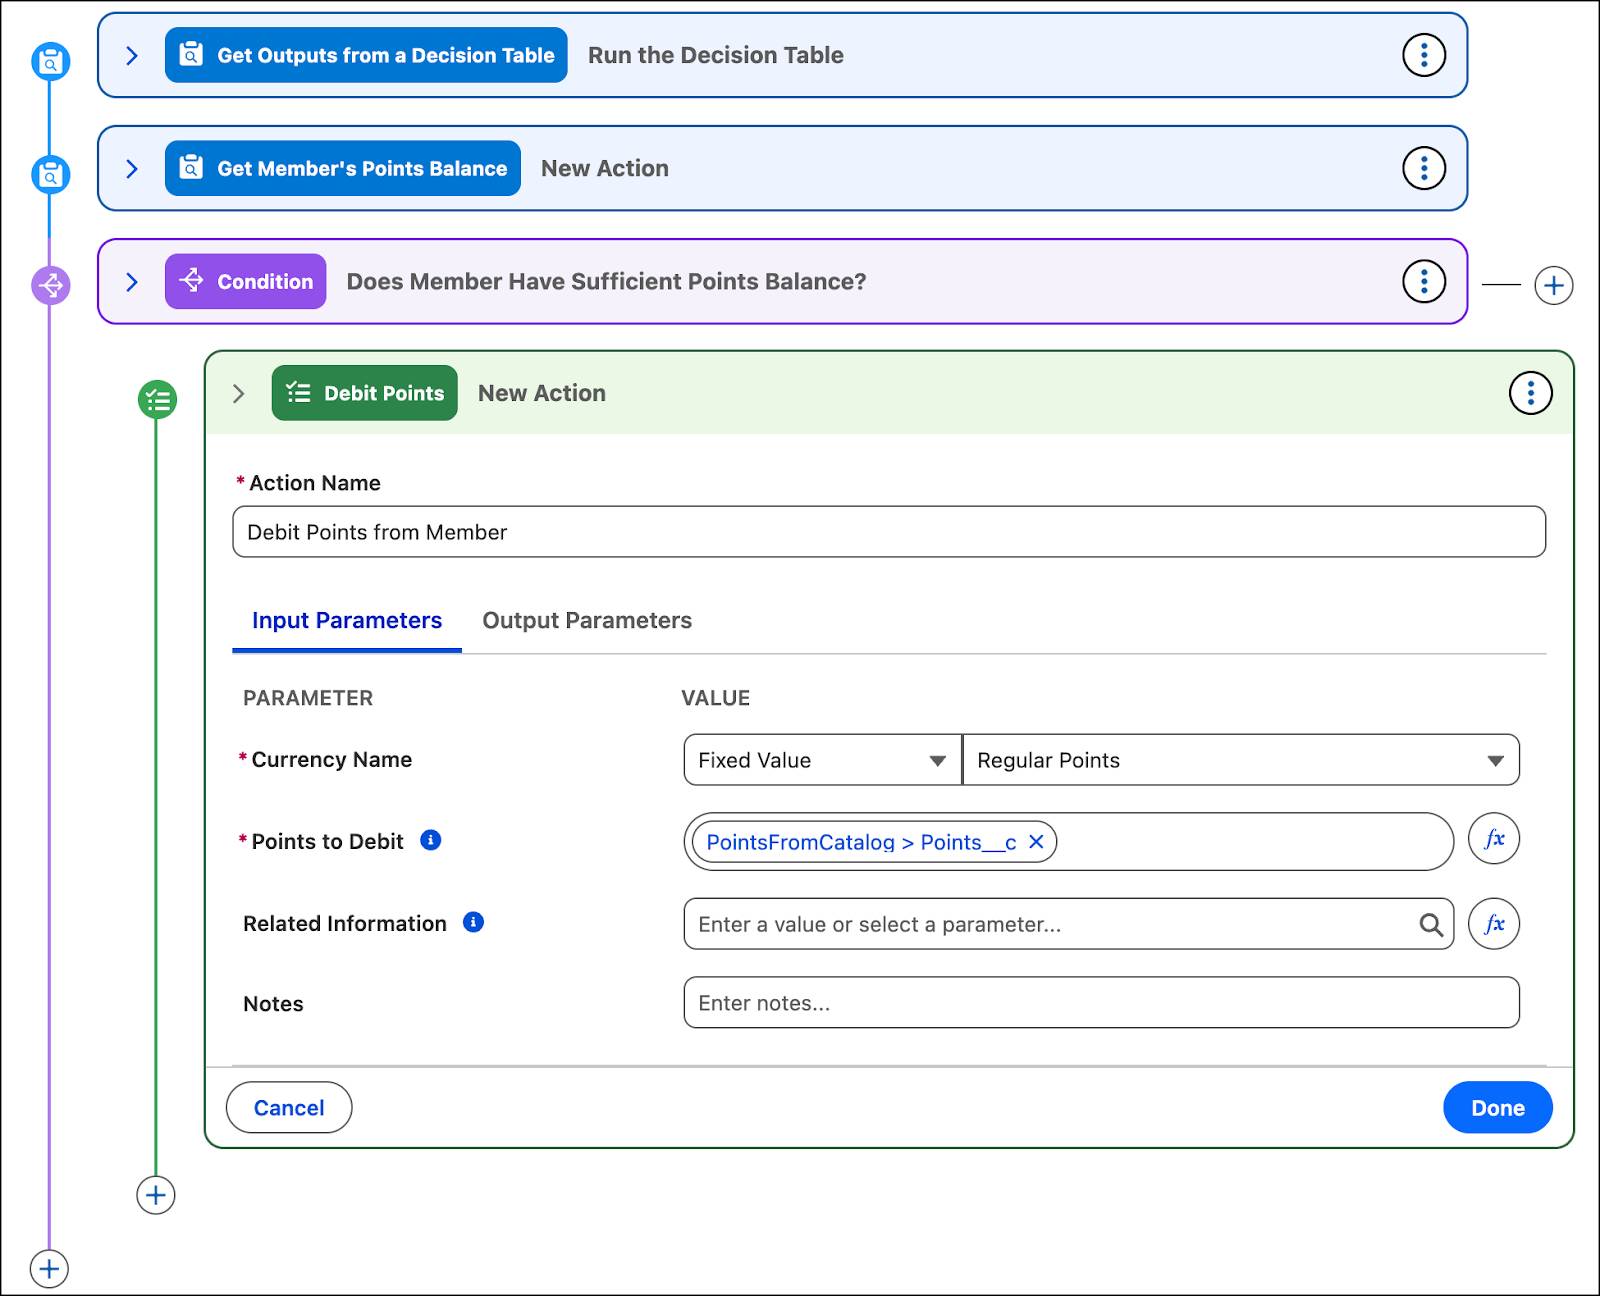
Add an Action to the Above Condition to Debit Points
- Click
 to the right (and not the left) of the condition: Does Member Have Sufficient Points Balance?
- Hover over Add Action and select Debit Points.
- Add the following values.
- Action Name:
Debit Points from Member - Currency Name: Fixed Value; Regular Points
- Points to Debit:
PointsFromCatalog.Points__c
- Click Done.
- Click Save.
Add a Condition Group to Check for a Voucher
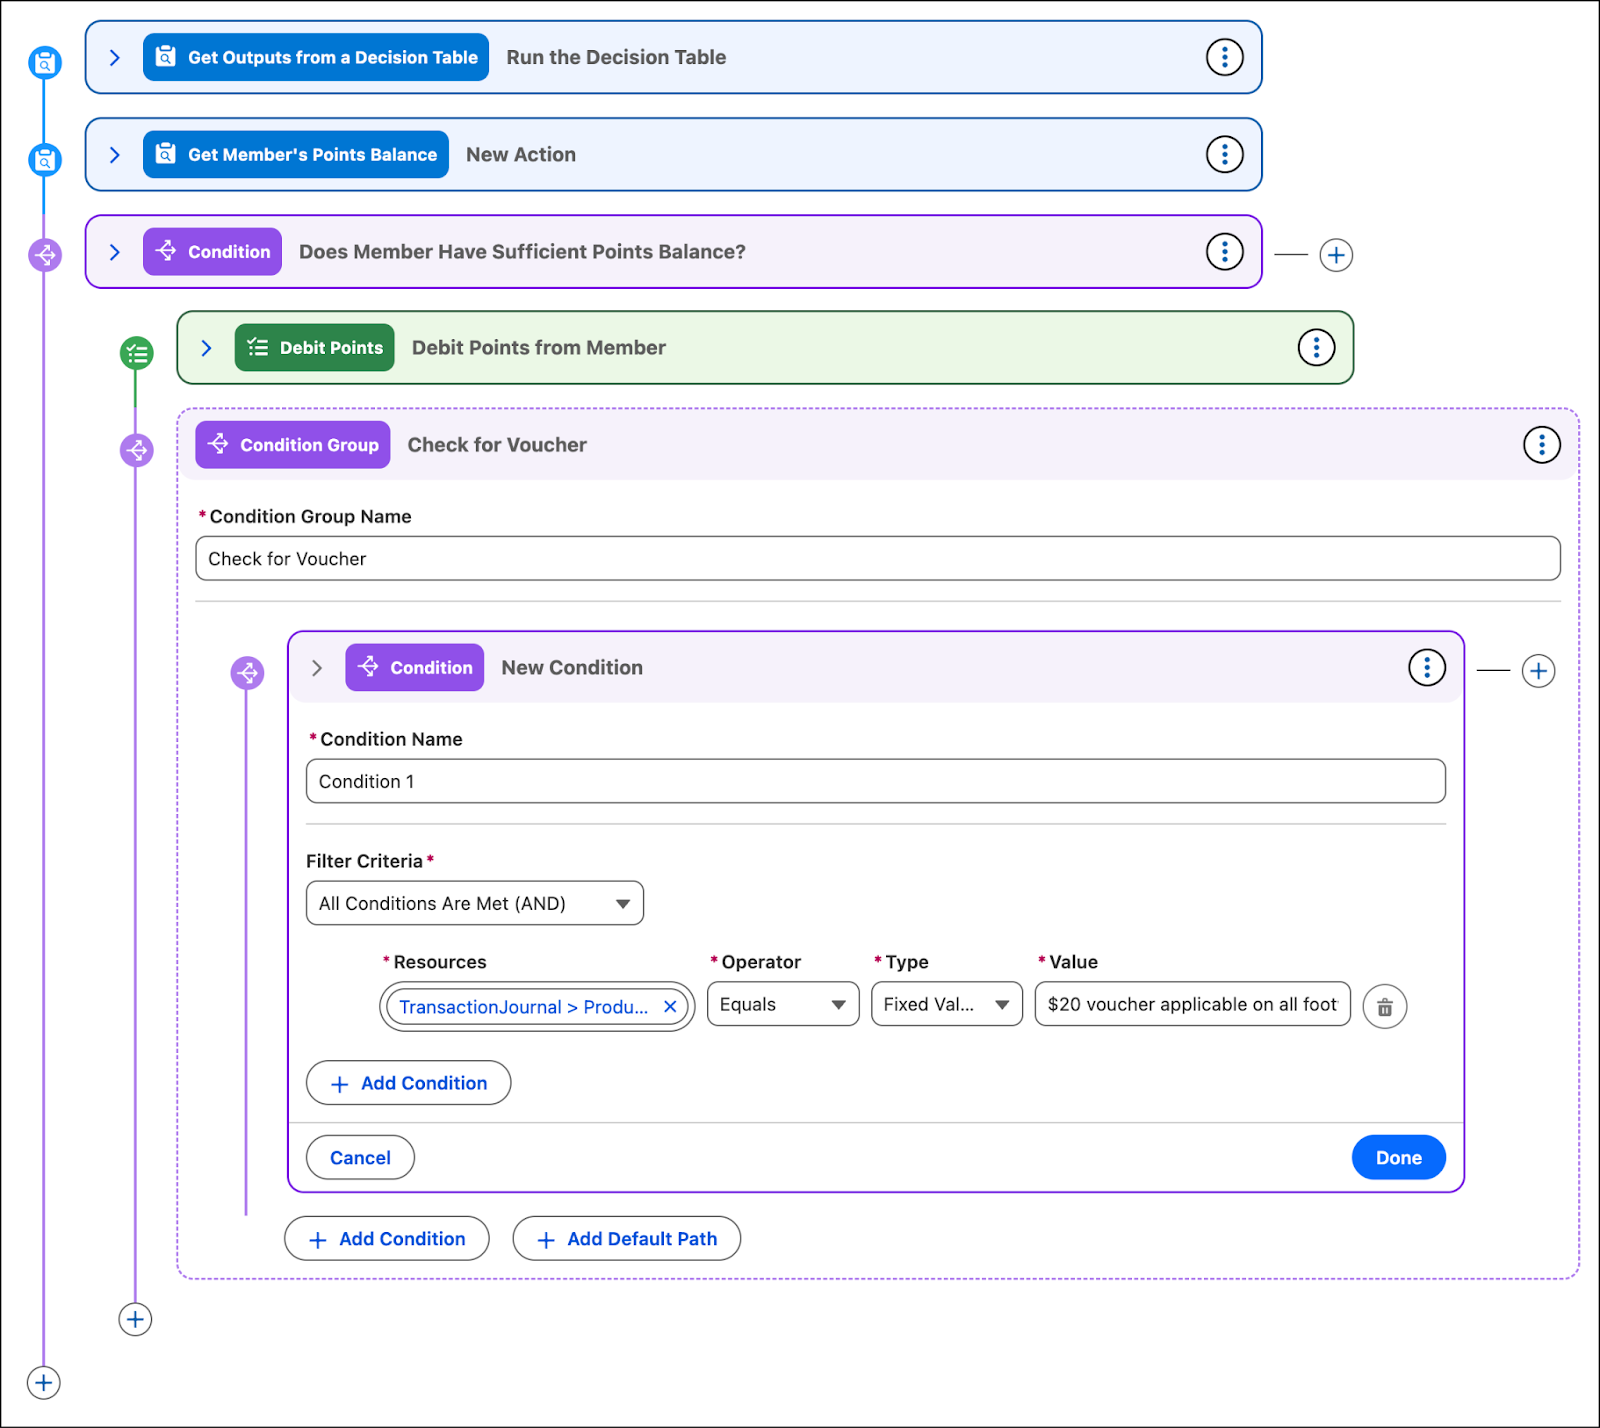
A condition group contains a set of conditions and a default path that can only contain a child action. When the condition group processes the transaction journal, it is evaluated by each condition sequentially. If the transaction journal satisfies a condition, it is no longer evaluated by the subsequent conditions. The child action triggers the selected action, which in this case is to issue the voucher.
- Click
 right below the Debit Points from Member action, and select Add Condition Group.
- Enter Condition Group Name:
Check for Voucher - Click Add Condition and add the following details.
- Condition Name:
Condition 1 - Filter Criteria: All conditions are met (AND)
- Resource:
TransactionJournal.Product.Name - Operator: Equals
- Type: Fixed Value
- Value:
$20 voucher applicable on all footwear
- Click Done.
- Click Save.
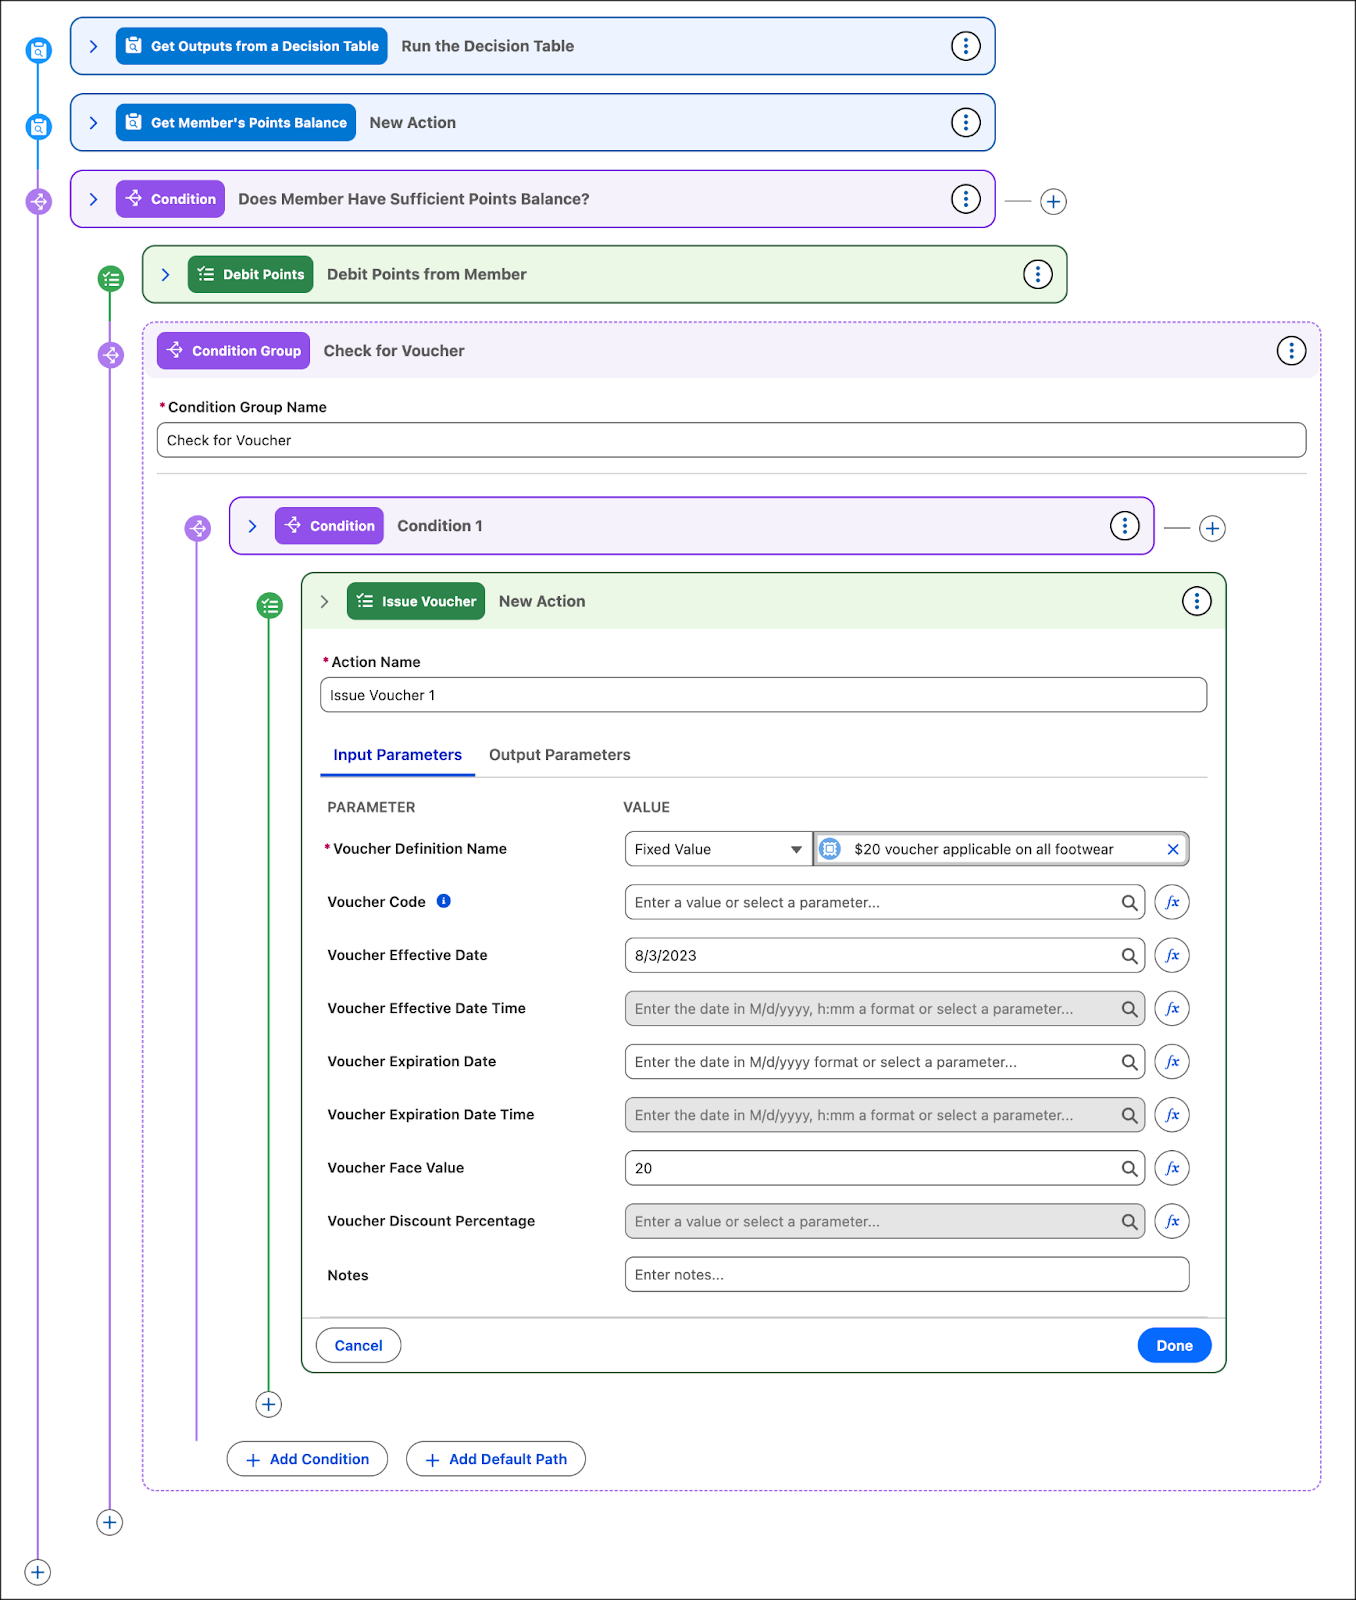
To Condition 1, Mary adds the Issue Voucher action. Anytime a voucher is issued, a code is generated that members use for redemption. Loyalty Management lets you generate codes automatically by enabling the Generate Codes for Vouchers setting in Setup. To learn more about this setting, refer to the Enable Automatic Generation of Voucher Codes help documentation.
- Click
 to the right of Condition 1.
- From the Add Action list, select Issue Voucher and add the following details.
- Action Name:
Issue Voucher 1 - Voucher Definition Name: Fixed Value, $20 voucher applicable on all footwear
The remaining voucher details are auto-populated based on the voucher definition.
- Click Done.
- Click Save.
Mary clicks Activate to activate the Rule to Debit Points rule.

With the rule in place, Mary proceeds to activate the process.
Activate the Process and Flow
Mary must activate the Debit Points for Redemptions loyalty program process and the Run Loyalty Program Process flow. Here’s how she activates the process.
- In the Cloud Kicks Inner Circle program record, click the Processes tab.
- Select Debit Points for Redemptions.
- Click Activate. In case you don’t see the Activate button, refresh the page.

Activate the Flow
In a real-world scenario, the Loyalty Program Process Connect API processes transactions in real time as soon as a member makes a transaction. The Connect API can be integrated with apps that generate transactions for a sale or service, for example, the Point of Sale (POS).
In this project, Mary processes the transactions using the Run Loyalty Program Process flow. Note that this flow has already been created. Mary navigates to the flow to activate it. Here’s what she does.
- Click
 , and select Setup.
- Enter
Flowsin the Quick Find box, and select Flows.
- Find and select the Run Loyalty Program Process flow.
- Click Activate.

You’ve seen how to set up a loyalty program process from scratch. You can also create and customize a loyalty process using templates. Check out this helpful video that explains how to customize a debit points process using a loyalty program process template.
Next, you create a transaction journal to see the redemption process in action.
Create a Transaction Journal
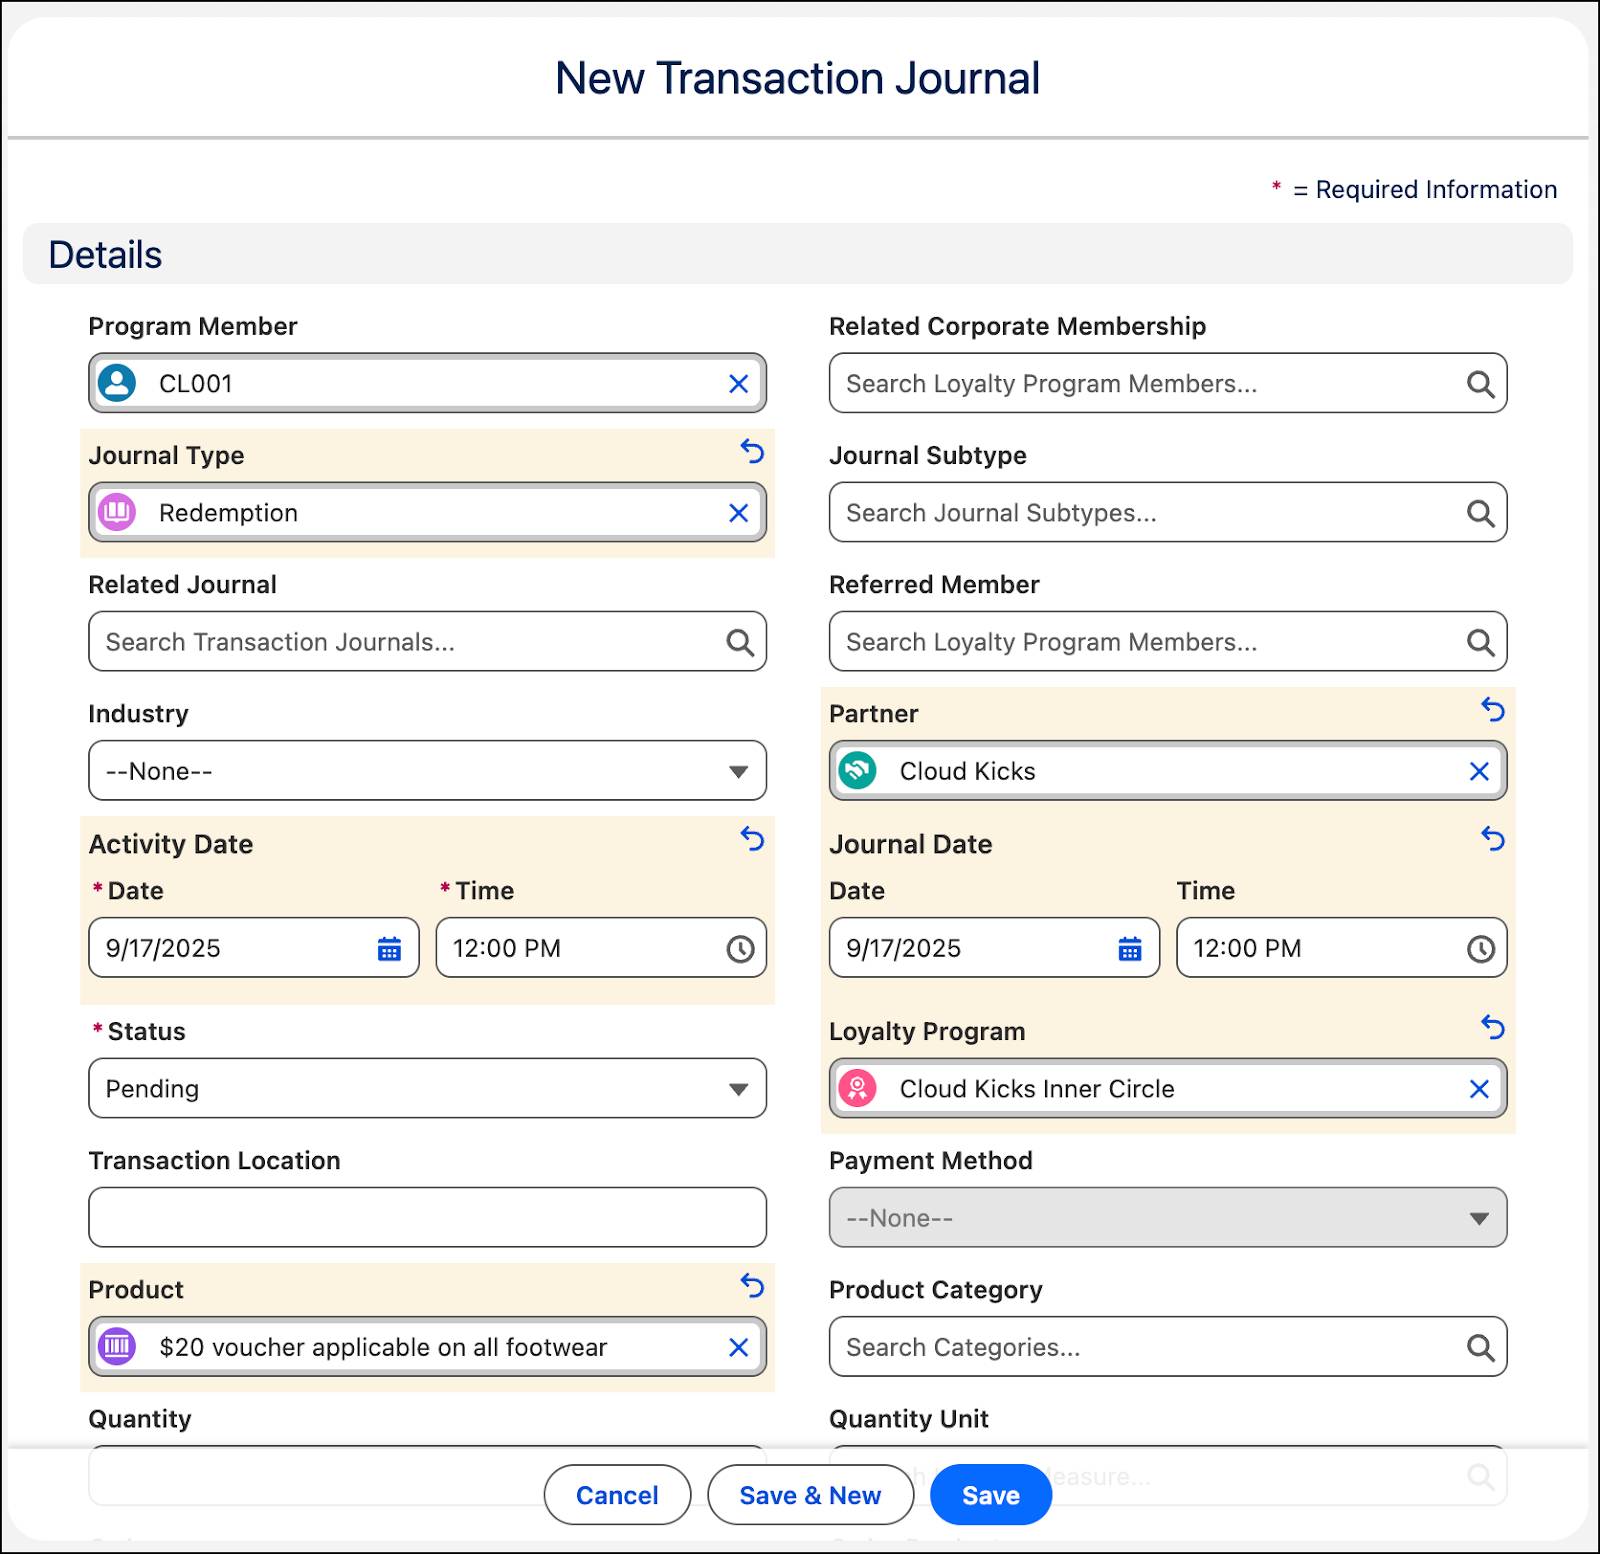
Let’s look at how points are debited and updated when a transaction is processed. Adria Darby, an Inner Circle loyalty member, wants to redeem a $20 Cloud Kicks voucher. As soon as the transaction journal is created, Adria is debited with 1000 non-qualifying points. Mary creates a transaction journal to see this in action.
- In the Loyalty Programs tab, select the Cloud Kicks Inner Circle loyalty program.
- In the Cloud Kicks Inner Circle program record, click the Members And Partners tab.
- Under Loyalty Program Members, select CL001. This record is associated with Adria Darby.
- On the Transaction Journals card, click New.
- Provide the following details.
- Journal Type: Redemption
- Partner: Cloud Kicks
- Activity Date: Current Date
- Journal Date: Current Date
- Status: Pending
- Loyalty Program: Cloud Kicks Inner Circle
- Product: $20 voucher applicable on all footwear
- Click Save.
As soon as the transaction is created, the transaction journal status changes to Processed. Mary sees that the Loyalty Ledgers card is updated with the points, and on the Vouchers card, she finds that the voucher has been issued.

Mary navigates to the Loyalty Member Currency card on the program member’s record page and sees that the non-qualifying points balance has been debited with 1,000 points.
In Conclusion
Mary is excited at the ease with which she could set up the redemption process. Now customers can seamlessly redeem products and vouchers. With Promotion Setup, you can easily create a redemption process as per your business requirements.
Resources
