Add a Channel Member and Configure Change Event Enrichment
You’ve set up a custom channel. Now, you use this custom channel to enable change event notifications for Account and to configure event enrichment.
What Is Event Enrichment?
Event enrichment lets you include unchanged fields in change events to facilitate data processing and replication. For example, use enrichment when your app needs an external ID field for matching records in an external system. Or if you want to always include a field that provides important information about a changed record.
You can select any field whose type is supported. Non-empty enriched fields are included in change event messages for update and delete operations. A field that you enrich the change event with is an enriched event field, or enriched field, for short. Event enrichment is available for channels that support multiple entities, such as the standard /data/ChangeEvents channel, or custom channels. Event enrichment is available for CometD and Pub/Sub API subscribers but not for Apex triggers because Apex triggers don't support multi-entity channels. You add enriched fields as part of a channel member.
For more information about event enrichment, see Enrich Change Events with Extra Fields and Event Enrichment Considerations in the Change Data Capture Developer Guide.
Sales Integration App Example Scenario
The integration app synchronizes Salesforce account record data changes with an ERP system that’s external to Salesforce. The app receives change events for account record changes and synchronizes the changes to the external data store. To better synchronize the changes, the events are enriched with extra fields that are always present when non-empty: External_Account_ID__c and Industry. The integration app uses the External_Account_ID__c field to match the Salesforce record with the record in the external data store. Also, the app uses the Industry field to make related changes in the external system.

Create a Custom Account Field
One of the enriched fields you set up is a custom field on Account, so create it first before proceeding to the next step.
- Click the gear icon
 and select Setup. This launches Setup in a new tab.
- Click the Object Manager tab next to Home.
- Select Account.
- Select Fields & Relationships from the left navigation, and click New.
- For Data Type, select Text, and click Next.
- Follow the field wizard to create this field.
- Field Label:
External Account ID - Length:
18 - External ID: Checked
- Leave the defaults for the remaining fields, and click Next.
- Click Next again to accept the default field visibility and security settings.
- Click Save to add the
External Account IDfield to the page layout
Enable Notifications and Add Enriched Fields
You add PlatformEventChannelMember to both enable change event notifications for Account and to add enriched fields. The notifications enablement is done through the selectedEntity field and the enriched fields are added in the enrichedFields array. The enriched fields are External_Account_ID__c and Industry.
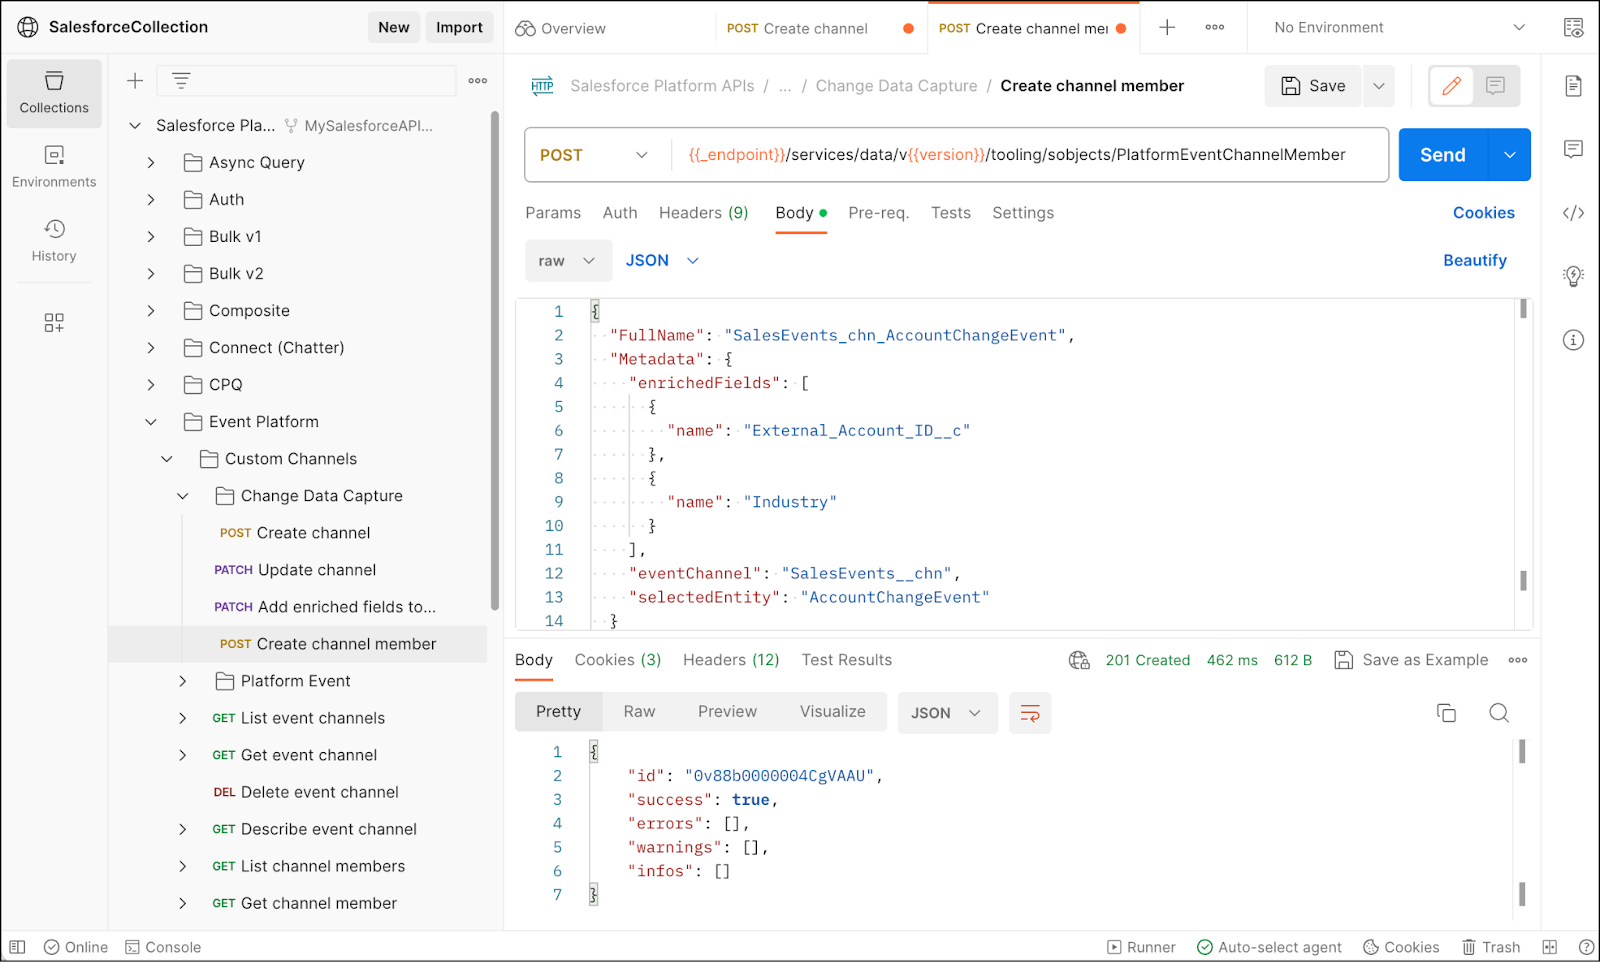
- In your fork of the Salesforce Platform APIs collection, expand Event Platform > Custom Channels > Change Data Capture, and click Create channel member.
- Click Body and ensure that raw and JSON options are selected.
{ "FullName": "SalesEvents_chn_AccountChangeEvent", "Metadata": { "enrichedFields": [ { "name": "External_Account_ID__c" }, { "name": "Industry" } ], "eventChannel": "SalesEvents__chn", "selectedEntity": "AccountChangeEvent" } } - Click Send.
- Verify that the response status is 201 Created.
The response returns the ID of the new custom channel, which looks similar to this.
{
    "id": "0v88b0000004CgVAAU",
    "success": true,
    "errors": [],
    "warnings": [],
    "infos": []
}
This image shows the request and response returned in Postman.
In this example, the selectedEntity is the Account object. The format of the selectedEntity for standard objects is <Object>ChangeEvent. For custom objects, the format is <Object>__ChangeEvent.
If the PlatformEventChannelMember already exists for the channel and the selectedEntity, you can’t overwrite it. You can update the channel member with a PATCH request, or delete it and create it again to add enriched fields. You learn how to perform an update in this project.
Query Enriched Fields
A handy Tooling API object, EnrichedField, lets you verify the enriched fields that are configured on a channel and a channel member. Use REST to query EnrichedField with Tooling API.
- In your fork of the collection, under Tooling, select Tooling Query.
- In the Params tab, add this value to the row for q:
SELECT Id,ChannelMemberId,Field FROM EnrichedField ORDER BY ChannelMemberId. The full URI looks as follows:{{_endpoint}}/services/data/v{{version}}/tooling/query/?q=SELECT Id,ChannelMemberId,Field FROM EnrichedField ORDER BY ChannelMemberId - Click Send.
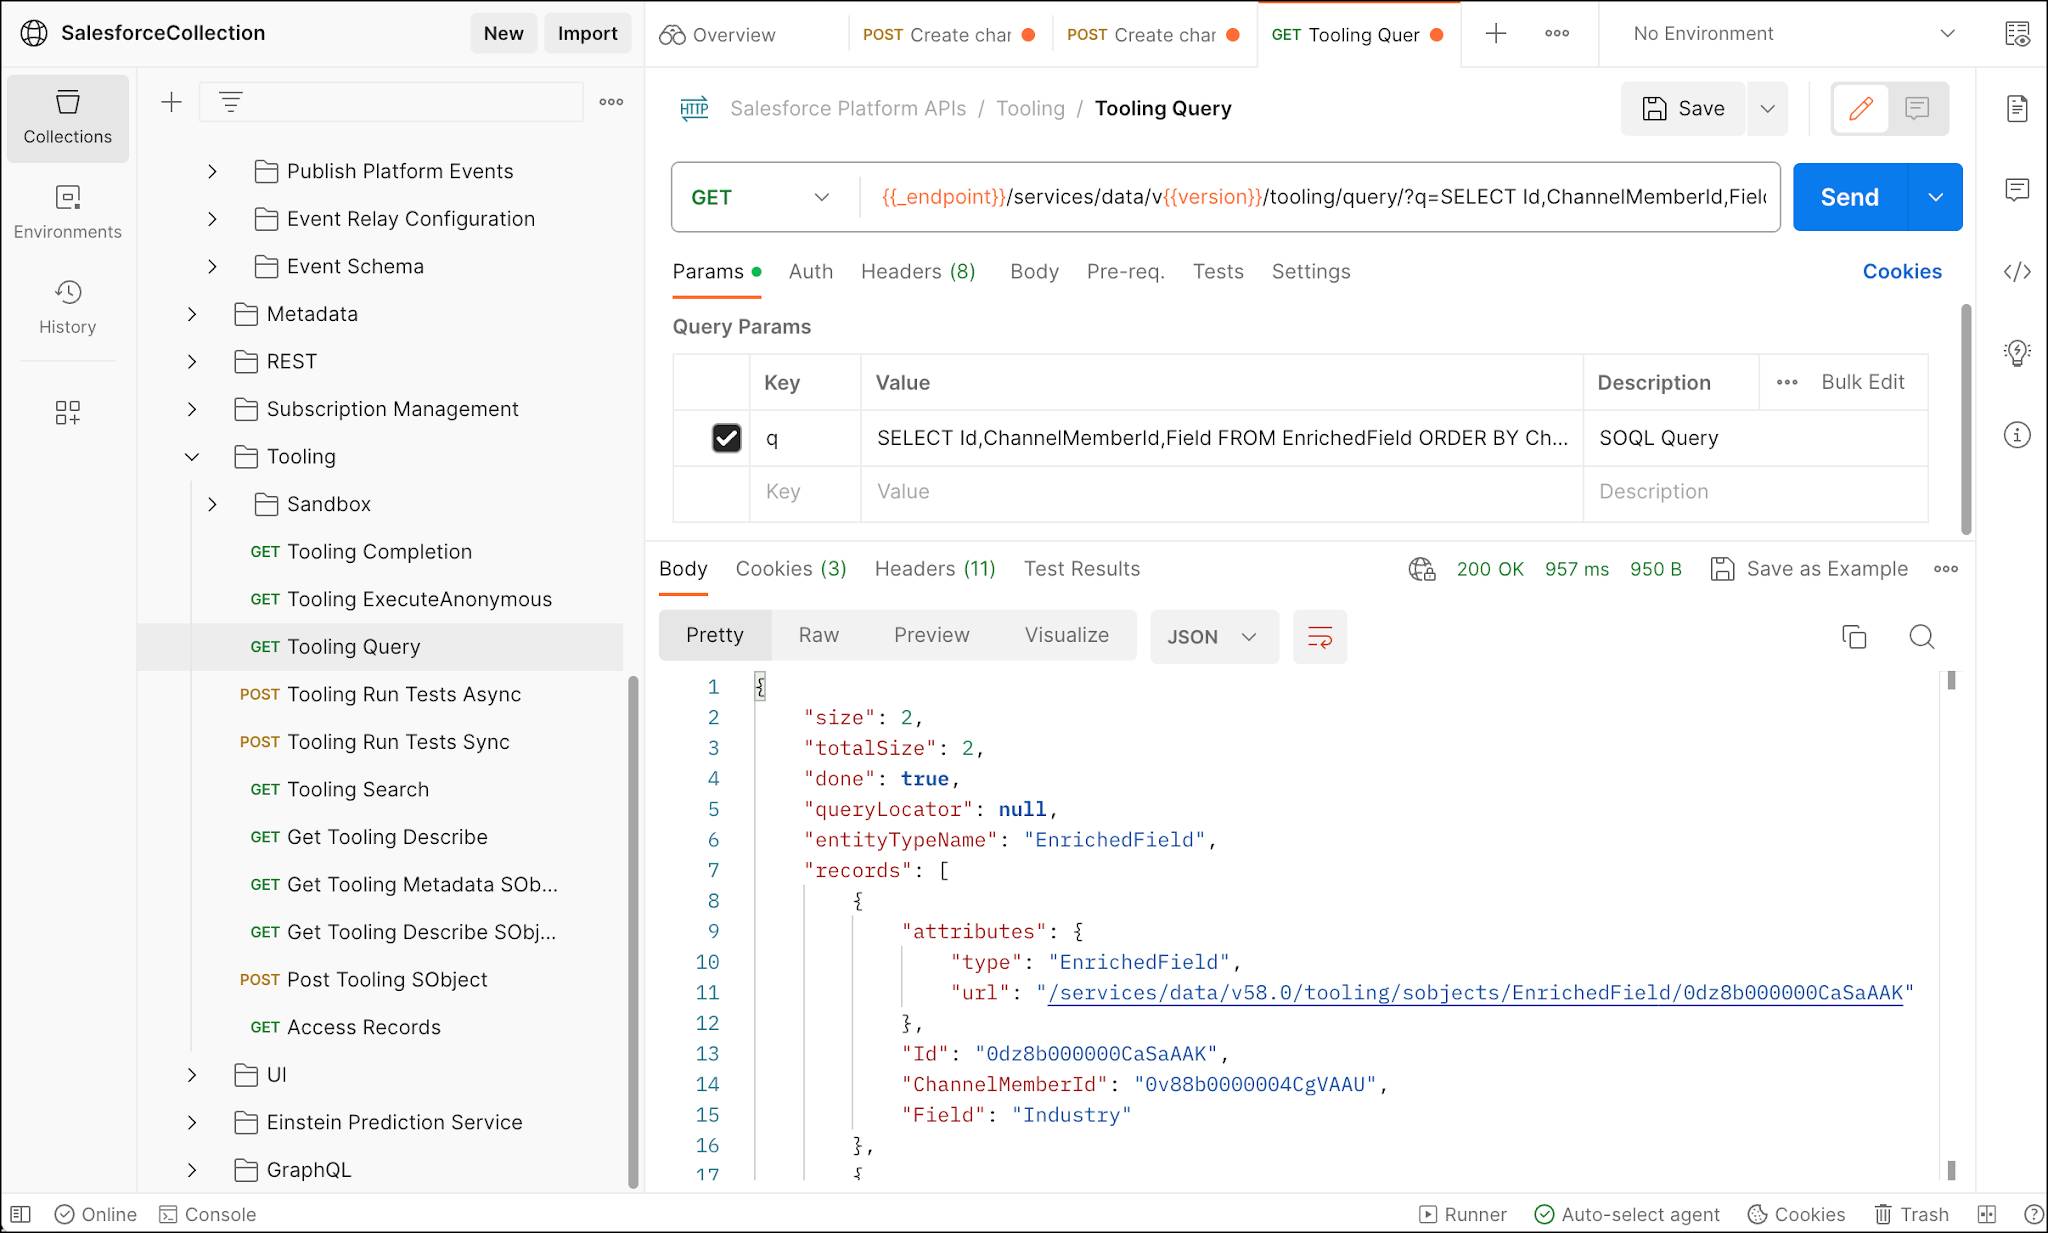
The returned response looks similar to the following example. The returned size of 2 means there are two enriched fields. Each enriched field is listed in the records array and has a channel member ID, which corresponds to the member you created in the previous step. The enriched field name is returned in Field. You can see the Industry field name listed. For the custom field, Field contains the field ID and not the name.
{
  "size": 2,
  "totalSize": 2,
  "done": true,
  "queryLocator": null,
  "entityTypeName": "EnrichedField",
  "records": [
    {
      "attributes": {
        "type": "EnrichedField",
        "url": "/services/data/v58.0/tooling/sobjects/EnrichedField/0dz8b000000CaSaAAK"
      },
      "Id": "0dz8b000000CaSaAAK",
      "ChannelMemberId": "0v88b0000004CgVAAU",
      "Field": "Industry"
    },
    {
      "attributes": {
        "type": "EnrichedField",
        "url": "/services/data/v58.0/tooling/sobjects/EnrichedField/0dz8b000000CaSZAA0"
      },
      "Id": "0dz8b000000CaSZAA0",
      "ChannelMemberId": "0v88b0000004CgVAAU",
      "Field": "00N8b00000J5pySEAR"
    }
  ]
}
For custom fields, the field name is returned as an ID. In this example, it is: "Field": "00N8b00000J5pySEAR". You can retrieve the corresponding field name by performing a Tooling API query on CustomField. For example, the following tooling query returns the field name in DeveloperName for the specified field ID: SELECT Id,DeveloperName FROM CustomField WHERE Id='<field_Id>'. If you replace <field_Id> with the Field ID value returned in the EnrichedField query, the name retrieved in DeveloperName is "External_Account_ID".
