Streamline Adding Contacts to Programs
Speed Up Program Engagement Creation
The first task for your users when they begin working with any client or program participant is to create a program engagement record.
The program engagement record connects a contact record—or whatever object records you are using to track the people, places, animals, or things you serve—with a program record. This connection is required before you start creating service delivery records for a client or program participant.

There are a few ways to change what information your users can or must collect when they create a program engagement. There are also ways to make it easier to create program engagements in bulk.
In this step you learn about these changes using a few examples. Follow along in your Trailhead Playground to verify your work at the end of this step.
Customize Add Contact to Program
To create a single program engagement for a single client, your users will probably go to that client’s contact record and click the Add Contact to Program quick action.
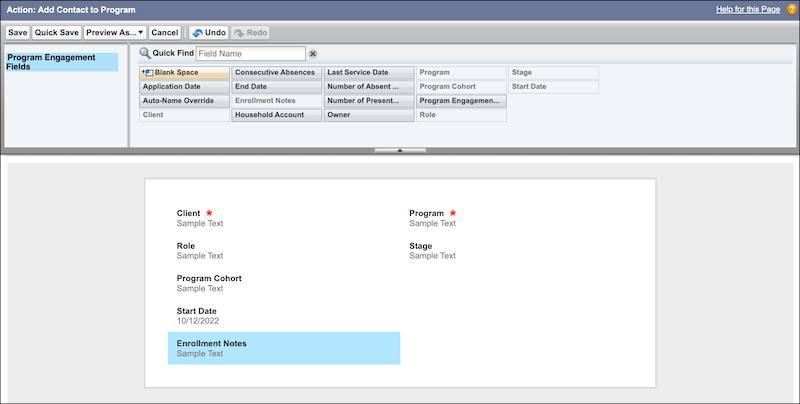
By default, the quick action layout includes a few basic fields: Program, Stage, Role, Program Cohort, and Start Date. But imagine you also wanted to provide a notes field for program staff to record details about the engagement.
First, create a new field on the Program Engagement object.
- From Setup, click the Object Manager tab.
- Find and select Program Engagement.
- Click Fields & Relationships.
- Click New.
- Select Text Area (Long) and click Next.
- Enter
Enrollment Notesin the Field Label field, make sure the Field Name field isEnrollment_Notesand click Next.
- The next page selects which profiles will be able to access the field. Program Management Standard User is selected by default, so click Next.
- Save your work.
With the new field created, add it to the quick action layout.
- From Setup, click the Object Manager tab.
- Find and select Contact from the list.
- Click Buttons, Links, and Actions.
- Click Add Contact to Program.
- Click Edit Layout.
- Drag and drop Enrollment Notes from the palette at the top of the page to the layout canvas. Place the new field just below Start Date.
- Save your work.
While you’re on the Contact object in the Object Manager, make sure the Program Management page layout is assigned to your profile. Page layouts decide what fields and sections you have access to on a record, and in what order they appear. Layouts can be customized and assigned to different user profiles.
Check that your profile, System Administrator, has the Program Management page layout assigned.
- Click Page Layouts.
- Click Page Layout Assignment.
- Notice that the System Administrator and Program Management Standard User are both assigned the Program Management Page Layout.
You’re all set with the new field, the customized quick action layout, and we know that the correct page layout is assigned. Let’s try the new quick action layout!
- From the App Launcher (
 ), find and select Program Management.
- In Global Search, find and select Zoe Blum’s contact record.
- Click Add Contact to Program.
- In the quick action layout, you’ll see the Enrollment Notes field. Specify these details to create a new program engagement record.
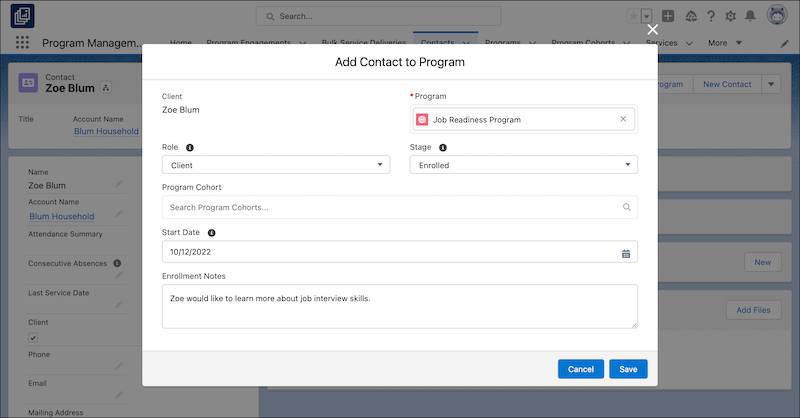
- Program: Job Readiness Program
- Role: Client
- Stage: Enrolled
- Start Date: Today
- Enrollment Note:
Zoe would like to learn more about job interview skills.
- Save your work.
Click through to the new program engagement record to see the data in the fields now. Your Enrollment Notes field should appear at the bottom of the Information section.
Enable Mass Creation of Program Engagements
What if you want to create program engagements for many contacts at the same time? For example, imagine you have a group of people who register for a class and the details will be mostly the same.
Fortunately, you can add a quick action to create multiple program engagements from the Contacts list view.
Add the quick action button first.
- From Setup, click the Object Manager tab.
- Find and select Contact from the list.
- Click List View Button Layout.
- In the List View layout row, click Show More (
 ), then select Edit.
- In the Available Actions list in the List View Actions in Lightning Experience section, select Add Contact to Program, then click
 to move it to Selected Actions.
- Save your work.
Now try your new quick action.
- From the App Launcher (
 ), find and select Program Management.
- Select Contacts in navigation.
- Click List View.
- Click Recently Viewed and select the All Contacts list view.
- Click the Name column header to sort alphabetically so that the names beginning with A are first.
- Using the checkboxes in the list view, select Aldegund Sokolov, Aldous Wong, and Alexandra Ventresca.
- Click Add Contact to Program in the list view quick actions. If you can’t find it right away, it may be under Show more actions (
 ).
).
- In the Add Contact to Program menu, specify these details:
- Program: Job Readiness Program
- Role: Client
- Stage: Applied
- Program Cohort: If your organization uses cohorts, it’s best to assign engagements to a cohort at this step. We’ll leave this blank, though, to show you another feature in the next section.
- Save your work.
- Click OK on the confirmation message.
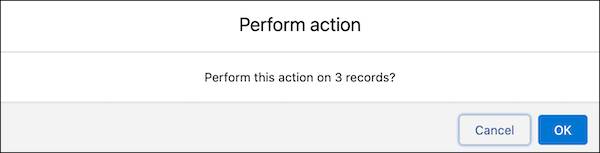
Just like that, you’ve created three new program engagement records. You can check them out by selecting one of the contacts you just added, and viewing the Program Engagements related list.
This quick action is especially helpful when paired with custom list views. Set up a list view for your users on shared criteria—such as clients’ ages, where they live, or their grade level—and users can add many similar contacts to a program quickly using the button. Check out the Lightning Experience Customization badge in Resources for more on custom list views.
Enable Mass Program Cohort Updates
Program cohort records are useful if you need to group similar program engagements. For example, a program cohort may include engagements that receive services at the same location, start a program at the same time, or are at the same grade level.
Your users might link a program engagement to a group when they create the engagement. You can also help them add many existing program engagements to a cohort at once.
You can do this two ways: Place the Add to Program Cohort button on the program engagement list view, or enable inline editing on list views. We cover adding the button here, and you can check out the instructions for inline editing in the PMM Configure Cohort Mass Update Help article.
Let’s get started.
- From Setup, click the Object Manager tab
- Find and select Program Engagement from the list.
- Click List View Button Layout.
- In the List View row, click Show More (
 ), then select Edit.
- In the Available Actions list in the List View Actions in Lightning Experience section, select Add to Program Cohort, then click
 to move it to Selected Actions. If it’s already there, you don’t have to change anything!
- Save your work.
Now that you set up the button, try it out.
- From the App Launcher (
 ), find and select Program Management.
- Click Program Engagements in navigation.
- Click Recently Viewed and select the All list view.
- Click
 then Select Fields to Display.
- Select Program Cohort then click
 to add it to the list view.
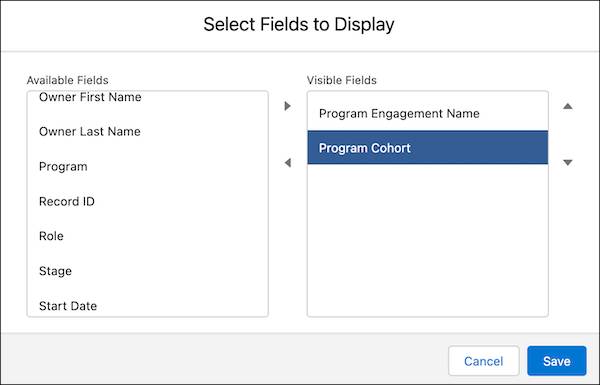
- Save your work,
- Back on the list view, use the checkboxes to select the Job Readiness program engagements for Aldegund Sokolov, Aldous Wong, and Alexandra Ventresca. Remember, you could have added them to a cohort when you created the engagements, but we left that field blank to demonstrate this feature.
- Click Add to Program Cohort in the list view quick actions. If you don’t see it, it may be under
 .
.
- In the Add to Program Cohort menu, find and select Eastgate in the Program Cohort field.
- Save your work.
- Click OK on the confirmation message.
In this step you helped your users more efficiently create program engagements and add them to program cohorts. In the next step, we cover ways to better track service deliveries.
First, be sure to check your work by clicking Verify below.
Resources
- Salesforce Help: PMM Customize Fields on the Add Contact to Program Action
- Salesforce Help: PMM Enable Mass Program Engagement Creation
- Salesforce Help: PMM Configure Cohort Mass Update
- Trailhead: Lightning Experience Customization