Add Attendance Summary Data
Attendance Data At-a-Glance
Service schedules and attendance are some of users’ favorite tools in Program Management Module (PMM) because they speed up entering the large amounts of data that programs tend to generate.
To put that data to use, PMM includes several roll-up summary fields that tally attendance on contact, program engagement, service, and service session records.
That means you can check how many sessions a client or program participant attended (or missed) across all their engagements on their contact record. You can also see how often they attend sessions in just one program engagement, or see how many clients attend any one service session.
This is a helpful feature, but it takes a little setup. In this unit, you configure this feature on the Service Session object, though you can follow the same steps for any of the other supported objects.
Set Attendance Service Delivery Summary Field Triggers
The service delivery summary fields are turned off by default. The first step to adding the fields is turning on the triggers that incrementally increase the summary fields as each new service delivery is created.
- From Setup, in the Quick Find box, enter
metadata, and then select Custom Metadata Types.
- Click Feature Gate.
- Click Manage Feature Gates.
- From the View picklist, select All.
- Click Edit next to the summary field you want to use. For this example, click Edit in the row for Roll up Svc Deliveries to Svc Session.
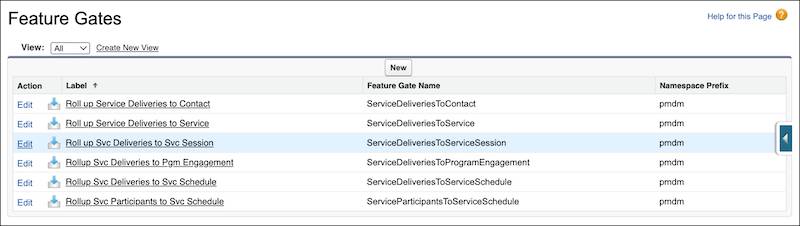
- Select Feature Active.
- Save your work.
In practice, you could repeat these steps for each set of object service delivery summary fields you want to activate—such as Roll up Service Deliveries to Service, Roll up Service Deliveries to Contact, and Rollup Svc Deliveries to Pgm Engagement. We won’t do all that in this example.
Create a Scheduled Job to Recalculate Summary Fields
In addition to the triggers, you must set up a scheduled job to regularly recalculate the summary fields to make sure your information is up to date. While the triggers incrementally increase the existing summary fields as each new service delivery record is created, the scheduled batch jobs fully recalculate all service delivery records. To ensure that your calculations are up to date and accurate, schedule the jobs to run weekly or monthly—and wait until your first batch job to run before you consider the data in these fields to be reliable.
You should schedule a job for each trigger you activate, so schedule one now for the service session record.
- In Setup, enter
apex classesin the Quick Find box, then select Apex Classes.
- Click Compile All Classes. It will take a minute or two to work. When it’s done, you’ll receive a message that the compilation was successful.
- After the confirmation message appears, click Schedule Apex.
- For Job Name, enter
Service Delivery to Service Session Rollup.
- Next to the Apex Class field, click
 .
.
- In the new window, find and select SessionRollupsSchedulable. In this example, you’re setting up the session fields, but you would select one of the other schedules if you were setting up another object.
- Back on the Schedule Apex window, set the values in the Schedule Apex Execution section. You should select a time when your users won’t be working with service delivery records. Specify these details.
- Frequency: Weekly
- Recurs every week on: Sunday
- Start: Leave the default value of today
- End: Set one year from today
- Preferred Start Time: 2:00 AM
- Save your work.
Now verify your scheduled job. Enter scheduled jobs in the Setup Quick Find box, then click Scheduled Jobs. The job you just created—Service Delivery to Service Session Rollup—should be listed in the table.
Add Attendance Summary Fields to Page Layouts
Now that the automation that populates the summary fields is active, let’s add the fields to the page layout. We set up the Service Session object here.
- In Setup, click the Object Manager tab.
- Find and select Service Session.
- Click Page Layouts.
- Click Service Session Layout.
- Drag and drop a new Section from the palette to the page layout after the Information section.
- Enter
Attendancein the section name and click OK.
- The fields you want to add to the page may be in the palette or already on the page. Regardless, you can find them using the Quick Find field in the palette. Drag these attendance fields to the new Attendance section:

-
Attendance Summary
-
Attendance Rate
-
Number of Present Service Deliveries
-
Number of Absent Service Deliveries
- Because all four of the fields are automatically updated and shouldn’t be modified by users, make them all read-only.
- Hover over one of the fields and click
 .
.
- Select Read-Only.
- Click OK.
- Repeat the processes for all of the fields in your new section until
 appears next to all of them.
- Save your work.
The fields are in place. Check them out on a service session record.
- From the App Launcher (
 ), find and select Program Management.
- Go to the Recent Sessions component on the Program Management home page and click on a pending service session. You may need to change the List View to All for the sessions to appear.
- Notice the fields in the new Attendance section on the page layout. All four should be empty.
- Go to the Track Attendance component, mark one client with an Attendance Status of Excused Absence, leave the other clients with an Attendance Status of Present, and click Submit.
- Check the fields to see the calculations at work.
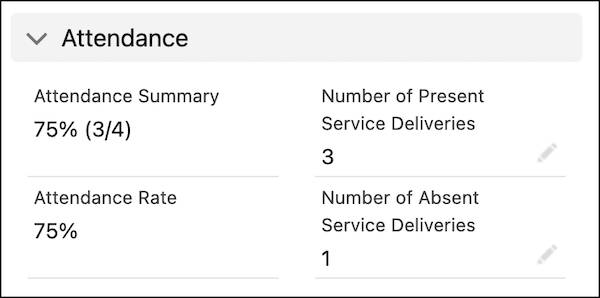
The summary field triggers worked automatically to update the fields on the service sessions.
You may notice that we likely won’t need all these fields. The Attendance Summary field includes the attendance rate and number of present service delivery information in a more compact format. In this example, we wanted to show you all the fields so you can choose what’s right for your organization. Even if all four fields aren’t on a page, you can use them for reports.
Configure Absent and Present Values for Attendance Summary Fields
PMM includes three attendance statuses by default: Present, Excused Absence, and Unexcused Absence. As we mentioned in the last unit, you can add other options as needed.
If you add other options, you need to indicate if those values should be counted as absent or present values for the purposes of the attendance summary fields.
We won’t do that here, but check out the Configure Service Delivery Summary Data link in Resources for details and instructions.
Report on Program Data
Attendance summary fields are just one simple example of the reporting and data analysis you can do using PMM. As you near the end of this badge, make a note to return to Trailhead soon to complete the Data Analysis with Program Management Module badge linked in Resources. That would be a perfect next step to learn how program data can help drive decisions at your organization.
Good luck on your journey administering PMM! Be sure to click Verify to check your work in this step and earn your badge.
Resources
- Salesforce Help: Configure Service Delivery Summary Data
- Salesforce Help: Schedule Apex Jobs
- Trailhead: Data Analysis with Program Management Module (PMM)