Build a Vertical Navigation Menu
What You’ll Do
The company logo is looking good, so next we want to add a vertical navigation menu to the sidebar.
In this step, you’ll:
- Create a new navigation component that extends the abstract forceCommunity:navigationMenuBase component.
- Test the new component with a simple unordered list.
- Add a click handler to the component’s controller method.
Create and Test the Navigation Component
- In the Developer Console, click File | New | Lightning Component.
- Name the component verticalNav and click Submit.
- Replace the component contents with this code.Code Highlights:
<aura:component extends="forceCommunity:navigationMenuBase">
   <ul>
       <aura:iteration items="{!v.menuItems}" var="item">
           <li>{!item.label}</li>
       </aura:iteration>
   </ul>
</aura:component>
- Extending the abstract forceCommunity:navigationMenuBase component gives the new component automatic access to all the navigation menu items defined in the site's Navigation Menu component. Admins can define and update the items in the Navigation Menu in Experience Builder.
- To show the menu in action, this simple unordered list iterates through an array of menuItems, which is defined in the extended abstract component, and outputs <li> for each entry in the array.
- Save verticalNav.cmp.
- In the markup for condensedThemeLayout.cmp, replace <!-- placeholder for navigation --> with <c:verticalNav></c:verticalNav> in the third slds-col container. Your component now looks like this.
<aura:component implements="forceCommunity:themeLayout"> <aura:attribute name="search" type="Aura.Component[]"/> <aura:attribute name="sidebarFooter" type="Aura.Component[]"/> <div class="slds-grid slds-grid--align-center"> <div class="slds-col"> <div class="slds-grid slds-grid--vertical"> <div class="slds-col"> <div class="logoContainer"></div> </div> <div class="slds-col"> {!v.search} </div> <div class="slds-col"> <c:verticalNav></c:verticalNav> </div> <div class="slds-col"> {!v.sidebarFooter} </div> </div> </div> <div class="slds-col content"> {!v.body} </div> </div> </aura:component> - Save condensedThemeLayout.cmp.
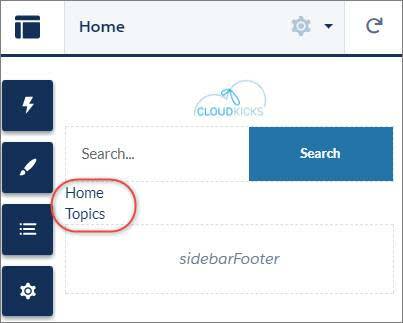
- Return to Experience Builder and refresh the page to see the vertical navigation menu with bullet points for each menu item. The new menu uses the same dataset that drives the default navigation menu in a site.
- Now let’s go back to verticalNav.cmp and add some polish. In the Developer Console, replace the unordered list with the following code.Code Highlight This code takes advantage of aura expression syntax to do some nifty things. You can conditionally add the slds-is-active class to the list item depending on whether the item is active. You also set the data-menu-item-id to be the item’s unique ID, which you can use later to navigate to the corresponding item. In this way, you need only one click listener for the entire list, instead of adding one for each list item.
<aura:component extends="forceCommunity:navigationMenuBase">
   <div class="slds-grid slds-grid--vertical slds-navigation-list--vertical">
       <ul onclick="{!c.onClick}">
           <aura:iteration items="{!v.menuItems}" var="item">
               <li class="{!item.active ? 'slds-is-active' : ''}">
                   <a href="javascript:void(0);" data-menu-item-id="{!item.id}" class="slds-navigation-list--vertical__action slds-text-link--reset">
                       {!item.label}
                   </a>
               </li>
           </aura:iteration>
       </ul>
   </div>
</aura:component>
- Save verticalNav.cmp.
Add a Click Handler
- Open the verticalNav component’s controller method by clicking Controller on the right-hand side of the Developer Console.
- Replace the controller contents with this click-handler code.Code Highlight: Note the JavaScript syntax for accessing data attributes on HTML elements, which allows you to get that item’s ID.
({
   onClick : function(component, event, helper) {
       var id = event.target.dataset.menuItemId;
       if (id) {
           component.getSuper().navigate(id);
        }
  }
})
- Save verticalNavController.js.
Add CSS to the Custom Theme Layout Component
To get everything looking peachy, we need to remove some unwanted margins from the theme layout component and set the main content width.
- If it’s not already open, open condensedThemeLayout.css.
- Add the following additional CSS rules below the CSS that you added previously.
.THIS .slds-col .ui-widget { margin: 16px 0; } .THIS .slds-col.content { width: 1140px; } - Save the file.
- Return to Experience Builder and refresh the page to check out your menu improvements.
