Create a Custom Theme Layout Component
What You’ll Do
In the previous step, we talked about how theme layout components work from the Experience Builder perspective. Now let’s look at how theme layout components work from the Developer Console perspective.
In this step, you create a basic theme layout component in the Developer Console, and use it in Experience Builder to transform the overall structure of your Experience Builder site’s pages.
You’ll:
- Add an interface to your theme layout component and define its regions.
- Add a design resource to the theme layout component.
- Test your component in Experience Builder.
Define Your Theme Layout Component
- In Experience Workspaces, click Builder to open Experience Builder.
 Experience Builder is where you edit the pages of your Experience Builder site. Developer Console is where you create the custom Lightning components that you can use on your site's pages.
- Click
 Settings | Developer and then click Developer Console.
- In the Developer Console, click File | New | Lightning Component.
- Name the component condensedThemeLayout and click Submit. In this case, don’t select Experience Builder Site Page because you’re not creating a drag-and-drop component. We’ll cover that in a later step.
- Replace the contents of the component with this code.Code Highlights
<aura:component implements="forceCommunity:themeLayout">
    <aura:attribute name="search" type="Aura.Component[]"/>
    <aura:attribute name="sidebarFooter" type="Aura.Component[]"/>
    <div class="slds-grid slds-grid--align-center">
        <div class="slds-col">
            <div class="slds-grid slds-grid--vertical">
                <div class="slds-col">
                <!-- placeholder for logo -->
                </div>
                <div class="slds-col">
                    {!v.search}
                </div>
                <div class="slds-col">
                <!-- placeholder for navigation -->
                </div>
                <div class="slds-col">
                    {!v.sidebarFooter}
                </div>
            </div>
        </div>
        <div class="slds-col content">
            {!v.body}
        </div>
    </div>
</aura:component>
- To appear in Experience Builder in the Settings | Theme | Configure area, a theme layout component must implement the forceCommunity:themeLayout interface.
- Add {!v.body} wherever you want the content, which changes from page to page, to appear within the theme layout component.
- Attributes declared as Aura.Component[] and included in your markup are rendered in the theme layout component as open regions, which form the basic structure of your theme layout. Users can add drag-and-drop components to these regions in Experience Builder.
- The code uses the SLDS grid system to add structure to the layout.
- Save condensedThemeLayout.cmp.
Add a Design Resource
A design resource controls which component attributes, such as UI labels or configuration properties, are exposed in Experience Builder. The design resource lives in the same folder as your .cmp resource, and describes the design-time behavior of the Lightning component—information that visual tools need to display the component in a page or app.
- Create a .design resource for condensedThemeLayout.cmp by clicking Design on the right-hand side of the Developer Console.

- To give the component a UI label, replace the contents with this code.
<design:component label="Condensed Theme Layout">
</design:component>
- Save condensedThemeLayout.design.
Verify the Condensed Theme Layout
Nice work so far! Let’s quickly test the new theme layout component to see how its structure looks on the page.
- In Experience Builder, refresh the browser page.
- Click Settings | Theme | Configure.
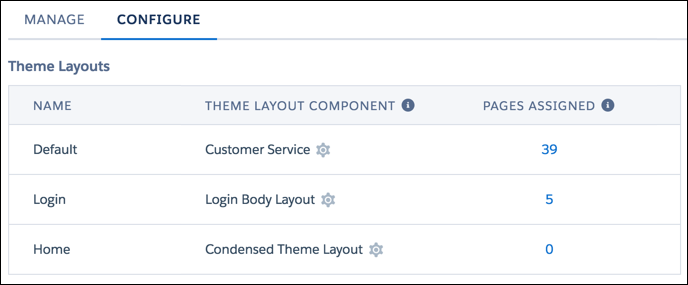
- Click New Theme Layout, name it Home, and select the Condensed Theme Layout component.

- Click Save.
- Open the Page Properties for the Home page by clicking the settings cog (
 ) on the top toolbar.
- Change the content layout to 2 columns; 1:1 ratio and click OK in the dialog that appears.
- Select Override the default theme layout for this page.
- Select Home in the Theme Layout dropdown.

The page refreshes, and now you can see your new theme layout component in action! Let's take a closer look at the layout of the page. You no longer have a header (1), which used to contain the navigation, search, profile menu, and logo. And you have two new regions on the left-hand side—search (2) and sidebarFooter (3). 
Notice how the template’s default search component appears in the search region? It appears there because search is a special, designated region name. When you declare search as an attribute name value, your custom theme layout component automatically reuses the template’s default search component.
Whenever you or other users switch the theme layout component of a template, the value of the search region’s content sticks around (as long as the new theme layout component also includes a search region, that is). It also means that you can swap the default search component with a custom search component. But let’s not get ahead of ourselves...we’ll cover that in a later step.