Share Data Using an Account Relationship
Follow Along with Trail Together
Want to follow along with an expert as you work through this step? Take a look at this video, part of the Trail Together series. The clip starts at the 53:35 minute mark, in case you want to rewind and watch the beginning of the step again.
Create Account-to-Account Business Relationships
Maria isn’t done setting up the necessary business processes for Ursa Major partners. She realizes that she needs more granular control over what information she’s sharing between partner accounts. She decides to use account relationships to meet these business needs.
When to Use Account Relationships
Account relationships are great when you need to set up a business relationship between two of your partner accounts. Let’s say that you have a distributor who needs access to a subset of the customer accounts owned by his reseller so that he can effectively support them. Or you have a distributor who needs to collaborate with a reseller on specific deals. Or maybe you were thinking of using Apex sharing for account-to-account sharing.
These examples are perfect for the account relationship feature.
Check Opportunity Data Visibility
Maria’s use case comes directly from Ursa Major’s channel account manager, Maya Pasqua. Maya wants Express Logistics and Transport partner users to see all the opportunities associated with the Pyramid Construction reseller account.
Before you solve for this use case, do some groundwork to make sure that Pyramid Construction opportunities aren’t already visible to Express Logistics and Transport partner users. To do that, convert the Pyramid Construction account into a partner account and change the owner of the Pyramid Construction opportunity to a partner user on the account.
- From the App Launcher, select Accounts.
- Select the All Accounts list view.
- Click Pyramid Construction Inc.
- From the quick actions dropdown menu, select Enable as Partner.
- In the confirmation dialog, click Enable As Partner.
- In the Contacts related list, click Pat Stumuller.
- From the quick actions dropdown menu, select Enable Partner User.
- Change the following in the New User detail page.
- Email: [Enter your email address so you can get login information for your newly created users.]
- Username: [unique username in an email format]
- User License: Partner Community
- Profile: Partner Community User

- Deselect Salesforce CRM Content User.
- Deselect Receive Salesforce CRM Content Email Alerts.
- Select the Generate new password and notify user immediately checkbox.
- Click Save and OK.
- Navigate back to the Pyramid Construction account.
- Click the Pyramid Emergency Generators opportunity, and from the quick actions dropdown menu, select Change Owner.
- Change the owner from yourself to Pat Stumuller. If you can’t find Pat, change the search target to Partner Users.
- Click Submit.
Now log in to the partner portal as Babara Levy to check if you can see any Pyramid Construction opportunities.
- From the App Launcher, select Contacts.
- Select Babara Levy.
- From the quick actions dropdown menu, select Log in to Experience as User.
- In the portal, select Sales | Opportunities from the navigation menu.
Do you see any Pyramid Construction opportunities? You better not! If you remember, your opportunity external org-wide defaults are set to private, so you shouldn’t see any Pyramid Construction opportunities here.
Share Opportunities Using Account Relationships
Let’s see how Maria gives access to opportunities owned by Pyramid Construction to Express Logistics and Transport users (including Babara Levy).
First Maria enables the account relationship feature in her org.
- In Setup, enter
Digital Experiencesin the Quick Find box and select Settings.
- Under Account Relationship Settings, select the checkbox next to Enable Account Relationships.
- Click Save.
Important: Once you enable account relationships in your org, you can’t disable the feature.
After you enable account relationships, you have a whole new object (Account Relationships) available in your org and can set up account relationship data sharing rules.
Maria now needs to add the account relationship related lists to the Account page layout. Why is this necessary? Because once she sets up the account relationship data-sharing rule, any internal user can use the related lists to create business relationships for data access.
- In Setup, click Object Manager | Account | Page Layouts | Account Layout.
- Click Related Lists.
- Drag the Account Relationships: Account From and Account Relationships: Account To related lists on to the page.
- Click Save.
- In the Overwrite Users' Related List Customizations? dialogue, click Yes.
Then Maria sets up an account relationship data sharing rule to meet Maya’s business needs.
- From Setup, enter
Account Relationshipin the Quick Find box, and then select Account Relationship Data Sharing Rule Settings. You may need to refresh the page for Account Relationship Data Sharing Rule Settings to show up.
- Click New.
- Enter the following information.
- Name:
Share Opportunities - Developer Name:
share_opportunities - Description:
Sharing opportunities between accounts. - Account Relationship Type: Distributor
- Access Level: Read/Write
- Object Type: Opportunity
- Account To Criteria Field: Account ID
- Click Save.
What does this new rule do? An account relationship data sharing rule identifies the account relationship type, the type of information that you want to share, and the access level to the records. The account relationship type is perhaps the most important part of this equation: it’s what connects the sharing rule with the account relationship (which you’ll set up in a little bit). Your org comes equipped with several account relationship types in place, but you can add more if your business needs require them.
Now that Maria has associated sharing logic to the Distributor relationship, she needs to define the specific distributor-reseller relationships.
- From the App Launcher, select Accounts.
- Select Express Logistics and Transport.
- In the Account Relationships: Account From related list, click New.
- Enter the following information.
- Name:
Share Opportunities with Express - Account From: Express Logistics and Transport
- Account To: Pyramid Construction Inc.
- Account Relationship Type: Distributor
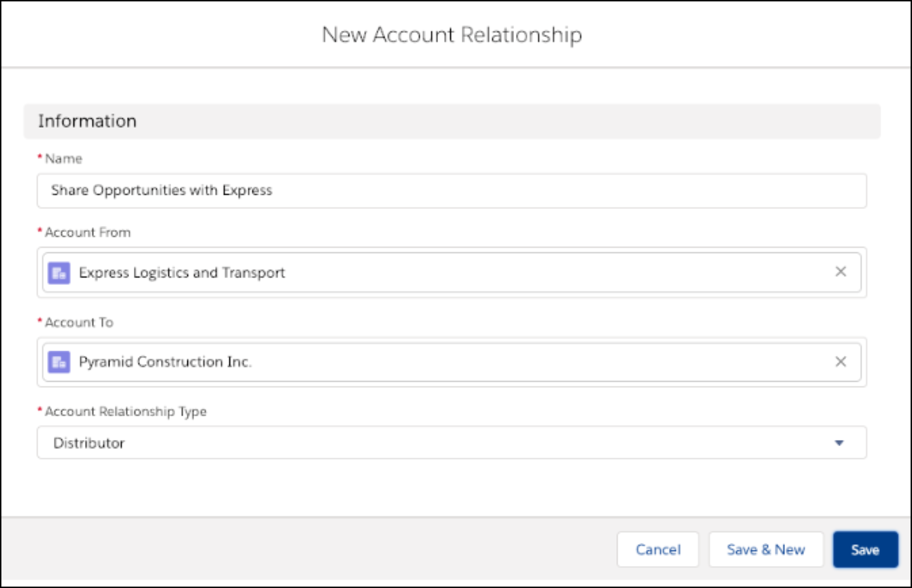
- Click Save.
In account relationships, Account From is the account that gets access to data, and Account To is the account that gives access to its data. And as mentioned before, the Account Relationship Type field is what connects all the dots in the org.
Now log back in to the portal as Babara Levy to check what opportunities she sees.
- From the App Launcher, select Contacts.
- Select Babara Levy.
- From the quick actions dropdown menu, select Log in to Experience as User.
- In the portal, select Sales | Opportunities from the navigation menu.
Do you see the Pyramid Construction opportunity? How’s that for some sharing magic?
Some things to note: We had you change the opportunity owner earlier in this step to show that you can share the opportunity regardless of owner. And even though Maria, the admin, set up the account relationship on the account, any Salesforce user with the right permissions can easily set up relationships between accounts. That allows for granular sharing of data that your business users can control without having to ask for an admin’s help to set up sharing rules.
See How Much You Shared
Let’s recap what you did in this project. You:
- Created a bare-bones partner portal using the Partner Central template
- Set up an external sharing model
- Created partner accounts and users
- Added a new user to the Salesforce role hierarchy
- Used sharing rules to share records via role hierarchies and account roles
- Used a sharing set to share records
- Created an account relationship to share records
Here’s how Maria (and you) met the initial requirements:
What are you sharing? |
Who owns it? |
Who are you sharing it with? |
How is it shared? |
|---|---|---|---|
Opportunities |
Partner user |
Partner users in the same account, and Salesforce users in the role hierarchy |
Account roles in the role hierarchy |
Opportunities |
Partner user |
Partner users in a different account |
Sharing rules |
Cases |
Customer user |
Other customer users on the same account |
Sharing set |
Opportunities |
Partner or internal users |
Partner users associated to a different account |
Account relationship |
Congratulations! Now go forth and use all your accumulated knowledge to share your records with the external users who need to see them most.