Communicate from Child to Parent
Learning Objectives
In this project, you'll:
- Build Lightning web components that communicate with one another.
- Communicate from a child component to its parent component.
- Communicate from a parent component to a child component.
- Communicate from a component to an unrelated component.
This project is designed for Salesforce developers who have some experience building Lightning web components. If you're not already familiar with Lightning web components, we recommend that you complete some of the badges in the Build Lightning Web Components trail before continuing in this project.
How Components Communicate
When multiple Lightning web components compose an app, we often want those components to share information. How we communicate from one component to another depends on whether and how the components are related. A component inside another component creates a parent-child relationship. How a parent communicates with a child is different from how a child communicates with its parent. And those are both different from how unrelated components (components in separate DOM subtrees) communicate with one another.

In this project, you establish communications between components in each of these relationships.
Before You Begin
We assume that you have your Salesforce DX development environment set up, and you're comfortable using it to create Lightning web components and deploy them to an org. If you're not familiar with this process yet, complete the Quick Start: Lightning Web Components project before you continue in this project.
Create a New Trailhead Playground
For this project, you need to create a new Trailhead Playground. Scroll to the bottom of this page, click the playground name, then click Create a Trailhead Playground. It typically takes 3–4 minutes to create a new Trailhead Playground.
Get Your Trailhead Playground Username and Password
Let's get started. Go to your Trailhead Playground. (If it's not already open, scroll to the bottom of this page and click Launch.) If you see a tab in your org labeled Get Your Login Credentials, great! Skip ahead to step 1. Otherwise, from the App Launcher ( ), find and open Playground Starter and follow the steps.
- Click the Get Your Login Credentials tab and take note of your username.
- Click Reset My Password. This sends an email to the address associated with your username.
- Click the link in the email.
- Enter a new password, confirm it, and click Change Password
Set Up Your Project
- In Visual Studio Code, create a Salesforce DX project named
Event Comms.
- Authorize your Trailhead Playground.
Communicate with a Custom Event
Let's start with a simple scenario. A child component dispatches a custom event that triggers an update in the parent component.
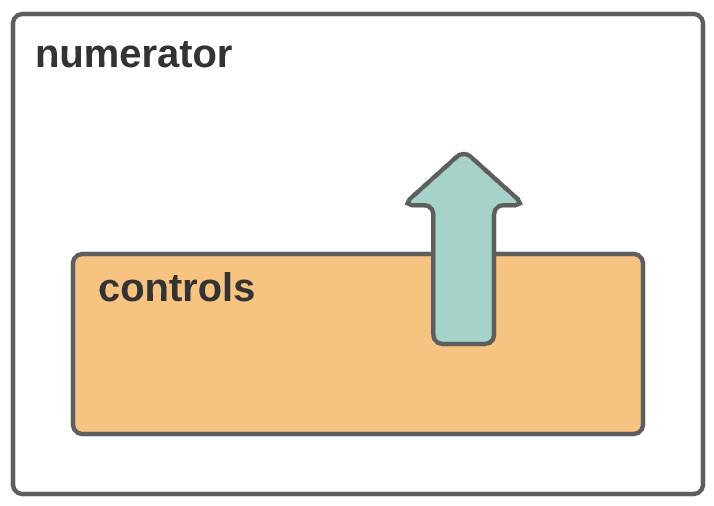
When you send an event, you can choose to send some data and you can allow the event to bubble up through the DOM. Let's start with a simple scenario. A child component dispatches a custom event that triggers an update in the parent component.
Communicate from the Controls Component to the Numerator Component
- Create a three-region Lightning app page named
Event Comms:
- In your org (your Trailhead Playground), open Setup.
- In the Quick Find box, enter
Lightning App Builderand then select Lightning App Builder.
- Click New.
- With App Page selected, click Next.
- For Label, enter
Event Commsand then click Next.
- Select Three Regions and then click Done.
- Click Save, Activate, Save, and Skip and Save.
- Click
 to exit Lightning App Builder.
- Create the parent Lightning web component named
numerator:
- In Visual Studio Code, under force-app/main/default, right-click the lwc folder and select SFDX: Create Lightning Web Component.
- Enter
numeratorfor the name of the new component.
- Press Enter and then press Enter again to accept the default
force-app/main/default/lwc.
- Code the numerator component files:
- In numerator.js, paste this code inside the
Numeratorclass:counter = 0; handleIncrement() { this.counter++; } handleDecrement() { this.counter--; } - Save the file.
- Open numerator.html and add this code between the
templatetags:<lightning-card title="Numerator" icon-name="action:manage_perm_sets"> <p class="slds-text-align_center slds-var-m-vertical_medium"> Count: <lightning-formatted-number value={counter}></lightning-formatted-number> </p> <!-- controls go here --> </lightning-card> - Save the file.
- To make the numerator component available in Lightning app pages, open numerator.js-meta.xml and replace the
isExposedtag with these lines:<isExposed>true</isExposed> <targets> <target>lightning__AppPage</target> </targets> - Save the file.
- Add the numerator component to the Event Comms app:
- Right-click the lwc folder and select SFDX: Deploy This Source to Org to deploy the lwc folder to your org.
- From the App Launcher (
 ) in your playground, find and open Event Comms.
- Click
 and select Edit Page to open the Event Comms app page for editing.
- Drag the numerator component (under Custom in the Components list) to the left region of the page.
- Click Save.
- Click
 to exit Lightning App Builder.
- Create and code the child component named
controls:
- Return to Visual Studio Code and create a Lightning web component named
controls.
- In controls.js, paste this code inside the
Controlsclass:handleAdd() { this.dispatchEvent(new CustomEvent('add')); } handleSubtract() { this.dispatchEvent(new CustomEvent('subtract')); } - Save the file.
- Open controls.html and add this code between the
templatetags:<lightning-card title="Controls" icon-name="action:upload"> <lightning-layout> <lightning-layout-item flexibility="auto" padding="around-small"> <lightning-button label="Subtract" icon-name="utility:dash" onclick={handleSubtract}> </lightning-button> </lightning-layout-item> <lightning-layout-item flexibility="auto" padding="around-small"> <!-- buttons go here --> </lightning-layout-item> <lightning-layout-item flexibility="auto" padding="around-small"> <lightning-button label="Add" icon-name="utility:add" onclick={handleAdd} icon-position="right"> </lightning-button> </lightning-layout-item> </lightning-layout> </lightning-card> - Save the file.
- Add the child component (controls) to the parent component (numerator):
- Open numerator.html and replace the
controls go herecomment with this code:<c-controls class="slds-show slds-is-relative" onadd={handleIncrement} onsubtract={handleDecrement}> </c-controls> - Save the file.
- Verify communications:
- To see the changes in Salesforce, deploy the lwc folder and then refresh the Event Comms app page in your Trailhead Playground org.
- Click Add and see the count increase.
- Click Subtract to see the count decrease.
Now we have a child component (controls) that sends an add event to the parent component (numerator), triggering the handleIncrement function in the parent component (numerator).
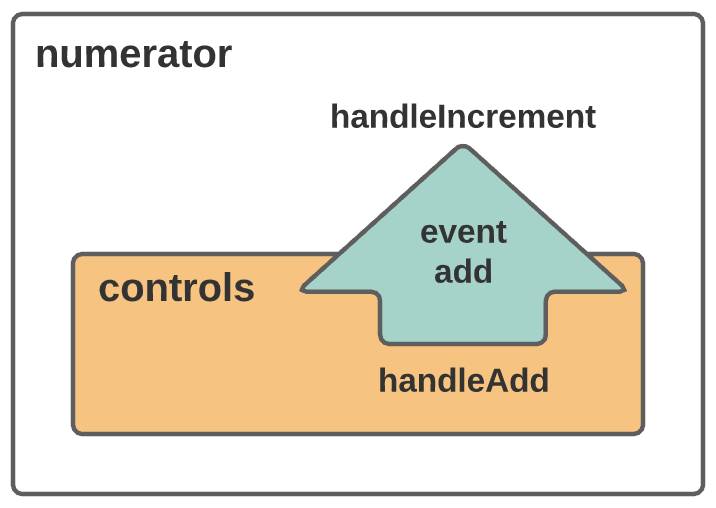
Send Data with the Custom Event
Next let's have the child pass some data with the event to the parent. The business wants to multiply the count. We'll give them more than one option. Use a custom event to pass data from the child to the parent.
- Add multiply buttons and a multiply function to the child component (controls):
- Open controls.html and replace the
buttons go herecomment inside the secondlightning-layout-itemtag with this code:<lightning-button label="2" data-factor="2" icon-name="utility:close" onclick={handleMultiply}> </lightning-button> <lightning-button label="3" data-factor="3" icon-name="utility:close" onclick={handleMultiply}> </lightning-button> - Save the file.
- Open controls.js and add this
handleMultiplyfunction after thehandleSubtractfunction:Notice we pass thehandleMultiply(event) { const factor = event.target.dataset.factor; this.dispatchEvent(new CustomEvent('multiply', { detail: factor })); }onclickevent to thehandleMultiplyfunction, which gets the buttondata-factorthrough theevent.target.dataset.factor. Then we pass thefactoralong with the new custom event (multiply) to the parent component (numerator).
- Save the file.
- Update the parent component (numerator):
- Open numerator.html and add this attribute to the
c-controlstag:onmultiply={handleMultiply} - Save the file.
- Open numerator.js and add this
handleMultiplyfunction after thehandleDecrementfunction:Here thehandleMultiply(event) { const factor = event.detail; this.counter *= factor; }handleMultiplyfunction gets theonmultiplyevent passed in and uses its data (event.detail) to update the count (counter).
- Save the file.
- Verify communications:
- To see the changes in Salesforce, deploy the lwc folder and then refresh the Event Comms app.
- Click Add and see the count increase.
- Click X 2 to see the count multiplied by 2.
- Click X 3 to see the count multiplied by 3.
The controls component passes data (data-factor) to its parent (numerator) along with the multiply custom event.
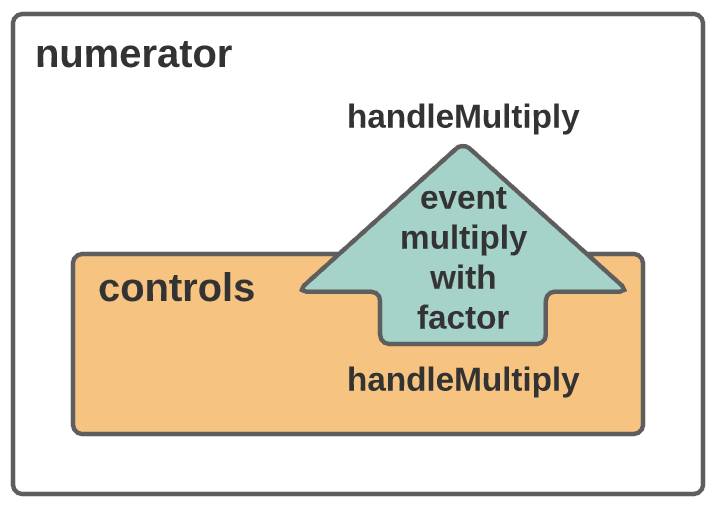
Allow Custom Events to Bubble
The two multiply buttons were a success. Now the business wants more multiply options. Let's make it easy to add as many buttons as they need. We'll add another Lightning web component for the buttons. To allow the communications to get through, you'll use event bubbling. Bubbling allows the custom event from the button component to bubble up the DOM tree.
- Create a component named
button:
- Create a Lightning web component named
button.
- In button.js, paste this code inside the
Buttonclass:@api label; @api icon; handleButton(event) { this.dispatchEvent(new CustomEvent('buttonclick',{ // bubbles: true })); } - Import the
apidecorator from thelwcmodule.import { LightningElement, api } from 'lwc'; - Save the file.
- Open button.html and add this code between the
templatetags:<lightning-button label={label} data-factor={label} icon-name={icon} onclick={handleButton}> </lightning-button> - Save the file.
- Make the button component a child of the controls component:
- Open controls.html and delete the
lightning-layout-itemthat contains twolightning-buttontags.
- In its place, paste this code:Notice that we moved the
<lightning-layout-item flexibility="auto" padding="around-small" onbuttonclick={handleMultiply}> <template for:each={factors} for:item="factor"> <c-button key={factor} label={factor} data-factor={factor} icon="utility:close"> </c-button> </template> </lightning-layout-item>handleMultiplyfunction call to theonbuttonclickhandler in thelightning-layout-item. This keeps us from adding a handler on every button, resulting in cleaner, faster code.
- Save the file.
- Open controls.js and add this
factorsproperty in theControlsclass:factors = [0,2,3,4,5,6];
- Save the file.
- Verify communications:
- To see the changes in Salesforce, deploy the lwc folder and then refresh the Event Comms app page.
- Click Add and see the count increase.
- Click X 2 and notice that nothing happens. Why? By default, a custom event doesn't bubble up past the host.
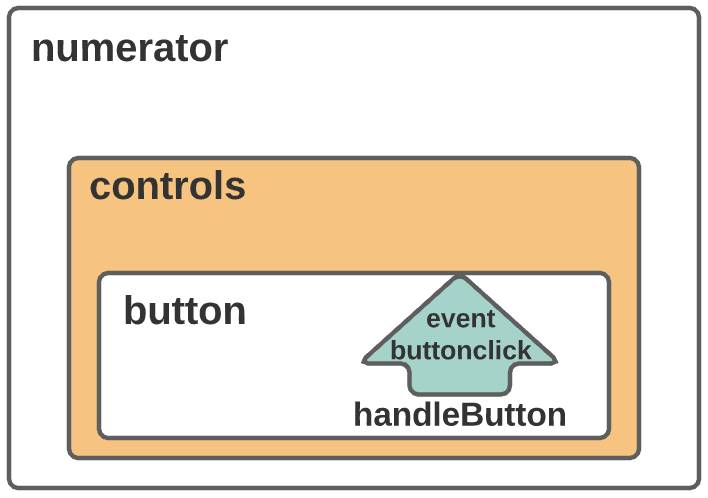
[Alt text: Custom event not getting past its container.]
To allow the event (buttonclick) to bubble up to thelightning-layout-item, we addbubbles: truein theCustomEvent.
- Open button.js and uncomment (remove the
//before)bubbles: true.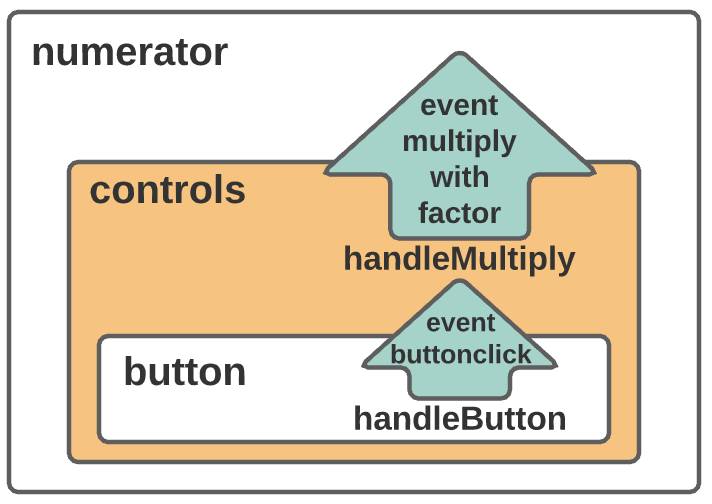
[Alt text: Custom event now bubbles up past its container.]
- Save the file and deploy it again.
- Refresh the Event Comms app page.
- Now click Add to set the count to 1.
- Click X 2 to see the count multiplied by 2.
- Click X 6 to see the count multiplied by 6.
- Click X 0 to reset the count to zero.
- Try the following clicks: Add, X 2, X 5, X 2, Add, X 2. Or: Add, X 3, X 2, X 2, Subtract, X 2, Subtract, X 2. Or try your own combination.
Challenge Yourself (optional—we won't check this code)
Add a second instance of the button component in the controls component to create division buttons that appear in the numerator component.
Summary
In this step you established communication from a child component to its parent using a custom event. You passed the event with and without data, and you saw how bubbling affects child-to-parent communications. In the next step you facilitate parent-to-child communications.
Resources
- Trailhead: Quick Start: Explore the LWC Recipes Sample App
- Lightning Web Components Dev Guide: Create and Dispatch Events
- GitHub: LWC Recipes: eventSimple
- GitHub: LWC Recipes: eventWithData
- GitHub: LWC Recipes: eventBubbling
- MDN web docs: Creating and triggering events
- Salesforce Developers Blog: Inter-Component Communication Patterns for Lightning Web Components
- Salesforce Developers Blog: How Events Bubble in Lightning Web Components
