Get Started with Data Processing Engine
Learning Objectives
In this project, you’ll:
- Explain the Data Processing Engine definition workflow.
- Configure a Data Processing Engine definition.
- Run the definition in builder.
- Monitor the definition run status.
- Invoke the definition in Salesforce flow.
Before You Start
Before you start this module, consider completing the following recommended content.
Revisit Data Processing Engine
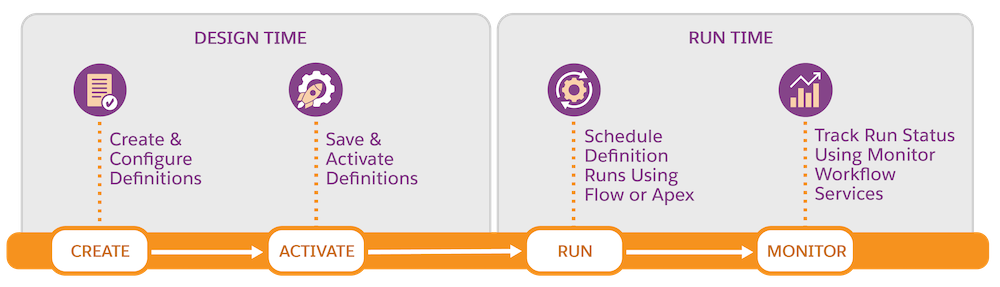
Data Processing Engine orchestrates data transformations of large volumes of customer data for any industry. It also provides a visual tool to configure a definition by adding data sources and nodes. Here’s a quick summary of how you can use Data Processing Engine to transform your data. You learn more about each step later in the project.
- Create a Data Processing Engine definition and configure the data sources and nodes. Data Processing Engine can use Salesforce objects in core, Data 360 objects, or datasets in CRM Analytics as data sources.
- Save and activate the definition.
- Run the definition from the definition builder. You can also run it by invoking it in Salesforce flow or Apex. Another way to run the definition is by scheduling a flow to execute the definition at a particular date and time. Finally, monitor the definition’s run status using the Monitor Workflow Services feature.
After you run the definition, the transformed data is stored in the target entities as defined in the definition.
Meet Cloud Kicks
To learn more about the Data Processing Engine workflow, consider Cloud Kicks, a company that makes stylish and comfortable custom sneakers. The shoes are a huge success among celebrities and professional athletes. But with success, comes management challenges. The company’s order book is growing more rapidly than it expected, and it is struggling to optimize and use the large volume of product data.
Cloud Kicks is exploring Data Processing Engine to extract meaningful insights from this large volume of data to support its growing business. You’re the trusty Salesforce admin at Cloud Kicks, and you’re tasked with implementing Data Processing Engine in the company’s org to meet the company’s business requirements.
It’s time to get into the specifics of those requirements. Examine this table that lists Cloud Kicks’s four bestselling products.
Product Name |
Product Code |
Price (USD) |
|---|---|---|
Cloud One |
CO1234 |
90 |
Cloud Two |
CO1235 |
125 |
Cloud Three |
CO1236 |
175 |
Cloud Four |
CO1237 |
350 |
Cloud Kicks wants to review and calculate the total quantity ordered and total revenue for each product from the beginning of the current year till date. And that’s exactly what you accomplish in this project. So, good luck!
Data Processing Engine Definition Workflow
Now that you know the requirements, study this definition workflow for Cloud Kicks to get an overview of how you configure and connect the nodes to get the desired result.
Here’s the plan of action.
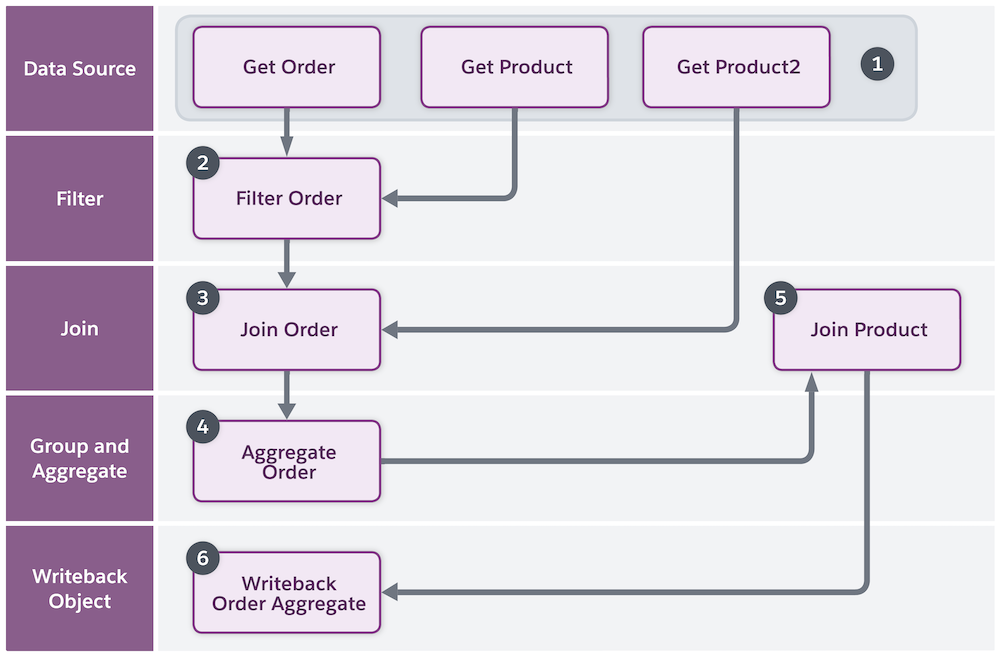
- Create a Data Processing Engine definition. Then define the data sources by adding Data Source nodes. For Cloud Kicks, you add three Data Source nodes for each data source object such as Order, Order Product, and Product to fetch the order details, product details, and product names respectively.
- Then, add a Filter node to filter the orders starting from the beginning of the current year till date. For the Filter node, the source node is the Get Order node. The Filter node fetches only those orders that meet the filter condition. Here, it fetches the date field from the Order object to add the date filter condition.
- Next, add a Join node to join the Filter Order node and the Get Product node. Use the inner join node type and select all the fields you want to join. Map the fields in both the nodes using the OrderId field. The inner join node fetches all the records for the selected fields that have matching OrderId fields in both the nodes.
- Next, add the Group and Aggregate node to select the fields based on which the results are grouped. The Join Order node is the source node for the Group and Aggregate node. Group the records using the Product2Id field. Add aggregation functions on the required fields to perform calculations and show the results as per your requirement.
- Next, add another Join node to join the Group and Aggregate node and Get Product2 data source node. Use the inner join node type to join both the nodes based on Id and Product2Id fields for Group and Aggregate node and Get Product2 node respectively.
- Finally, add a Writeback Object node and select the target object and fields where you want to store the transformed data. The Join Product node is the source node for the Writeback Object node.
Now, you know the workflow and how the nodes are configured. The first task at hand is to create a Data Processing Engine definition. But before you do that, request and set up an org where you perform this and other steps.
Sign Up for a Developer Edition Org with Data Processing Engine
To complete this module, you need a special Developer Edition org that contains Data Processing Engine and our sample data. Get the free Developer Edition org and connect it to Trailhead now so you can complete the challenges in this module. Note that this Developer Edition org is designed to work with the challenges in this badge, and may not work for other badges. Always check that you’re using the Trailhead Playground or special Developer Edition org that we recommend.
- Sign up for a free Developer Edition org with Data Processing Engine.
- Fill out the form:
- For Email, enter an active email address.
- For Username, enter a username that looks like an email address and is unique, but it doesn't need to be a valid email account (for example, yourname@example.com).
- For Email, enter an active email address.
- After you fill out the form, click Sign me up. A confirmation message appears.
- When you receive the activation email (this might take a few minutes), open it and click Verify Account.
- Complete your registration by setting your password and challenge question. Tip: Save your username, password, and login URL in a secure place—such as a password manager—for easy access later.
- You’re logged in to your Developer Edition.
Now connect your new Developer Edition org to Trailhead.
- Make sure you’re logged in to your Trailhead account.
- In the Challenge section at the bottom of this page, click the org name and then click Connect Org.
- On the login screen, enter the username and password for the Developer Edition org you just set up.
- On the Allow Access? screen, click Allow.
- On the Want to connect this org for hands-on challenges? screen, click Yes! Save it. You’re redirected back to the challenge page and ready to use your new Developer Edition to earn this badge.