Get Records and Create An Email Template
Get the Data You Need
So far, your flow contains a screen asking users if they'd like to acknowledge an opportunity. But which opportunity, exactly?
You use the Get Records element to retrieve details about the opportunity record where the user starts the flow. A Get Records element tells the flow which record or records you want to get more information about.
For any screen flow that launches from a record page—like the one you're building—you need to capture the record ID in a variable, which stores text or other information that you need to use in the flow. You'll then pass that variable to the flow and use it as the criteria that determines which records you get.
Add the new element to the canvas now and create your variable.
- On the flow canvas, on the path after the Launch screen, click
 .
.
- Select Get Records in the Data section.
- In the New Get Records interface, specify these details.
- Label:
Get Opportunity - API Name:
Get_Opportunity(This should generate automatically.)
- Description:
Look up all field values from the opportunity, whose ID is passed from the opportunity record to the flow in a text variable. - Get Records of This Object: Select Opportunity (Opportunity). The Filter Opportunity Records section appears.
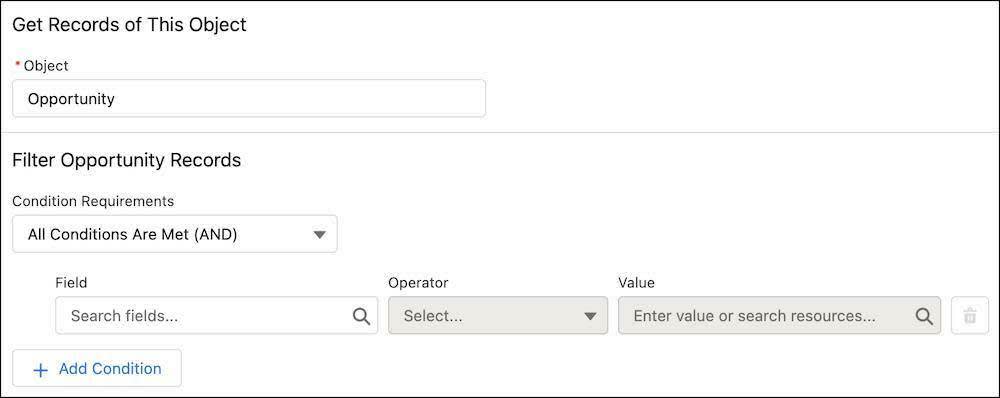
- Condition Requirements: All Conditions Are Met (AND)
- Field: Select Id (Opportunity ID)
- Operator: Equals
- Value: Click + New Resource. Enter these details:
- Resource Type: Variable
- API Name:
recordId
This API name is case-sensitive and is a reserved variable for the record ID. Make sure this is formatted exactly as recordId, with a capital I and lowercase d.
- Data Type: Text
- Availability Outside the Flow: Select Available for input.
The data for this variable is coming from the opportunity page.
- Click Done, and
{!recordId}will automatically appear in the Value field. It may also appear formatted as .
.

- How Many Records to Store: Select Only the first record, the default.
- How to Store Record Data: Select Automatically store all fields, the default
- Click
 .
.

You just told the Get Records element you want to find the single opportunity record that matches the opportunity ID variable you just set, then store all data fields. This will help you later, when you'll have all the record's fields available for your email.
This same idea works in different situations. For example, you could put in different rules, like finding opportunities with a value of over $100 whose primary contact lives in a certain area.
Before you move on to the next step, save your flow.
Create the Email Template
Now create another variable: your email template.
To start, check the Manager tab in the Flow Builder Toolbox. If it's closed, you can open it by clicking  . Here you can see all of the resources and elements you've used so far. Notice the recordId variable that you just created.

Now create your new resource right from the manager.
- Click New Resource.
- Select Text Template as the Resource Type. The Text Template resource type is used to store text that can be changed and used throughout the flow, just like your email template.
- API Name:
emailBody - Description:
This is the email template to send to acknowledge the gift.
Now you're at the body of the email. First, make sure that View as Rich Text, the default, is selected.
In the text editor, start by typing Dear followed by a space.
You need to pull details from the opportunity record and its related contact record to make this a true template. All this information is stored on a record variable, a special type of variable that the Get Records element created to hold details about a Salesforce record.
Start by getting the donor's name. The record variable holds details about the opportunity record and any related record, so you'll need to find the primary contact record related to the opportunity and then the donor's name.
- Click in to the Insert a resource… search bar.
- Find and select Opportunity from Get_Opportunity, the record variable created by the Get Records element. Because you chose to store all fields, you can select any field from the record.
- After clicking Opportunity from Get_Opportunity fields and related records in the opportunity record will appear. Find and select Primary Contact. There should be an arrow (
 ) next to the record to show that you can select fields inside of it.
- Find and select FirstName (First Name).
- In the Body field, this should appear:
{!Get_Opportunity.npsp__Primary_Contact__r.FirstName}
In a similar way, you can get the values for the Amount and Close Date from the opportunity record in your template, which are just one layer down from Opportunity from Get_Opportunity.
- Click in to the Insert a resource… search bar.
- Find and select Opportunity from Get_Opportunity.
- Find and select Amount.
{!Get_Opportunity.Amount}will appear in the Body field.
- Click in to the Insert a resource… search bar.
- Find and select Opportunity from Get_Opportunity.
- Find and select CloseDate (Close Date).
{!Get_Opportunity.CloseDate}will appear in the Body field.
You can also return details about the Salesforce user who started the flow. For example, you want this email to be signed by whoever is sending it. You can use the Running User global variable to do that.
Try this.
- Click in to the Insert a resource… search bar.
- Find and select Running User.
- Find and select FirstName.
{!$User.FirstName}should appear in the body of the text template.
- Click back into the Insert a resource… search bar.
- Find and select Running User.
- Find and select LastName.
{!$User.LastName}should appear in the body of the text template.
Using the data from these fields fields, you can add other text and create a text template like this:
Dear {!Get_Opportunity.npsp__Primary_Contact__r.FirstName},
Thank you for your generous gift of ${!Get_Opportunity.Amount} on {!Get_Opportunity.CloseDate}. Your support of our capital campaign helps us make sure everyone in our community has enough food and an affordable place to live.
Sincerely,
{!$User.FirstName} {!$User.LastName}
No More Homelessness
No goods or services were received in return for this gift. No More Homelessness is a public charity recognized as tax-exempt by the IRS under Section 501(c)(3), and your gift may be tax-deductible. Please save this acknowledgment and consult a tax advisor if you can deduct this donation.
Pretty cool, right?
In your text template, you can just copy and paste the text above, but we suggest you use the same resources to write your own email and add some rich-text formatting. Just remember to put one return between each line or your email will appear with extra space between each paragraph.


When your template is complete, click Done.
Then, back in Flow Builder, save your work on this flow.
In the next step, you set up a preview to double-check the content of your email, then send it to your recipient.
To complete this step and move on, launch your Trailhead Playground and click Verify to check that your Get Records element and text template are saved correctly.
Resources
- Salesforce Help: Get Records Element
- Salesforce Help: Text Template Flow Resource
- Video: Flow: Get Records