Deploy and Use Your Flow

Get Ready to Deploy the Flow
The flow you just built will appear on a Lightning Page, and users will interact with it through the Screen components you added earlier. You chose that route because you want users to see the email preview in context of an opportunity record and its details.
That’s not the only way for users to interact with a flow, though. You can deploy it as an object-specific action button on a Lightning page, as a button in the utility bar, or in many different ways. Plus, you can limit access to the flow to specific users or permission sets.
You can also control when your flow appears through the flow itself or with component visibility settings, which is what you’ll do in a moment. And, of course, you can set permissions for flows. Check the documentation linked in Resources for more details about deploying flows and setting security.
Now, place your flow on a page and use it.
Edit the Opportunity Lightning Page
It’s time to leave Flow Builder and head back to Nonprofit Success Pack (NPSP).
Follow these steps to get there:
- Click Back (
 ) in Flow Builder to go back to Setup.
- Click the App Launcher (
 ) and find and select Opportunities.
- In the Opportunities list view, click any Opportunity Name to open an opportunity record. You may need to change your list view to All Opportunities first.
- Click Setup (
 ) and then click Edit Page to go to the Lightning App Builder.
Add the Flow Component to the Opportunity Lightning Page
Add the flow to the NPSP Opportunity Record Page now at the top of the secondary column, the one that contains the Activity Timeline and Chatter components.
To start, find the Flow component and drag it onto the canvas to the top of the secondary column above the Activities Timeline.

Then make these selections:
- Flow: Find and select Gift Acknowledgment. If you completed the last step, it will be activated. If you don’t see it here, go back to the previous step and check your Playground.
- Layout: One Column
- recordId: Leave the text field blank and select Pass record ID into this variable. This automatically fills the recordId text field.
You don’t want this flow to appear on every opportunity. You only want your users to have the option to send this email if the opportunity is a closed donation that hasn’t been acknowledged. The donation must also be from an individual with an email address in the system.
You meet these requirements by adding a few filters under Set Component Visibility so the flow doesn’t appear if it doesn’t meet all the criteria.
Follow these steps:
- Click + Add Filter under Set Component Visibility. Add the email check first.
- Filter Type: Advanced
- Field: Click Select.
- Select Record in the filter list.
- Find and select Primary Contact in the next filter list.
- Find and select Email in the next filter list.
- Click Done.
- Operator: Not Equal
- Value: Leave this blank.

- Click Done.
- Now check that the opportunity is a donation from an individual. Click + Add Filter.
- Filter Type: Advanced
- Field: Click Select.
- Select Record in the filter list.
- Find and select Opportunity Record Type.
- Find and select Name.
- Click Done.
- Operator: Equal
- Value: Enter
Donation.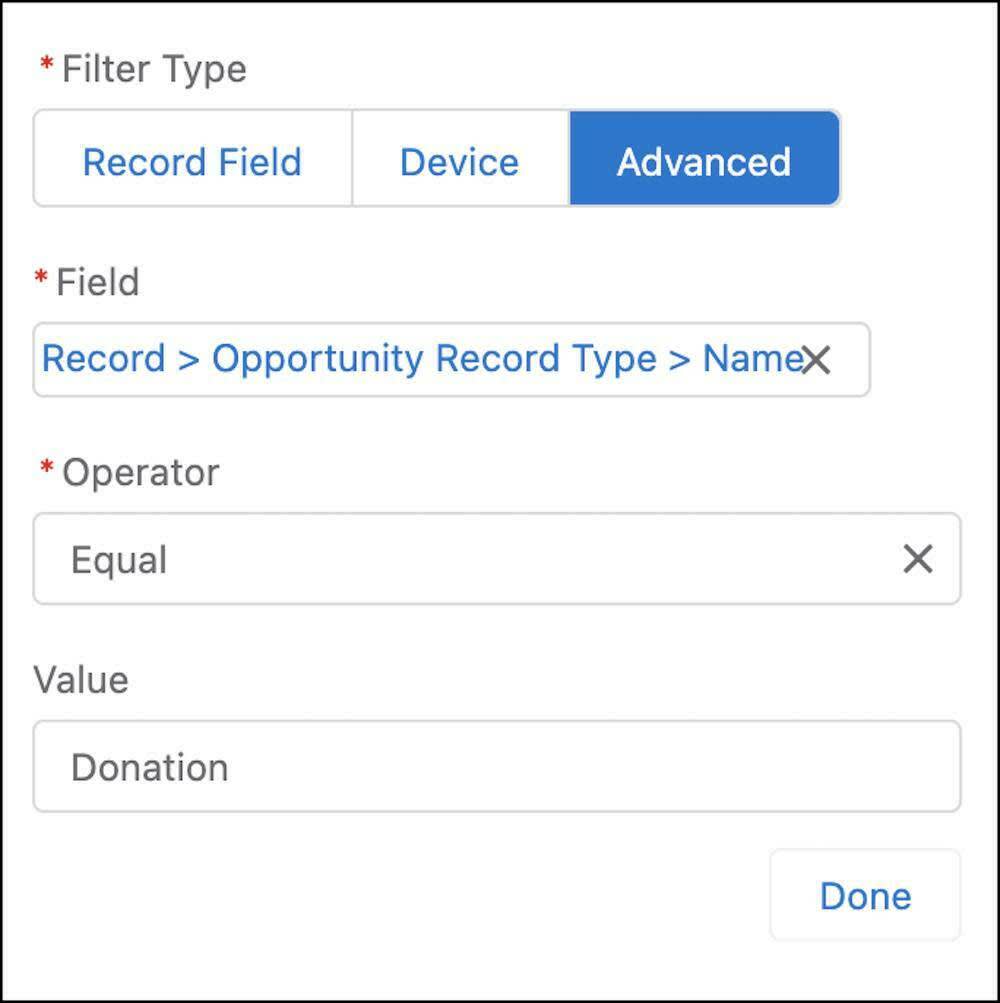
- Click Done.
- Now check that the gift hasn’t already been acknowledged. Click + Add Filter.
- Filter Type: Record Field, the default
- Field: Find and select Acknowledgment Status
- Operator: Not Equal
- Value: Find and select Acknowledged.

- Click Done.
- For your last check, make sure the gift is in Closed Won status. Click + Add Filter.
- Filter Type: Record Field, the default
- Field: Find and select Stage.
- Operator: Equal
- Value: Find and select Closed Won.

- Click Done.
- Show component when: Select All filters are true, the default.

- Click Save.
You can check out the new flow on the record page by clicking Back ( ) in the Lightning App Builder. It might not appear on the opportunity record if it doesn’t meet your filters, so test it on a new record.
Use Your Flow
First, create a new contact with your email address so that you can test the email.
- Click the App Launcher (
 ) and find and select Nonprofit Success Pack.
- Click the Contacts menu (
 ) on the Contacts tab, then New Contact in the menu.
- Enter these details:
- First Name:
Gorav - Last Name:
Patel - Account Name: Leave this blank so that a new household account is automatically created.
- Preferred Email: Personal, the default
- Personal Email: Enter your email address.
- Click Save.
Now, create a new opportunity.
- On your new contact record, click New Donation.
- Opportunity Name: Leave as the default.
- Close Date: Leave as the default, today's date.
- Stage: Change to Closed Won.
- Amount: $
100.00 - Click Save.
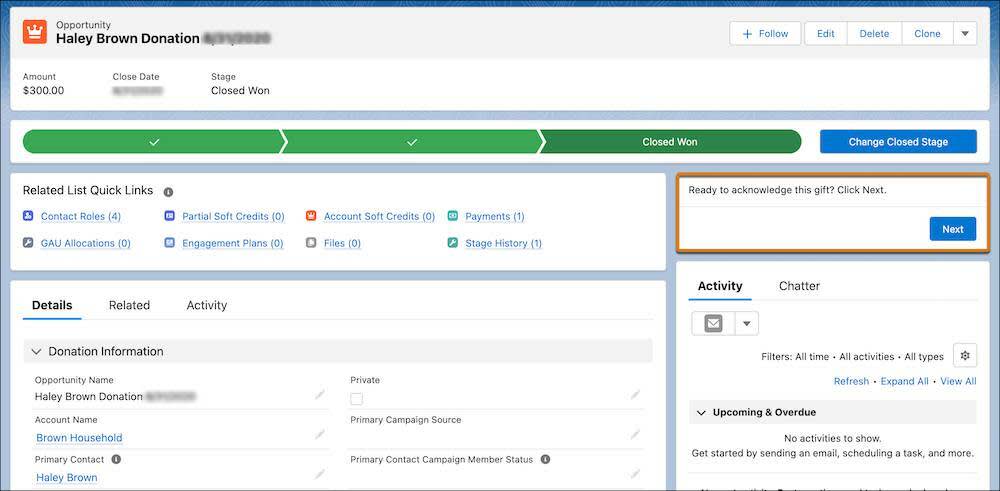
Click into the opportunity you just created by either clicking the opportunity name in the notification that appears, or go to the Related tab on the contact record and click the opportunity in the Opportunities related list.
On the opportunity, click Next in your new flow in the secondary column on the page. Check that the details in the email are correct and all of the details from the opportunity and contact records appear correctly.

If everything is correct, click Next to send the email.
Before you look for the email, check the opportunity record to see that the Acknowledgment Status and Acknowledgment Date fields are filled in automatically. Pretty cool, right?

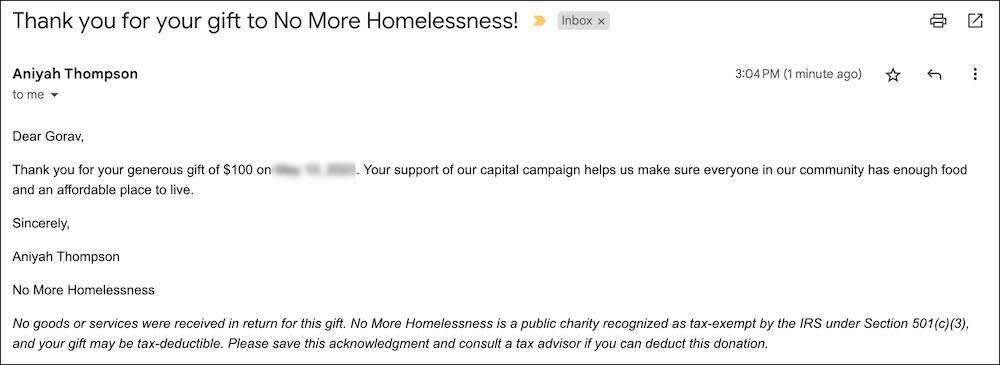
Now, go to your email client to check that you’ve received the email you just sent. It should have the subject line Thank you for your gift to No More Homelessness! and is from the email address connected to your Trailhead account.
Flow: Achieved
At the (fictional) nonprofit No More Homelessness (NMH), Salesforce Admin Gorav demos his flow for the Fundraising team and they love it! They can’t wait to start using this right away.

In this project you set up a screen flow, learned about some important flow elements and variables, and deployed it so that it could be used. You might not need a gift acknowledgment, but with these same flow building blocks you can create other types of push-button emails to send to your donors, the people you serve, or your colleagues. Flow is a powerful tool—now you can start to use it to automate your team’s processes!
To complete this final step and earn your badge, launch your Trailhead Playground and click Verify to check that the email sent correctly and the opportunity fields are populated.
Resources
- Salesforce Help: Distribute a Flow
- Salesforce Help: Limit User Access to Execute Flows
- Trailhead: Build Flows with Flow Builder