Add a Screen to Your Flow and Get Records
Learning Objectives
In this project, you’ll:
- Use Flow Builder to create and send an email with information stored in Salesforce records and Nonprofit Success Pack (NPSP) fields.
- Learn the basics of Screen, Get Records, Action, Assignment, and Update Records elements.
- Use flow Resources to create a text template for email.
- Add a flow to a Lightning Page and set component visibility.

Before You Start
Before you complete any steps in this module, make sure you complete the hands-on challenges in Set Up a Nonprofit Success Pack Trial for Trailhead using the same Trailhead Playground. The work you do in the hands-on challenges here builds on the work you complete in that badge.
An Easier Way to Show Gratitude
Aniyah Thompson, Development Director at the nonprofit No More Homelessness (NMH) would like to say thank you.
No, not to you—to her donors.
NMH is experiencing a deluge of donations. The organization’s fundraising and marketing efforts for its capital campaign have provided a lot of visibility for the nonprofit, and the staff is looking for a new way to keep up with donor acknowledgment messages. Aniyah would like her staff to have an easy way to thank donors. She wants to send a short, templated message directly from closed won opportunity records and have a chance to review each message before it goes out.
Gorav Patel, NMH’s amazing Salesforce Admin, thinks he has a way to build what Aniyah needs: Flow Builder.

In this project you’ll follow Gorav’s process to create a flow that gets details from opportunity and contact records, inserts them into an email text template, generates a preview of the email, sends the message, and updates the opportunity record to show that the gift has been acknowledged.
Introducing Flow Builder
Flow Builder is a tool to build automations with clicks, not code, for every Salesforce app, experience, and portal. You create flows by connecting a few provided elements.

While there are many types of flows, the ones you will use most often will likely be:
-
Screen flows, which automate business processes that require direct user interaction, such as inputting data. (This project will build a screen flow.)
-
Autolaunched flows, which automate a process in the background without user interaction, such as on a particular schedule or when a record changes. (Check out the Build a Discount Calculator project on Trailhead for an example of this type of flow.)
Flows can create and update records, create tasks and events, send email, and more.
This project is designed to teach you a few basic principles of flow—like using Screen elements, getting and updating records, creating text templates, and sending email—and it isn’t a full solution. There are plenty of ways to achieve Aniyah’s goals, and you might already have one in place.
Once you complete this project, though, you’ll have the knowledge to build flows for templated emails to send to donors, volunteers, and other constituents.
Sign Up for a Developer Edition Org with NPSP
To complete this module, you need a special Developer Edition org that contains Nonprofit Success Pack and our sample data. Get the free Developer Edition and connect it to Trailhead now so you can complete the challenges in this module. Always check that you’re using the Trailhead Playground or special Developer Edition org that we recommend.
Start Your Flow
Once you’ve set up NPSP in the prerequisite project, it’s time to start your flow.
- Click Setup (
 ) and then Setup.
- Type
flowsin the Quick Find box and click Flows in the Process Automation section.
- Click New Flow.
- Select the type of flow you want to create. For this project select Screen Flow, the default, because you will launch this flow from opportunity records and it needs user interaction.
A Brief Tour of Flow Builder
Now you’re in Flow Builder. Let’s start with a quick primer on the elements of Flow Builder, just so we’re using the same terms going forward.
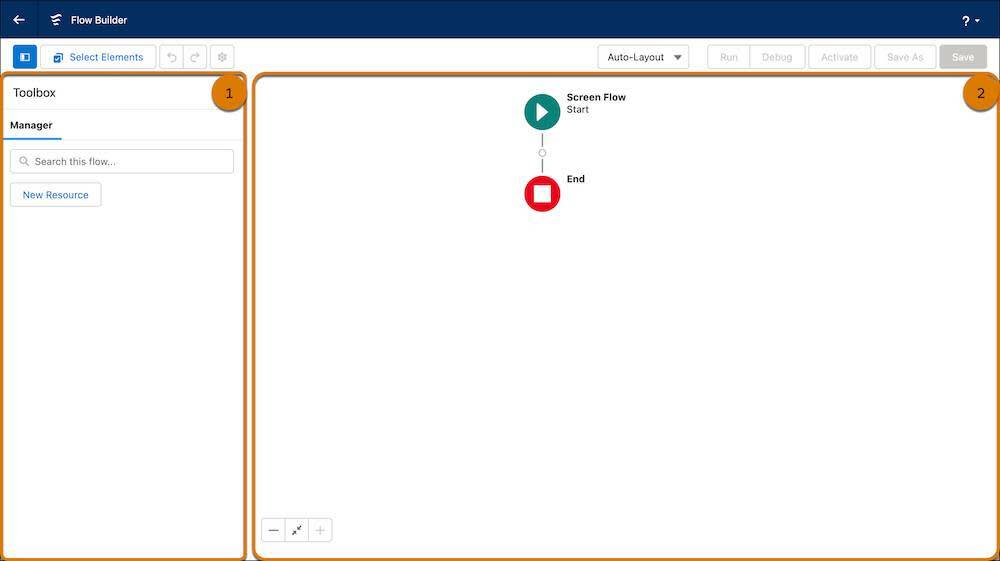
- The Toolbox (1) is where you'll find the components of the flow as they are created. These can be either Elements (interactions, logic, and data) or Resources (containers that hold information, like variables, constants, formulas, and text templates). You’ll use both Elements and Resources in this project. You open and close the toolbox by clicking
 .
.
- The Canvas (2) is where you build your flow by adding Elements. You’ll notice that the canvas already includes Start and End elements, with an Add element icon (
 ) between them.
Add Your First Screen
Start by adding a Screen element to the canvas.
Screens are a way to collect information from users or display information. In this project, the Screen element will appear on the opportunity record page to give users a simple interface to preview and send their email.

- On the flow canvas, on the path after the Start element, click
 .
.
- Select Screen in the Interaction section.
- In the New Screen interface that appears, specify these properties:
- Label:
Launch
This is the title that will appear on the canvas and help you keep track of what each element does.
- API Name:
Launch
This text should generate automatically.
- Description:
This screen is embedded on the opportunity Lightning Page and allows the user to start the flow.
Don’t neglect your descriptions! Flow is a complicated tool and descriptions can help you and other admins keep track of what each piece does.
- Configure Header: Deselect Show Header
The header shows the name of the flow at the top of the screen, and you won’t need it for this project.
- Now add a component to the new screen. Components provide input fields or display text to guide users to the next step in your screen flow. In this flow you’ll display a message prompting the user to begin. Drag Display Text, under the Display category in Components, onto the screen canvas.

- In the Display Text options fields that appear, specify these details:
- API Name:
displayText - In the text editor, enter:
Ready to acknowledge this gift? Click Next.
Optionally, you can spruce up your screen by using rich-text editing features or adding an image to the text area by clicking Image ( ) in the text editor’s controls.
- API Name:
- Click Done.

Save Your Flow
There’s still a lot of work to do, but just as every epic journey begins with a first step, so, too, does a great flow begin with a first element.
Before you move on, save your work.
- Click Save.
- Enter these details:
- Flow Label:
Gift Acknowledgment - Flow API Name (should automatically generate):
Gift_Acknowledgment - Description:
Screen element that sends a gift acknowledgment email to donors after allowing users to first preview the email on an opportunity record.
- Save your work.
If you’d like, you can click Run to see what you’ve built so far. It’s a fine Screen element, but it doesn’t do anything yet.
In the next step you get data and create your email template.
To complete this step and move on, launch your Trailhead Playground and click Verify to check that your new flow and the Screen element are saved correctly. If that seems too easy, just stay with us. You'll have plenty to do in your Playground in subsequent steps!
Resources
- Trailhead: Set Up a Nonprofit Success Pack Trial for Trailhead
- Trailhead: Build Flows with Flow Builder
- Salesforce Help: Automate Tasks with Flows
- Salesforce Help: Screen Element
- Trailhead: Build a Discount Calculator