Prepare Your Org
Introduction
Sales reps’ daily lives are full of yeses and nos. And not just from potential clients. There are some things that simply require in-house, managerial approval—such as discount requests, which we tackle in this project. As an admin, you can make the whole thumbs-up/thumbs-down situation easier for all involved by setting up an approval process.
An approval process is an automated process implemented to approve records in Salesforce. It specifies the steps necessary for approval, and allows a step to apply to all records or just records that have certain attributes. An automated process also specifies who does the approving at each step, and the actions to take when a record is approved, rejected, or recalled.
For this project, you create an automated approval process for AW Computing’s new VP of North American Sales, Allison Wheeler. She’s requested an automated system for processing discount requests from her reps using these parameters:
- If a discount is requested for 15% or less, it’s automatically approved.
- If a discount is requested for more than 15%, it must be approved by a manager in the sales department—for U.S. reps, that's Courtney Brown.
- If a discount is requested for more than 40%, it must also be approved by Allison.
Before you set up this approval process for Allison, a bit of prep is required to ensure your org has everything in place to let you meet her specifications. So pop on your Awesome Admin hat, and let’s get rolling.
Follow Along with Trail Together
Want to follow along with an instructor as you work through this step? Take a look at this video, part of the Trail Together series on Trailhead Live.
Create a New Trailhead Playground
For this project, you need to create a new Trailhead Playground. Scroll to the bottom of this page, click the playground name, then click Create Playground. It typically takes 3–4 minutes to create a new Trailhead Playground.
Note: Yes, we really mean a brand-new Trailhead playground! If you use an existing org or playground, you can run into problems completing the steps in this project.
Add a New User
Prior to setting up process automation, first set up Allison Wheeler with a user record so you can assign tasks to her later.

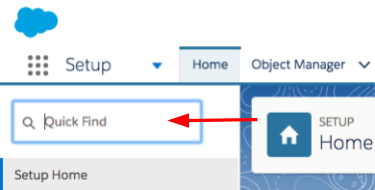
- From Setup, enter Users in the Quick Find box, then select Users.
- Click New User. Complete the new user record with these details:
Field |
Value |
|---|---|
First Name |
Allison |
Last Name |
Wheeler |
Alias |
(this field auto-populates) |
(fill in your own email address) |
|
Username |
Your email auto-populates to this field. Replace it with a new one using this formula:user’s first initial + user’s last name @ your initials + your favorite color + today's date (MMDDYY).com.For example: |
Nickname |
awheel |
Title |
Vice President North American Sales |
Company |
AW Computing |
Department |
Sales |
User License |
Salesforce Platform |
Role |
VP, North American Sales |
- Uncheck Generate new password and notify user immediately.
- Click Save.
Create a Role
One of the first projects Allison takes on is some restructuring of AW Computing’s sales department. She’s adding a sales manager who will serve as the official discount approver. Add that role to the hierarchy, reporting to her.
- From Setup, enter Roles in the Quick Find box, then click Roles.
- Click Set Up Roles.
- Click Expand All.
- Below VP, North American Sales, click Add Role, and then complete the new role details:
Field |
Value |
|---|---|
Label |
Manager |
Role Name |
[this field auto-completes] |
Role Name as displayed on reports |
Manager |
- Click Save.
Allison has hired Courtney Brown to fill the manager role. Add Courtney as a user, with the newly created role of manager, so you can assign tasks to her later.
- From Setup, enter Users in the Quick Find box, then select Users.
- Click New User. Complete the new user record with these details:
Field |
Value |
|---|---|
First Name |
Courtney |
Last Name |
Brown |
Alias |
[this field auto-populates] |
[fill in your own email address] |
|
Username |
Your email auto-populates to this field. Replace it with a new one using this formula:user’s first initial + user’s last name @ your initials + your favorite color + today's date (MMDDYY).com.For example: |
Nickname |
cbrow |
Title |
Manager |
Company |
AW Computing |
Department |
Sales |
User License |
Salesforce Platform |
Role |
Manager |
- Uncheck Generate new password and notify user immediately.
- Click Save.
You’ll be reporting to Courtney, so make her your manager.
- From Setup, enter User in the Quick Find box, then select Users.
- Click Edit next to your name.
- Under Approver Settings, click the lookup icon
 next to the Manager field and search for Courtney Brown, then click on her name.
- Click Save.
Add Custom Fields
Before you create an approval process, you first add a few custom fields to your org. Custom fields let your sales team capture unique business information, such as the Discount Percentage and Approval Status fields you add in this step. You can add custom fields for each of the tabs and objects your organization uses, with a limit of 800 fields.
First, create the Discount Percentage field:
- From Setup, click the Object Manager tab.
- Click Opportunity, then click Fields & Relationships.
- At the top of the Fields & Relationships section, click New.
- Select the Percent radio button, and click Next.
- Complete the new field details:
Field |
Value |
|---|---|
Field Label |
Discount Percentage
|
Length |
2 |
Decimal Places |
2 |
Field Name |
[this field auto-autopopulates] |
- Click Next.
- In the Read-Only column header, select the checkbox.
- In the Read-Only column, deselect the Standard User and System Administrator checkboxes.
- Click Next, then click Save & New.
While still in the Fields & Relationships page for Opportunity, create an Approval Status field:
- Select the Picklist radio button, and click Next.
- Complete the new field details in Step 2:
Field |
Value |
|---|---|
Field Label |
Approval Status |
Values |
Select: Enter values, with each value separated by a new line.
|
- In the text box enter these values, separated by a new line:
- Pending
- Approved
- Not Approved
- Ensure Restrict picklist to the values defined in the value set is selected.
- Click Next, then set the field-level security:
- In the Read-Only column header, select the checkbox.
- In the Read-Only column, deselect the Standard User and System Administrator checkboxes.
- Click Next, then click Save.
Create a Folder and Email Templates
Next, you set up two email templates—one to use when alerting requestors that a discount is approved, and one to use when alerting requestors that a discount is rejected. But first, create a folder to house your new templates.
- From Setup, enter Classic Email Templates in the Quick Find box, then select Classic Email Templates.
- Click Create New Folder.
- Fill in the folder information:
Field |
Value |
|---|---|
Email Template Folder Label |
Discount Request Responses |
Folder Unique Name |
(this field auto-populates) |
Public Folder access |
Read/Write
|
- Select the This folder is accessible by all users radio button.
- Click Save.
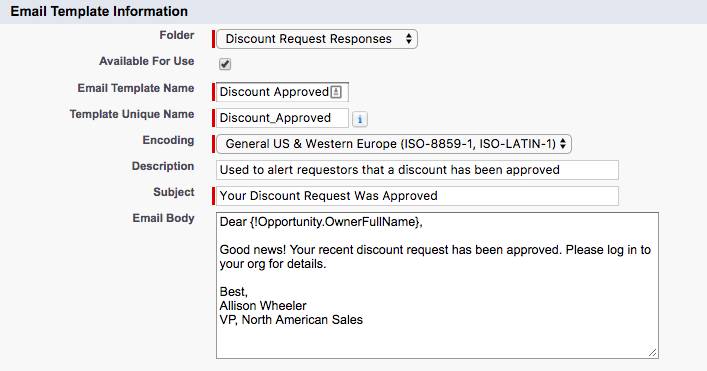
Now create the necessary templates. First, set up a Discount Approved email template.
- From Setup, enter Classic Email Templates in the Quick Find box, then select Classic Email Templates.
- Click New Template.
- Select the Text radio button, then click Next.
- Fill in these details:
Field |
Value |
|---|---|
Select Field Type |
Opportunity Fields
|
Select Field |
Owner Full Name
|
Copy Merge Field Value |
This field auto-populates. It’s copied and pasted into the email body. |
Folder |
Discount Request Responses
|
Available for Use |
Select |
Email Template Name |
Discount Approved |
Template Unique Name |
(This field auto-populates) |
Encoding |
General US & Western Europe (ISO-8859, ISO-LATIN-1)
|
Description |
Used to alert requestors that a discount has been approved |
Subject |
Your Discount Request Was Approved |
Email Body |
Dear {!Opportunity.OwnerFullName}, Good news! Your recent discount request has been approved. Please log in to your org for details. Best, Allison Wheeler VP, North American Sales |
- Click Save.

Next, set up a Discount Rejected email template.
- Navigate back to the initial Classic Email Templates page, then click New Template.
- Select the Text radio button, then click Next.
- Fill in these details:
Field |
Value |
|---|---|
Select Field Type |
Opportunity Fields
|
Select Field |
Owner Full Name
|
Copy Merge Field Value |
This field auto-populates. It’s copied and pasted into the email body. |
Folder |
Discount Request Responses
|
Available for Use |
Select |
Email Template Name |
Discount Rejected |
Template Unique Name |
(This field auto-populates) |
Encoding |
General US & Western Europe (ISO-8859, ISO-LATIN-1)
|
Description |
Used to alert requestors that a discount has been rejected |
Subject |
Your Discount Request Was Rejected |
Email Body |
Dear {!Opportunity.OwnerFullName}, Unfortunately, your recent discount request has been rejected. Please log in to your org for details. Best, Allison Wheeler VP, North American Sales |
- Click Save.
Now that you’ve got the prep work done, you’re ready to create an approval process.
