Assign the Right Agents to Shifts
Learning Objectives
After completing this unit, you’ll be able to:
- Create shifts faster using a shift template.
- Mark shifts as non-standard.
- Assign shifts to the right agents based on your scheduling rules and scheduling objectives.
- Compare case volume demands with your existing schedule.
So far Rachel Jones has predicted the coming month’s case volume through intelligent forecasting and determined staffing requirements with an Omni-Channel plan. Her team is also hard at work upskilling and reskilling with agent engagement to help better serve customers. Now Rachel must assign the right agents to the right shifts at the right time. That’s where the Mass Update tool comes in.
After Rachel views her plan, she’s ready to add shifts.
After shifts are created, she uses the Mass Update tool to assign the shifts to the best qualified agent automatically. Mass Update chooses the right agent for the job based on these criteria.
- Business rules: Admins can set rules that ask their org to match agents to shifts based on availability, skills or membership in queues, service territory, or work limit.
- Business objectives: Admins can set scheduling objectives that meet their business goals. Current objectives are matched to agent preferences, balance shifts among the workforce, and balance non-standard shifts among the workforce. Non-standard shifts are shifts that many workers don’t want to sign up for, such as weekends or night shifts.
First, Rachel creates the number of shifts that her Omni-Channel Plan recommends. Then she uses the Mass Update tool to assign her shifts and refreshes her Omni-Channel plan to compare shift requirements with assigned shifts.

Create Shift Templates to Create Shifts Faster
Shift templates automatically fill in the important information for the shift like the start and end times and the job profile and status. This enables shift schedulers to be more efficient.
- From the App Launcher, open Shift Templates.
- From the Shift Templates page, click New.
- Enter
Start Time,Duration, andJob Profile. - Click Save to save the template or Save and New to save and continue creating shift templates.
Create Shifts to Meet Your Plan’s Demand
- Open Shifts from the App Launcher.
- Select All Shifts from the dropdown, and change to Schedule View.
- Hover over the date you want for this shift.
- Click + New Shift.

- Select a start and end time for the shift.
- Add the service territory that’s associated with your Omni-Channel plan.
- Add a job profile. Make sure these values match what was used in the Omni-Channel plan.
- If it’s a non-standard shift, select the checkbox.

- Click Save.
- View the new shift on the calendar.
- Reopen the shift, and click Clone to repeat the steps and create as many shifts as you need.
When Rachel’s shifts are all in place, she uses the Mass Update tool to add the agent who will work the shift.
Assign the Right Agents to the Right Shift
The Mass Update tool looks at Ursa Major Solar’s scheduling rules and scheduling objectives to determine who is appropriate for the shift. Then it assigns all the shifts to agents who meet the criteria. Let’s look at how Rachel uses Mass Shift Update.
- In the App Launcher, find and select Shifts.
- In either the schedule or table view, click Mass Shift Update.
- Select Assign Shifts.
- Define criteria that selects which shifts to assign. Specify a date range, service territories, and job profiles.

- Click the button to start the update process.
Her shifts are assigned. Now Rachel can refresh her Omni-Channel plan to see how the shifts she assigned meet the forecasted shift requirements.
Compare Shift Requirements Against Scheduled Shifts
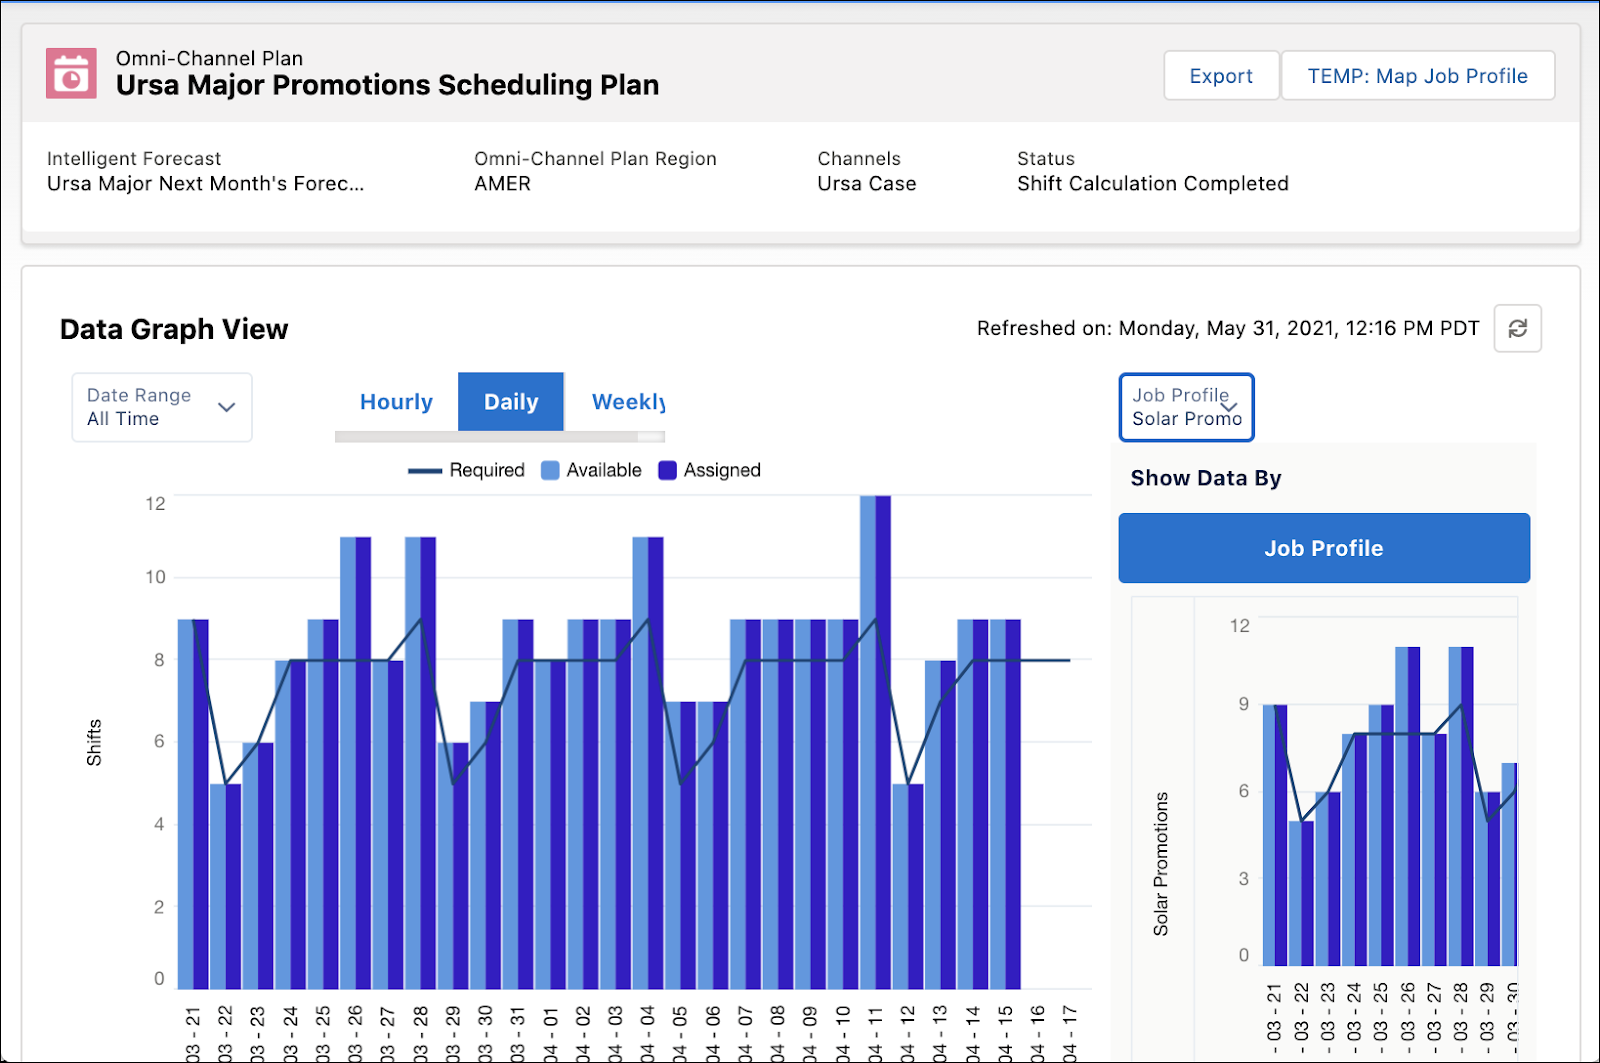
Rachel returns to her Omni-Channel plan and refreshes it. The plan still shows the required number of shifts in the black line. But now there are two more important data points. The light blue bar represents available shifts, both assigned and unassigned. The dark blue bar represents assigned shifts only.
Rachel can toggle between hourly, daily, and weekly views in the main graph to see the number of additional shifts she could add.
She can filter by job profile at the right.

Rachel moves confidently into the month-long promotion, knowing that her agents are going to be in the right place at the right time to ensure a smooth customer experience. She rests easy knowing that she reviewed her intelligent forecast to anticipate next month’s future workload. She feels good about the data-driven staffing decisions she made with her Omni-Channel plan. She has confidence in her newly upskilled support agents who took agent engagement modules to prepare for the increased support workload that this promotion may bring. And she knows the best agents are assigned to shifts thanks to the batch assignment tool.