Extract External Data into CRM Analytics
Learning Objectives
After completing this unit, you’ll be able to:
- Prepare external data before bringing it into CRM Analytics.
- Upload a CSV file of external data.
- Monitor and verify an external data upload.
Extract External Data Overview
It’s time to get that data into CRM Analytics so the sales leadership team can have its performance dashboards. It’s your job to administer Salesforce and set it up for the sales team. You know that most of the data they want to look at is already there, in the Opportunity, Account, and User objects. But some of it, if you recall, is pulled in from an external source. No problem at all for CRM Analytics! Let’s dig a little deeper.
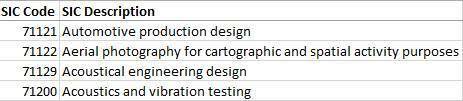
The Sales Operations team at your company uses a Standard Industry Classification (SIC) code field on each account to identify its industry. Sales leaders have a hard time deciphering these codes, preferring instead a good old-fashioned description. So, Sales Operations has provided a CSV file with all the SIC codes they use, complete with descriptions. Here’s a snippet:
Your objective in this unit is to extract this data in CRM Analytics so that it can be added to the Salesforce data you’re going to extract.
Prepare Your CSV Data
When you extract data from a CSV file, CRM Analytics makes assumptions about what type of data it is, based on the values it sees in each field. It assigns each field a type of measure, date, or dimension. These types are important because they determine how you interact with a field in a CRM Analytics lens or dashboard.
CRM Analytics does a good job of assigning the correct field type, but sometimes you need to help determine the right type. So, let’s walk through the SIC Descriptions CSV file, field by field, to see what you need to do.

SIC Code
CRM Analytics identifies a numerical field like this as a measure.
A measure is a field that you can perform calculations on, such as sum and average. CRM Analytics recognizes currency symbols, commas, and decimal points in numerical data, but beware. If it sees any other non-numeric characters, it sets the field to a dimension, and you can’t do math on it. So review numeric fields and remove any other non-numeric characters if you want the fields to be measures.
But look out for fields like this that contain numeric values but aren’t measures. Nobody wants to do math on an SIC code, zip code, or ID field, but CRM Analytics thinks you do and identifies fields like these as measures. There’s not much you can do about it now, but when you upload the data, you can change these field types to dimensions. So, for now, just make a note of them.
SIC Description
Any field like this, that contains non-numeric characters, is identified as a dimension. You can group and filter on dimension fields. CRM Analytics doesn’t usually get tripped up by these fields, so there shouldn’t be anything for you to do!
Last Updated
CRM Analytics recognizes all common date formats and sets a field like this as a date. It even sets the format for you and is smart enough to distinguish between US and European date formats. However, take a moment to review the date fields to ensure that values are in one of the supported formats. If CRM Analytics doesn’t recognize the format, it sets the field to a dimension. When this happens, you lose some of the cool date grouping and filtering functionality. Also, check that your dates are all in the same format. For example, if CRM Analytics sees a mixture of US and European formats, it uses the European format.
Column Headers
Check that the column headers are correct because these become field labels in your dataset. You can fix them in the CSV before you proceed. Or you can wait until you upload the file, where you get another chance to change them.
The good news is that you get a chance to preview how your data appears in CRM Analytics, and you can tweak it if you need to.
Upload Your CSV Data
Now that you’ve prepared your CSV file, it’s time to upload it to CRM Analytics using the CSV uploader tool. You also create an app for the new dataset along the way.

- Download the SIC Descriptions CSV file to your desktop from here.
- If you’re not already logged in, log in to the Developer Edition org that you signed up for in the previous unit.
- From the App Launcher (
 ), find and select Analytics Studio. Analytics Studio opens in a new browser tab.
- In the Analytics Studio, click Create and select App.
- You’re creating an empty app, so click Create Blank App.
- Click Continue.
- In the Name your app field, enter Sales Performance Datasets.
- Click Create.
- At the top of the app page, click Create and select Dataset. Creating a dataset from within an app automatically selects the app name for you. Hey, every little bit helps!
- Click CSV File.
- Click Select a file or drag it here.
- Navigate to the CSV file that you downloaded earlier, select it, and then click Open. If the file is within dragging distance, you can drag it into the Select a file or drag it here box instead, and save yourself a few seconds.
- Click Next. CRM Analytics uses the file name as the name for the new dataset, and selects the app.
- In the Dataset Name field, change the name to SIC Descriptions. CRM Analytics detects certain properties of your file, such as the delimiter and encoding. You can review these properties in the File Properties Detected box. To make changes, click
 and then click Edit.
- Click Next. The Edit Field Attributes screen appears, giving you a preview of the data you’re about to extract to CRM Analytics.
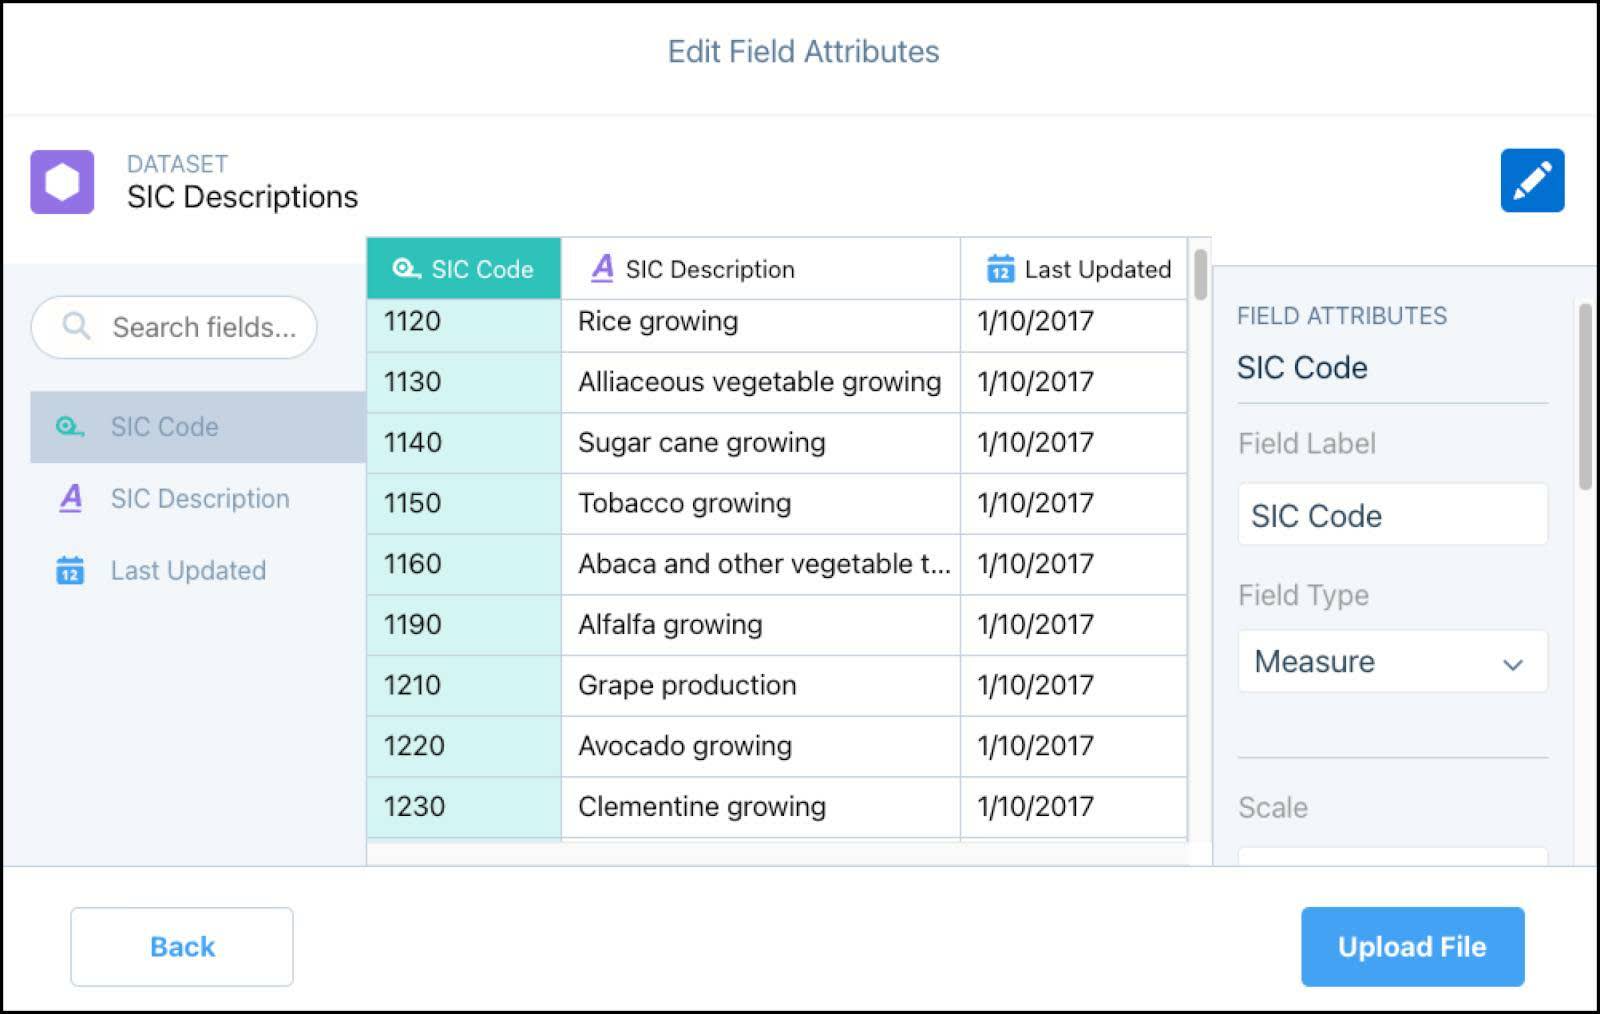
As previously promised, now is your chance to fix your data before getting it into CRM Analytics. Think back to the things you were looking out for when you prepared the CSV file. You wanted to make sure that the fields were set to the correct type: measure, date, or dimension. You also checked that the field names were correct. To see if CRM Analytics got the field types right, look at the field headers in the preview. The icon in each header tells you the field type.
If CRM Analytics made a mistake, you can click a column to view and edit its attributes in the Field Attributes panel on the right.
In your data, it looks like CRM Analytics has identified the SIC Code field as a measure. That identification is understandable, but it’s not what you want. If you leave the field type as measure, you can add SIC codes together (not useful), but you can’t group your accounts and opportunities by SIC code (very useful). So, let’s change the type.
- Click the SIC Code column. The field attributes appear in the panel on the right.

- From the Field Type picklist, select Dimension.
You also checked the date field in the CSV file to ensure CRM Analytics sets the type and format correctly. So let’s check that too.
Click the Last Updated column. The field attributes appear in the panel on the right.

Looks like CRM Analytics got the data type right but set the format to d/M/yyyy. All the dates in the CSV file are 1/10/2017. This is either January 10 if you use the M/d/yyyyy format popular in the US or October 1 if you use the d/M/yyyyy format popular in Europe. CRM Analytics doesn’t know which, so it picks the European format. If you want to use the US format, you can easily change it here.
Leave the data format as is for now.
As we predicted, CRM Analytics had no trouble correctly identifying the SIC Description field as a dimension. So, it looks like you’re done here. Just click Upload File to finish up.
CRM Analytics uploads the data and gives you a view of progress as it creates the dataset.

There’s a link here that takes you to the data monitor to see how the dataset is getting on. But let’s take a break here, so, if the progress dialog hasn't closed, click Close. Close the Sales Performance Dataset tab.
OK, time for a hot beverage. When you get back, you can check that the dataset has been created.
Monitor the Data Job and Verify the New Dataset
Behind the scenes, CRM Analytics creates a job for your new dataset, which runs in the background. How long this job takes to run depends on how big your CSV file is and how many other jobs CRM Analytics has on the go. It’s easy to check the progress of jobs through the data manager.
- From the App Launcher (
 ) in the upper right, find and select Data Manager. The data manager opens in a new browser tab. The first thing you see here is the Monitor tab.
- Look for your job in the list. The job name starts with the name of the CSV file, SIC_Descriptions, followed by “Upload flow - overwrite”.

- If you’re interested in seeing what CRM Analytics has done to extract your data, click the job ID.
If all’s well, the job status is Successful. If not, try retracing your steps and loading the data again.
Now, it’s time to check the dataset itself. Check such things as field data types and date formats again in the live dataset. So, find the dataset and take it for a spin.
- On the left of the data manager, click the Data Assets option.
- On the Data Assets tab, on the right of the SIC Descriptions dataset, click
 and select Explore.
- On the left of the new lens, under Bar Length, click (+), the add a measure button.

No measures here! Remember, we didn’t set any measures in the field attributes.
- Under Bars, click (+), the add a group button. Check that your three fields, Last Updated, SIC Code, and SIC Description, are here. This confirms that CRM Analytics has set them as a date or dimension. Close the New Lens browser tab.
Congratulations! You’ve turned your CSV file into a dataset using the CSV uploader tool.
Next up: Bring your Salesforce data into CRM Analytics.
Resources