Finalize Sales Analytics Creation
Learning Objectives
After completing this unit, you’ll be able to:
- See how CRM Analytics lets you mix Salesforce and external data.
- Create and add a .CSV file to the Quotas dataset to complete Sales Analytics dashboards.
Add the Finishing Touches to Your App
Your mission as DTC’s Salesforce admin—to get Laura Garza off to a flying start with the Sales Analytics app—is almost done. In the previous unit, the last time you created Sales Analytics you noticed that your dashboards missed a key component: data about quotas for Laura’s sales team! That won’t do: Laura needs to show the CEO how the quarter is going and to recognize top performers. (And get the team members facing the biggest challenges back on track.)
We show you how to put this final touch on Sales Analytics here.
Importing Quota Data From Outside Salesforce
As the DTC Salesforce admin, you know that DTC keeps specifics about quotas (such as their amounts and the period they cover) in a tool that’s not part of Salesforce. You know exactly where, and you need to get that data into Sales Analytics so it shows in dashboards.
Dashboards showing quotas, such as the Company Overview and (even worse) the Executive Overview, won’t be meaningful without showing targets for individuals and the team. Just in case you haven’t done so yet, go to the Analytics for Sales Managers app and have a look at those dashboards. In Executive Overvew, click the Sales Performance widget. You can see a place for Quota Attainment, but there’s nothing there! Let’s fix this by creating and importing a CSV file with the quota data.

Fortunately CRM Analytics gives you a great way to integrate with multiple data sources so you can look at all your data in one place. To get your quotas data from the external tool into the app, follow a basic two-step procedure:
- Assemble quotas data into a plain CSV file.
- Import the data into a dataset called Quota.
Let’s get going.
Assembling the Quotas CSV File
Just so you know, Sales Analytics is picky, and expects the file to follow a precise format. First, make sure it’s just a simple CSV file and NOT an .xls or other file. In fact, only open your CSV file in a UTF-8 compliant text editor, like Sublime, or Sales Analytics might choke on it.
The CSV file needs to include the following fields, with those specific column names in this order, or the app can’t import it:
- QuotaAmount -- the amount assigned to each team member.
- StartDate (in yyyy-mm-dd format) -- the start of the period you want your team to reach its quota.
- OwnerName -- the name of the team member. This is the user’s Full Name in Salesforce.
- Username -- the team member’s Salesforce User ID.
It also needs to include a header identifying each column. When complete, the file needs to look like this:
QuotaAmount,StartDate,OwnerName,Username
150000,2016-01-01,Chris Riley,trailhead9.ub20k5i9t8ou@example.com
150000,2016-02-01,Chris Riley,trailhead9.ub20k5i9t8ou@example.com
150000,2016-03-01,Chris Riley,trailhead9.ub20k5i9t8ou@example.com
150000,2016-01-01,Harold Campbell,trailhead14.jibpbwvuy67t@example.com
150000,2016-02-01,Harold Campbell,trailhead14.jibpbwvuy67t@example.com
150000,2016-03-01,Harold Campbell,trailhead14.jibpbwvuy67t@example.com
150000,2016-01-01,Jessica Nichols,trailhead19.d1fxj2goytkp@example.com
150000,2016-02-01,Jessica Nichols,trailhead19.d1fxj2goytkp@example.com
150000,2016-03-01,Jessica Nichols,trailhead19.d1fxj2goytkp@example.com
150000,2016-01-01,Catherine Brown,trailhead16.kojyepokybge@example.com
150000,2016-02-01,Catherine Brown,trailhead16.kojyepokybge@example.com
150000,2016-03-01,Catherine Brown,trailhead16.kojyepokybge@example.com
150000,2016-01-01,Kelly Frazier,trailhead7.zdcsy4ax10mr@example.com
150000,2016-02-01,Kelly Frazier,trailhead7.zdcsy4ax10mr@example.com
150000,2016-03-01,Kelly Frazier,trailhead7.zdcsy4ax10mr@example.com
150000,2016-01-01,Dennis Howard,trailhead4.wfokpckfroxp@example.com
150000,2016-02-01,Dennis Howard,trailhead4.wfokpckfroxp@example.com
150000,2016-03-01,Dennis Howard,trailhead4.wfokpckfroxp@example.com
Two of the fields – owner name and Salesforce ID – come from Salesforce, and we can tell you how to get them. With that understood, things get tricky. The other two fields come from the application outside of Salesforce that DTC uses to track quotas. In the real world, you’d export that quota data and reformat it to work correctly. The basic process looks like this:
- Start with a Salesforce report about your team that grabs just the owner name and Salesforce ID columns, in just that order. It’ll look like this:
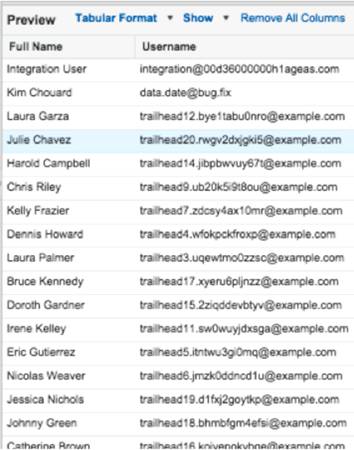
- Export a comma delimited CSV file with the resulting data. The above report will look like this:

- Use the DTC quota tracking tool to get the other information to complete the file, that is amount and start date, and export that as a CSV file, as well.
- Merge the data from the two files into a single CSV, being careful to put the right dates and amounts next to the right members of your team.
- Clean the file up, getting rid of extraneous spaces, characters, and so on.
- Put the header ‘QuotaAmount,StartDate,OwnerName,Username‘ at the top of the file.
Okay, while we know CSV files are tremendous fun, we don't want you to spend precious Trailhead time building your own. In the real world, set aside time for cutting and pasting. In Trailhead, we provide a prebuilt CSV file with all the right data in the right places -- you can find it in the Trailhead Data Manager. Read on to find out how to get it and what to do with it.
Import the Quota File
Great work! You’ve assembled your quota CSV file. (OK, not really, but you’ve learned how.) Now, go ahead and grab the file with the correctly formatted data from the Trailhead Data Manager page. Here’s how:
- Go to Analytics Studio, then open the App Launcher (
 ).
).
- Select Trailhead Data Manager.
- Click the Quota Data circle, and then click Download Quota CSV.
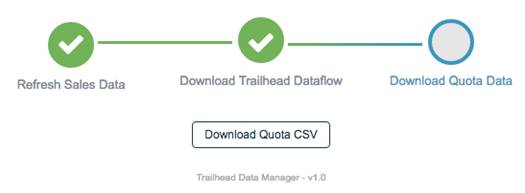
- Save the file, ‘DTC_Quota.csv’ in your Downloads directory.
- While you’re in the data manager, if you see a message that your data isn’t up to date, click Refresh Sales Data and wait for that to finish running.
Now, let’s add the file to the Quota dataset in your app.
- In the app picker at left, select Analytics Studio. Click Analytics for Sales Managers to see the complete list of app assets. The app’s assets include dashboards, lenses, and datasets, all organized into their own sections.
Note: Be sure to click the name of the app and not Run App.
- Click the Datasets tab and locate the Quota dataset.
- Click the arrow to the far right of the dataset name and click Edit.
- In the next window, click the Replace Data icon
 at the upper right.
- That takes you to the Replace Dataset Data page. Click Select file or drag file here….
- Find and select the DTC_Quota.csv file and click Next. Click Next in the next screen, then Upload File in the next screen. (These screens let you fine-tune your data before you upload it into a dataset, but that’s a subject for a different day. If you want to learn more about importing data to CRM Analytics, see the CRM Analytics Data Integration Basics Trailhead module.)
- You’ll be asked to confirm that you want to replace the data. Click Replace to confirm, and you’re almost done. But first…
Run the Dataflow to Include Quota Data
You have to run the dataflow again to make sure Sales Analytics adds your sales team quota data, which you’ve just uploaded, to all the other datasets of your app!
- From Analytics Studio, click the gear icon in the upper right, and select Data Manager.
- Scroll down and click Manage Dataflows, then click Dataflows.
- Locate Analytics for Sales Managers eltdataflow.
- Open the menu on the far right opposite the app name and select Run Now. It takes a few minutes for the dataflow to run.
Once the dataflow finishes running, your app dashboards include your team’s quotas so you can see how each of them is doing against their target for the period. When it’s done, take a look.
View Quota Data in a Dashboard
Go to your app, open the Company Overview dashboard again, and reload the page. Just for fun, change the Time Period filter from this Current Fiscal Quarter to Current Fiscal Year. Now that we’ve added quota data, it will look something like this, with data in all the right places:
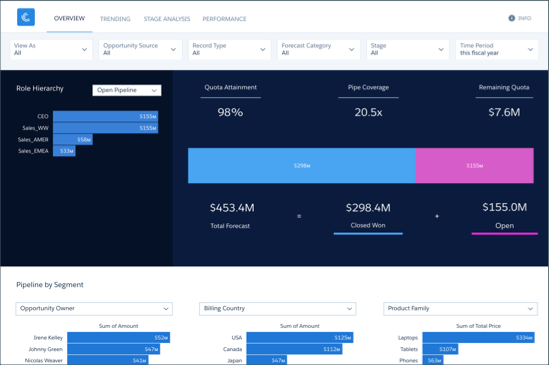
What else can you learn from the dashboard? Below, under Pipeline by Segment, you can see individual opportunity owners. That lets you see quotas for individual members of the team. Click the bar for one of them and the dashboard shows you just that rep’s results against quota and the product areas they’re selling, under Product Family. For an even more granular breakdown, change the Product Family filter to Product Name.
That’s it! Your app is all set for Laura to use. Now, the fun can really begin: Laura can use the app’s dashboards to get a fast, visual overview of the quarter and take the actions she needs to manage her team to success.
Share the App
Just one more step: Share the app with Laura.
- Open your app if it’s not already open. If you’ve navigated away from Analytics Studio, go back to it, select All Items, find your app, and click it.
- Click the Share icon
 at upper right.
- In the next screen, type
Laurain the search field under Invite others:. When her name comes up, select it
- She only needs to view the app (not edit or delete it), so select Viewer.
- Click Add, then click Save.
Wrap Up
Congratulations on a patient job, carefully done. Laura just sent you an email telling you about the lunch she’s going to take you to at your favorite seafood place next time she’s in town. Awesome.
Of course, your job as Salesforce admin is never done, and there’s certainly some fine-tuning ahead. But, for now, you can pat yourself on the back for finishing the process of creating Sales Analytics!
Resources
- Salesforce Help: Forecasting and Quotas Data in Sales Analytics