Customize the Vehicle Console
Learning Objectives
After completing this unit, you’ll be able to:
- Create a timeline for vehicles.
- Add a timeline to the Vehicle page layout.
- Create an actionable relationship center graph for vehicles.
- Set up Retail Delivery Report records.
- Add interest tags for vehicles.
Track Records on a Timeline
When service agents interact with customers or dealers, each interaction is captured as an Engagement Interaction record. And each topic that they discuss during an interaction is captured as an Engagement Topic record. Rosa wants to:
- View all Engagement Topics related to a vehicle’s current owner on the Vehicle page. This would help sales and service managers to understand the type of queries and assistance the customer has reached out for.
- Track all escalated and ongoing cases related to a vehicle owner’s account so that her team can resolve the cases quickly.
To meet Rosa’s requirements, David creates a timeline called Vehicle Timeline in Setup. He selects Current Owner ID for the Parent Record, which is a lookup to Account. Next, he selects two related objects with the following details and activates the timeline.
Related Object |
Field |
Title Field |
Timestamp |
Visibility Conditions |
|---|---|---|---|---|
Case |
AccountId |
Description |
Created Date |
Status = In Progress and Escalated |
Engagement Topic |
RelatedPersonID |
Name |
System Modstamp |
Not Applicable |
Having created and activated the timeline, David adds it to the Vehicle page layout.
- Open a Vehicle record, and click Edit Page from Setup.
- Drag the Timeline component to the page layout.
- To select the timeline configurations to make available, in the component properties panel, click Select. Only active timeline configurations are available for selection.
- In the Timeline window, select the Vehicle Timeline configurations, and then click OK. You can select up to five active timeline configurations.
- Click Save.
- Click Activation, and select Assign as Org Default.
- Click Done.
And just like that, David is done with Rosa’s first requirement for the vehicle console. Users can now easily track all topics and relevant cases associated with a vehicle’s current owner.
Create a Relationship Graph
A vehicle can be associated with many stakeholders. There are sales dealers who sell the vehicle and its parts and accessories, and service dealers who repair the vehicle. Then, there are customers and the members in their households. And each customer or dealer is related to several other stakeholders, such as the financier, the legal representative, the customer relationship manager, service technicians, and sales agents.
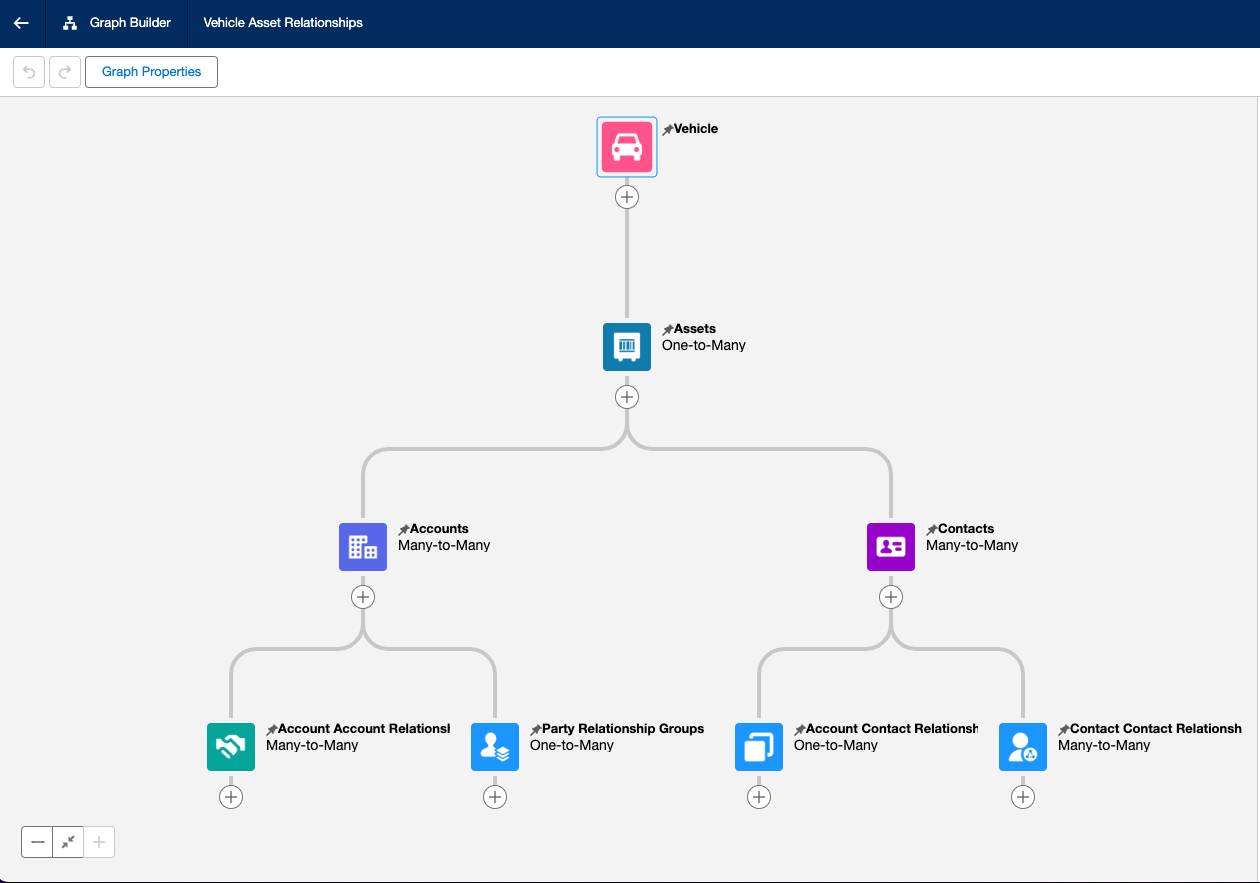
To help users understand how these different accounts and contacts are related to each other, David creates an Actionable Relationship Center graph that visually depicts all the relationships.
- From Setup, in the Quick Find box, search for and select Actionable Relationship Center.
- Click New Relationship Graph.
- Select New on the Default Templates tab.
- Click Create Graph.
- Configure the graph properties:
- For Label, enter
Vehicle Asset Relationships.
- For Graph Type, select Horizontal Hierarchy.
- For Label, enter
- Click the root node on the graph and complete the following fields:
- Object: Vehicle
- Sort By: Last Modified Date Descending
- Node Configuration: Use As Default
- Object: Vehicle
- Click Save.

Next, David adds the following nodes and fields.
Node Object |
Parent Node |
Relationship Type |
Junction Object |
Parent Node Lookup Field |
Object Lookup Field |
Additional Fields or Actions |
|---|---|---|---|---|---|---|
Asset |
Vehicle |
One-To-Many |
N/A |
Vehicle |
N/A |
Edit (Record Action) |
Account |
Asset |
Many-to-Many |
Asset Account Participant |
Asset |
Account |
Add Contacts to Campaign (Record Action) |
Contact |
Asset |
Many-to-Many |
Asset Contact Participant |
Asset |
Contact |
Add to Call List (Record Action) |
Account Account Relationship |
Account |
Many-to-Many |
Account Account Relationship |
Related Account |
Related Inverse Record |
Party Role Relationship Name (Additional Field) |
Party Relationship Group |
Account |
One-to-Many |
N/A |
Account |
N/A |
(Additional Fields) |
Account Contact Relationship |
Contact |
One-to-Many |
N/A |
Contact |
N/A |
Edit Relationship (Record Action) |
Contact Contact Relationship |
Contact |
Many-to-Many |
Contact Contact Relationship |
Related Contact |
Related Inverse Record |
Party Role Relationship Name (Additional Field) |
Finally, he adds the graph to the Vehicle page layout.
- Open a Vehicle record, and click Edit Page from Setup.
- Click anywhere in the main region, and click Add Tab.
- For Tab Label, select Custom, and enter
Relationships.
- Drag the ARC Relationship Graph component onto the Actionable Relationship Center tab.
- In the properties panel, in the Label field, enter
Businesses and Individuals.
- For Graph Name, select the active graph Vehicle Asset Relationships.
- Click Save.
- Click Activation, and select Assign as Org Default.
- Click Done.
Create Retail Delivery Report Records
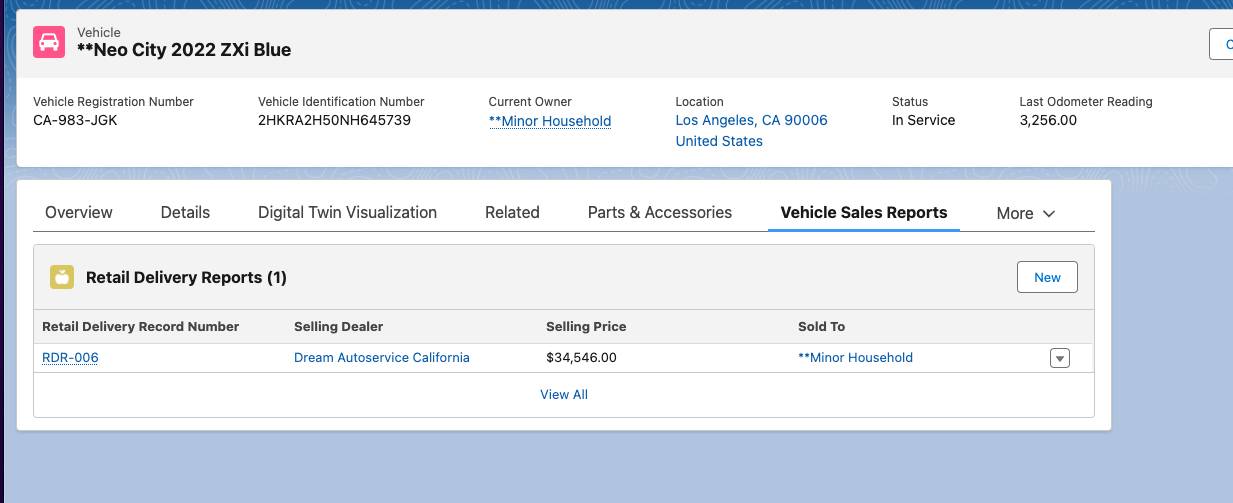
At Neo Motors, sales managers track all retail delivery reports submitted by dealers whenever dealers sell a vehicle or parts and accessories to a customer. Rosa wants to view all retail delivery reports related to a vehicle on the vehicle console.
In Automotive Cloud, retail delivery reports are captured in Rebate Claim records with Claim Type specified as Vehicles Sales Report. But David realizes that to show the list of Rebate Claim records related to a vehicle, he needs to create a custom object that connects the two. The custom object must show essential information that a sales manager wants to know.

David creates a new object called Retail Delivery Report with the following fields.
Field |
Data Type |
|---|---|
Vehicle |
Lookup to Vehicle |
Vehicle Sales Claim |
Lookup to Rebate Claim |
Selling Dealer |
Lookup to Account |
Sold-To |
Lookup to Account |
Selling Price |
Currency |
Sold Date |
Date |
Claim Status |
Text |
Vehicle Delivery Status |
Text |
To automatically populate the values in Retail Delivery Report records, he creates a record-triggered flow. The flow creates a Retail Delivery Report record each time a Rebate Claim record is created with the following conditions.
- Claim Type equals Vehicle Sales Report.
- Vehicle ID is not null.
He defines conditions to ensure field values in the Retail Delivery Report record get auto-populated from corresponding fields on the Rebate Claim record. For example, the Selling Price field automatically inherits the Sale Price Per Unit value from the Rebate Claim record.
Add Interest Tags
David moves on to the last requirement. When sales managers design marketing campaigns and messages targeted to customers, it’s crucial to track a customer’s interests and preferences. David wants to add the Interest Tags component to the Vehicle page layout. This would allow users to browse through a list of tag categories and tags with ease and assign tags to a vehicle record. You can think of these as hashtags on social media platforms, which help you categorize and discover content.
Here are the key tasks that David performs to set up Interest Tags for the Vehicle page.
- Enable Topics in Setup for the Vehicle object.
- Assign Rosa and her team members the permission to assign, create, and edit topics.
- Create Tag Category records, such as Vehicle Type, Advanced Features, and Customer Preferences.
- Create Interest Tag records and associate them with a specific category. For example, create tags Sunroof, Heated Seats, and ADAS - Traffic Sign Recognition, and associate them with the Advanced Features category.
- Add the Interest Tags component to the Vehicle page in Lightning App Builder.
- Specify the maximum number of tag categories and tags to display on the component.
- Allow users to search for tags within the component.
- Save and activate the layout.
Let’s say the Neo Ionic EV CD4 VXi Blue vehicle gets the Sunroof tag. Users can easily discover this vehicle when they send segmented marketing messages, or when they take stock of customer purchasing patterns.

Accelerate with Automotive Cloud
David has successfully customized Automotive Cloud to meet Rosa’s requirements. Rosa and her team can track all vehicles and their related data with ease and simplicity. As Neo Motors’s business grows, Automotive Cloud can support other requirements. For example, Rosa can view telematics data related to vehicles, or track the amendments and renewals to opportunities and orders where an asset was sold. The possibilities are truly endless and with David in the driver’s seat, Neo Motors feels confident.
It’s now time for you to put this knowledge to the test, and take your business to the fast lane with Automotive Cloud!