Create Prompts in Agentforce 360 Platform
Learning Objectives
After completing this unit, you’ll be able to:
- View all prompts and walkthroughs in an org.
- Create a targeted prompt in Lightning Experience.
- Create a docked prompt in Lightning Experience.
Ready to Get Hands-on with Prompts?
To follow along and practice the steps in this module, you need to install an app (package) in your Trailhead Playground. Follow the instructions here to launch a playground and install the app. You also use this app and playground when it’s time to complete the hands-on challenge.
To launch your Trailhead Playground, scroll to the bottom of this page and click Launch. Then follow these steps.
- If you see a tab in your org labeled Install a Package, great! If not, open the App Launcher (
 ), enter play, and then select Playground Starter.
- Click the Install a Package tab.
- Install the Prompts for the Sales app package:
- For Package ID, enter
04t3k000000bHJEAA2.
- Click Install.
- Select Install for All Users, then click Install.
- When complete, click Done.
- Repeat step 3 to install the Prompts for the Service app package, using this ID:
04t6g000002RSR7AAO.
If you don’t see the Playground Starter app, copy one of these app IDs and check out Install a Package or App to Complete a Trailhead Challenge on Salesforce Help.
When your app is finished installing, you see a confirmation page and get an email to the address associated with your playground.
Let’s take a look at the new prompts you just installed.
- Click
 and select Setup.
- In the Quick Find box, enter in-app, and then select In-App Guidance. This page shows all prompts you installed.
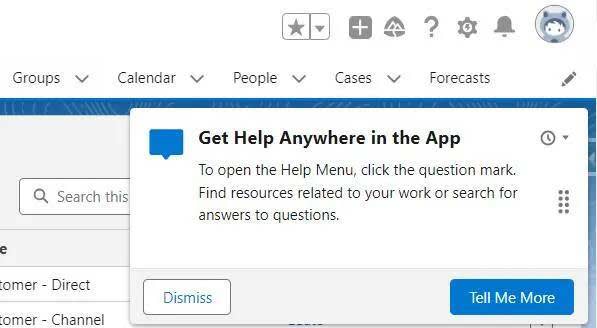
- Find the floating prompt named “Get Help Anywhere in the App” or “Case List Get Help Anywhere in the App”.
From the row-level action dropdown menu, select Preview. A new tab opens so you can see how the prompt appears to users.
If these prompts don't precisely meet your needs, you can create your own prompts or walkthroughs.
Add a Prompt
The Get Help Anywhere in the App prompt looks great just as it is, but it’s only set up for the Sales app. Let’s add it to the Sales Console app so console users see it too. See Lightning Sales Console in the Resources section for more information about the Sales Console app and how it differs from the standard Sales app.
Navigate to the Sales Console App
- Click Setup (
 ) and select Setup.
- In the Quick Find box, enter
in-app, and then select In-App Guidance.
- Click Add. The In-App Guidance Builder opens in a new tab.
- Click the App Launcher (
 ), enter
 sales, and then select Sales Console.
- In the builder bar (above the Home page), click Add. A side panel opens so you can specify the prompt’s details.
Create a Targeted Prompt
- Select Single Prompt and then click Next.
- For Prompt Type, select Targeted Prompt.
- Scroll to Prompt Position and click Targeting Mode.
- Click the Salesforce Help icon in the global header.

- If you want to select a custom theme color:
- Select the Use a custom color for in-app guidance option.
- Choose an Available Color.
- Choose either Light or Dark.
- Click Next.
- For Title, enter
Get Help Anywhere in the Console App.
- For Body, enter:
To open the Help Menu, click the question mark. - For Dismiss Button Label, enter
Got It.
- Save your changes. A window opens for specifying additional settings.
Specify Prompt Settings
- Specify behavior for the prompt’s action button.
- For Action Button Label, enter
Tell Me More.
- For Action Button URL, enter
https://help.salesforce.com/s/articleView?id=xcloud.lex_find_help.htm.
- Click Next.
- Specify the prompt’s schedule.
- For End Date, enter 3 months from today.
- Select the Show when the page loads option.
- For Times to Show, enter 2.
- For Days In Between, enter 5.
- Click Next.
- Leave No profile restrictions selected and click Next.
- Leave No permission restrictions selected and click Next.
- Enter an internal name and description so that other in-app guidance creators know how this prompt is used.
- For Name, enter
Get Help Anywhere in the Console App.
- For API Name, accept the default value:
GetHelpAnywhereintheConsoleApp - For Description, enter
Tell users how to get help from anywhere in the console app.
- Click Save.
- When you’re satisfied, click Done.

To see your new prompt, in the builder bar, open the On This Page list and select Get Help Anywhere in the Console App.
Specify Trusted URLs for Images in Prompts
Sometimes it helps to include an image in a prompt. For example, you might want to highlight an important part of a custom app. You can upload an image file directly into a prompt or you can link to an image stored somewhere else. Before you can link to an image, however, your org must trust the URL that has the image.
Set Salesforce Help as a trusted location for images.
- In Setup, in the Quick Find box, enter trust and then select Trusted URLs.
- Click New Trusted URL.
- For API Name, enter:
help_salesforce_com - For URL, enter:
help.salesforce.com.
- For Description, enter:
Allow images from Salesforce Help.
- Under CSP Directives, verify that img-src (images) is turned on.
- Click Save.
Prompts and Walkthroughs in Experience Cloud Sites
If your company has purchased Enablement, purchased Partner Relationship Management (PRM), and created an Experience Cloud site built with Aura templates, you can add these types of in-app guidance to site pages.
- Individual floating prompts
- Walkthroughs that consist of floating prompts only
For requirements and considerations for creating prompts and walkthroughs in supported site pages, see the Resources list.
Track User Engagement for Prompts and Walkthroughs
When you have a lineup of great prompts and walkthroughs, track how well users are interacting with your content. These prebuilt metrics are available on the In-App Guidance page in Setup for tracking user engagement.
|
Metric
|
Description
|
|---|---|
Views |
The total number of unique users who have seen the prompt or walkthrough. |
Completes |
The percentage of viewers who have clicked the action button in a prompt, clicked the action link in a walkthrough, or clicked Finish on the last step of a walkthrough. |
Set up a custom report type using the Prompt Actions object. Add the Step Number, Last Display Date, Last Result (look for the Error valid value), Name, and User: Full Name fields as columns in the report. See Analytics for In-App Guidance in the Resources for a list of all available fields and links to topics about creating custom reports.
You can download a Salesforce Labs package of prebuilt, customizable reports and dashboards. Visit the Salesforce AgentExchange to install the free packages for prompts and walkthroughs. Find more information about the package on the AgentExchange listing pages, including user guides.
With these metrics in hand, you can start asking questions to identify trends and gain insights.
- Did you get more views or clicks on docked, floating, or targeted prompts?
- Did you get more action button clicks with a certain button label or title?
- Did longer content get fewer button clicks?
- Was there a drop-off in engagement during the run of the prompt?
- Did walkthroughs with more than five steps have a greater drop-off rate than shorter walkthroughs?
It may be difficult to identify exact correlations between behavior and retention, but reviewing metrics helps you fine-tune your location, position, content, and frequency settings.
Keep it going! Prompts and walkthroughs are pretty easy (and fun) to create. You might want to keep making more of them. However, they're only one part of user engagement. In the next unit, you use what you’ve learned to craft a user engagement journey.
Resources
- Salesforce Help: Create a Custom Report Type
- Salesforce Help: Considerations for Creating In-App Guidance
- Salesforce Help: Analytics for In-App Guidance
- Salesforce Help: Manage Trusted URLs
- Salesforce Help: Lightning Sales Console
- Salesforce Developers: PromptAction