Add Modules and Trails to a Release
Learning Objectives
After completing this unit, you’ll be able to:
- Explain why a company might want different users to manage content and manage releases.
- Describe how to back up and store a copy of your content for maintenance.
- Describe how to add content to a release.
Content Creators and Release Managers
Cindy, a content creator at Pure Aloe, pauses for a moment to admire her progress. She’s created the modules, units, quizzes, and a trail for the Pure Aloe sales team. To publish the content and make it available for learners, the content needs to be added to a release. But because Cindy is a content creator and hasn’t been given permission to access the Trailmaker Release app, she can’t add content in her workspace to a release.
Recall that in the Enablement Site Basics module, we explored all the different roles that work together to plan, develop, publish, and maintain learning content. And in the Enablement Site Configuration module, we saw how a Salesforce admin helps create and assign permission sets to users based on their publishing responsibilities.
Some companies only want their content creator to create content, the skill in which they excel and for which they were hired. They want a different role, a release manager, to create the release records and coordinate all the different deliverables that they want to make available at the same time. Perhaps a company has multiple content creators, but only one release manager. Pure Aloe divides their work so that Cindy prepares the content, and Marisol manages the releases.
Other companies can take a more relaxed approach, and give content creators freedom to prepare releases. The beautiful thing about Salesforce is that permission sets give you the flexibility to implement the access that you want your team members to have!
Download and Back Up Content
How can Cindy get her awesome trail and its modules into the hands of Marisol, the release manager? She downloads separate backpack files for her trail and each module. A backpack is a ZIP file that contains all the content’s metadata, details, and image files.
Let’s see how Cindy can download backpacks for her trail and modules.
- In the Trailmaker Content workspace, click the Actions dropdown for the Sell Well at Pure Aloe trail.
- Select Download.

A trail’s backpack only contains the trail’s information, including references to the modules it contains, but it doesn’t contain all the module information. Each module has its own backpack that contains its own details. To make sure that she has all the details for her trail and its modules, Cindy repeats these steps to download both module backpacks, too. Then she saves the backpacks in a shareable location, such as a version control system (VCS) or cloud drive.
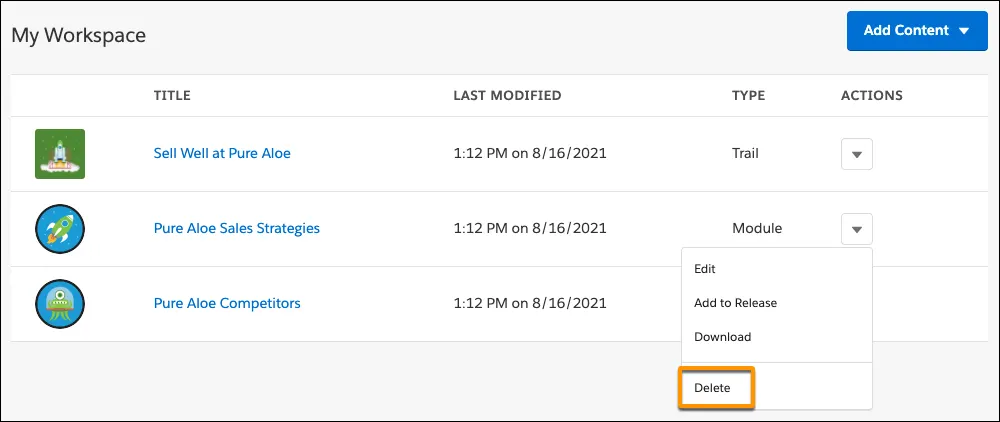
Delete Content from the Workspace
After she checks in her backpacks to the VCS, Cindy deletes the trail and modules from her own Trailmaker Content workspace. Why? The content that’s in the VCS is the source of truth. If Cindy continues to make changes locally in her workspace, suddenly her workspace and VCS become out of sync. As a best practice, we recommend that you always download a new backpack and check it in to your VCS anytime you make changes.
To delete content from workspace, Cindy clicks the Actions dropdown for the content and selects Delete.
Add Content to a Release
After Cindy saves the backpacks, she notifies Marisol, the Pure Aloe release manager, that the content is ready to be added to a release. They worked in parallel: While Cindy was busy preparing the trail and modules, Marisol was creating releases in the Trailmaker Release app. To learn more about Marisol’s workflow for creating releases, check out the Trailmaker Release Basics module.
Marisol’s workspace is separate from Cindy’s workspace, so how can Marisol add the content that Cindy created? Because Cindy and Marisol are excellent communicators, Marisol knows that she can log in to the VCS and find the backpacks that Cindy checked in. Then, she can import the backpacks into her own workspace.
- Log in to the enablement site.
- Click the user avatar in the upper right, and select Trailmaker.
- In the Trailmaker Content workspace, click Add Content and select Existing Content.
- On the Import Existing Content page, drag a backpack file to the workspace, and then click Import.

- Repeat this step to drag and import the remaining backpack files.
- Click the back icon
 to return to the Trailmaker Content workspace.
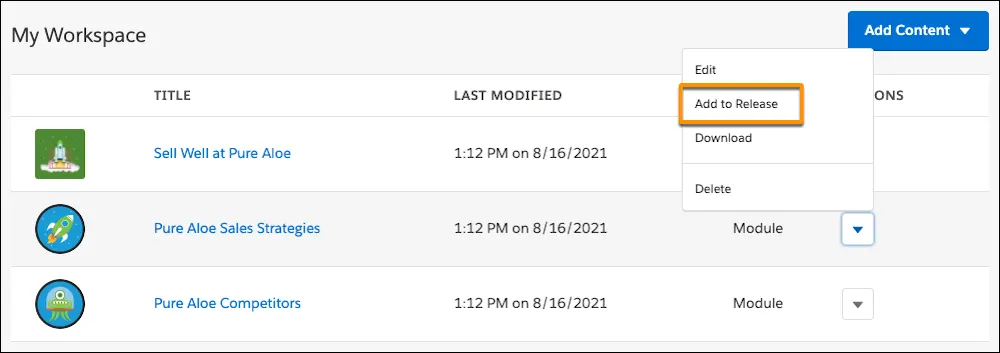
- In the workspace, click the Actions dropdown for the Pure Aloe Sales Strategies module, and select Add to Release.
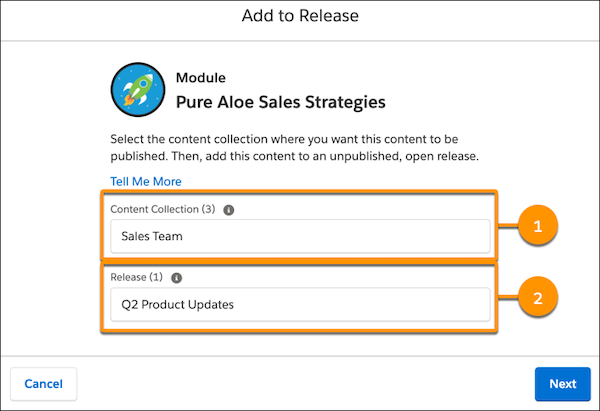
- In the Add to Release window, select the content collection (1) and release (2) where the module should be published, and click Next. Because this content is intended for the Sales team, select the Sales Team content collection.
- In the success window, copy the URL for viewing the module in the full release preview. This will come in handy later for previewing the content before it’s published.
Marisol repeats these steps to add the second module to the release, then the trail.
Together, Cindy and Marisol have prepared some excellent Sales team enablement content. To learn more about how Marisol prepares, previews, and publishes a release, check out the Trailmaker Release Basics module. In the next unit, you look at Cindy’s next task as a writer in Trailmaker Content: maintaining trails and modules after they’ve been published.
Resources
- Salesforce Help: Backpacks for Trails and Modules
- Salesforce Help: External Tools and Dependencies for an Enablement Site
- Salesforce Help: Considerations for Managing Content in Trailmaker Content
- Salesforce Help: Considerations for Managing Releases
- Trailhead: Trailmaker Release Basics