Examine an Integration Use Case
Learning Objectives
After completing this unit, you’ll be able to:
- Describe the challenge of keeping sales leads in Salesforce in sync with Tableau.
- Explain how to use MuleSoft Composer to sync leads in Salesforce with a leads data source in Tableau.
- Prepare to create a flow.
Before You Start
This module builds on MuleSoft Composer Installation and Configuration, so make sure you've completed it before you continue. Recall from that module, you need to have the MuleSoft Composer User permission set if you want to build and run integration flows.
In this module, we assume you’re an authorized MuleSoft Composer user. If you’re not a MuleSoft Composer user, that’s OK. Read along to learn how they perform the steps. Don’t try to follow the steps in a Trailhead Playground, because MuleSoft Composer isn't available in the Trailhead Playground.

In this unit, you step into the role of admin for Northern Trail Outfitters (NTO), an outdoor and recreational gear retailer. First, you examine an integration challenge faced by NTO, and then you learn about a MuleSoft Composer integration solution. Finally, you learn how to prepare to create your flow.
Integration Challenge
Let’s take a look at an integration challenge NTO is facing. Your sales team at NTO manages and maintains sales leads in the NTO org’s Sales Cloud. They also manage and maintain interactive visualizations that are based on a leads data source in Tableau.
Currently, the sales team is performing these tasks manually. Every week, they export leads from Sales Cloud to a .csv file, create a Tableau .hyper extract from the .csv file, and publish the extract as a data source to a Tableau Cloud project. Also, there’s a significant lag time between when the leads are entered into Sales Cloud and when those same leads show up in Tableau. This process is time-consuming and highly error-prone, so the team wants to automate it.
Integration Solution
As a solution, you need to automate the data sync between the NTO org’s Sales Cloud and Tableau in order to achieve near real-time integration. To do this, you use MuleSoft Composer to create an integration flow that automatically updates an existing leads data source in Tableau with new leads in Sales Cloud. Specifically, the flow must perform the following tasks.
- Find any new lead created in the NTO org’s Sales Cloud.
- Add the lead to the existing leads data source in Tableau Cloud.
To implement the solution using MuleSoft Composer, you need to perform these flow creation tasks.
- Prepare to create a flow.
- Design and test a flow.
- Activate a flow.
- Monitor and troubleshoot a flow.
You learn how to perform these tasks in the rest of this module.
Prepare to Create a Flow
Ready to get started?
First, you need to gather all required information about the systems and assets your flow is going to use. The following table describes the systems the flow needs to connect to and the information you need to have for those systems.
As a best practice, ensure the NTO org has a sandbox org you can connect to when you design and test your flows.
System |
Required Information |
|---|---|
NTO’s Sales Cloud |
|
Tableau |
|
Next, you learn about the prerequisites for your Tableau environment.
Prerequisites for Your Tableau Environment
Before you can use MuleSoft Composer to create a connection to Tableau, ensure your Tableau environment meets the following prerequisites.
- A leads data source in .hyper format must exist in Tableau.
- Your Tableau user must have at least the Explorer (Can Publish) site role.
Now let’s find out values for a Tableau connection.
Tableau Connection Parameters
When you create a connection to Tableau using MuleSoft Composer, you must specify values for the following parameters.
Connection Display Name
The connection display name is any name of your choice.
Server URL and Site
To find out the server URL and site for a Tableau connection, follow these steps.
- Log in to Tableau Cloud using your email address and password.
- Navigate to the leads data source.
- Look at the URL and identify the server URL and site. For example, if the URL of your leads data source is
https://online.tableau.com/#/site/nto/datasources/1234/connections, use these parameter values:
- Server URL:
https://online.tableau.com - Site:
nto
Personal Access Token and Token Secret
Your Tableau connection requires a personal access token and token secret. A personal access token is long-lived and removes the need to use hard-coded credentials or interactive login. Using a personal access token reduces the risk that your Tableau credentials are compromised while automation tasks are being performed. If your personal access token is ever compromised, you can just revoke the token. Note that you must create your own personal access tokens; Tableau admins cannot create personal access tokens for you.
In general, personal access tokens expire if they are not used after 15 consecutive days. If they are used more frequently than every 15 days, the tokens expire after one year. After one year, you must create a new token. For more information on personal access tokens, refer to Tableau Personal Access Tokens.
To create a personal access token and token secret, follow these steps.
- In your Tableau Cloud, click your profile icon and then select My Account Settings.
- In the Settings tab, scroll down to the Personal Access Tokens field, enter a name of your choice, and then click Create new token.

- Click Copy to clipboard and paste your personal access token secret into a text file of your choice.
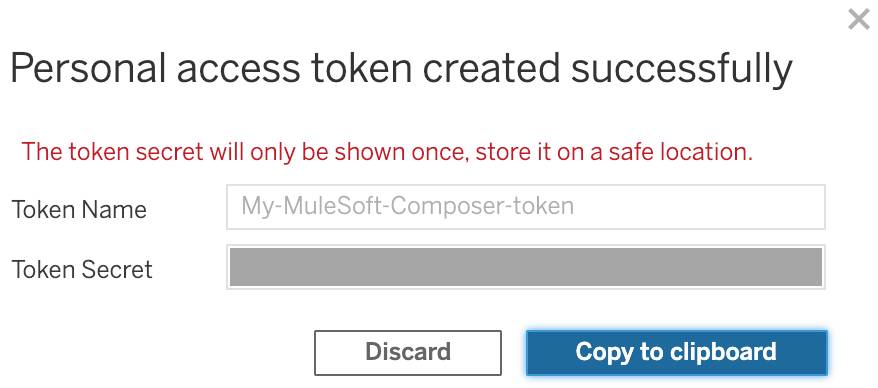
- Copy and paste the personal access token name into the same text file. Use your personal access token name and token secret when you configure a Tableau connection using MuleSoft Composer.
You’ve taken the first steps to prepare to create your flow with MuleSoft Composer. In the next unit, you learn how to design and test your flow.
Resources