Set Up the CRM Analytics for Healthcare App
Learning Objectives
After completing this unit, you’ll be able to:
- Provide users permission to administer and use CRM Analytics for Healthcare.
- Create and share the app.
- Schedule data import frequency.
- Embed dashboards in the page layout.
Enable CRM Analytics for Healthcare
First things first, Harryette must enable the feature.
- Click
 , and select Setup.
 - Enter
Getting Startedin the Quick Find box, and select Getting Started under Analytics. - Click Enable CRM Analytics in the upper right corner. The button changes to Launch CRM Analytics.

CRM Analytics for Healthcare User Permissions
To use the CRM Analytics for Healthcare app, Harryette must create it from the Analytics for Healthcare template. She must grant users in the org permissions to either administer or use CRM Analytics for Healthcare. Harryette grants herself the permissions to administer and April the permissions to use.
Provide Permission to Administer CRM Analytics for Healthcare
Harryette assigns two permission sets to herself. The first gives her admin access to CRM Analytics Studio, and the second gives her admin access to the templates and the apps created from them.
- Click , and select Setup.
- Enter
Usersin the Quick Find box, and select Users. - Click Harryette’s username.
- Click Permission Set Assignments.
- Click Edit Assignments.
- Select the following permission sets:
- CRM Analytics Plus Admin
- HealthCare Analytics Admin
- Click Add.
- Click Save.
Provide Permission to Use CRM Analytics for Healthcare
Next, Harryette assigns two permission sets to April. The first gives April user access to Analytics Studio, and the second gives her user access to the templates and the apps created from them.
- Click , and select Setup.
- Enter
Usersin the Quick Find box, and select Users. - Click April’s username.
- Click Permission Set Assignments.
- Click Edit Assignments.
- Select the following permission sets:
- CRM Analytics Plus User
- HealthCare Analytics User
- Click Add.
- Click Save.
Harryette has enabled CRM Analytics for her org and also provided her teammates access to the template. Before she uses the template to create an app, she checks if there’s enough data for the app.
Check Data Requirements
Bloomington Caregivers has been using Health Cloud for some time now so there’s enough data for the app. To meet data requirements, each org must have at least one record of the objects listed in Get Your Org Ready to Create the Analytics for Healthcare App.
Create the App
Permissions given, ready-to-use data is available. It’s time for Harryette to use the CRM Analytics for Healthcare template to create an app.
- From the App Launcher, find and select Analytics Studio.
- Click Create, and select App.
- Search and select Analytics for Healthcare.
- Click Continue to get an overview of what the app contains.

- Click Continue.
- Select Create a brand new app, and click Continue.
The Analytics for Healthcare template performs a compatibility check of your org’s data.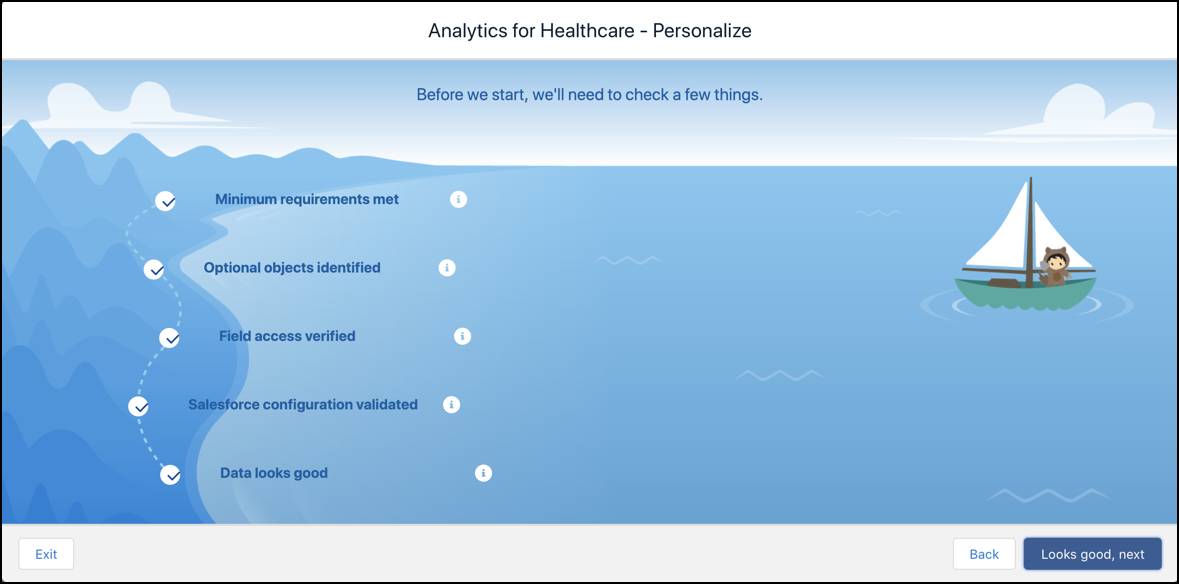
- If the check completes successfully, click Looks good, next.
- Choose the settings you want to use to create your app, Basic or Custom.
If you choose Custom, the template checks whether the required Health Cloud entities are present and displays a list of options accordingly. You can choose the objects you want to include in your app.
Harryette selects Basic. - Click Looks good, next.
- Choose the record type(s) used to determine person accounts and individual accounts.
- Click Looks good, next.
- Name your app.
- Click Create.
Because Bloomington Caregivers has a lot of data, the creation of the app takes a while. After the app is created, Harryette refreshes the page to view the shiny new app.
Share the App
Now that the app is ready, Harryette can share it with April.
- From the App Launcher, find and select Analytics Studio.
- Search for and select Bloomington Analytics for Healthcare and select it.
- Click
 .
. - On the Invite others section, add April Guthman as Viewer.
- Click Add.
- Click Save.
Schedule the Data Sync and Dataflow
April needs up-to-date information to make the right decisions for her patients. Harryette must schedule the sync and dataflow to run every day to ensure that the app that she created uses current data.
- From the App Launcher, find and select Analytics Studio.
- Click
 and select Data Manager.
 - To schedule the sync, click Connect.
- Click
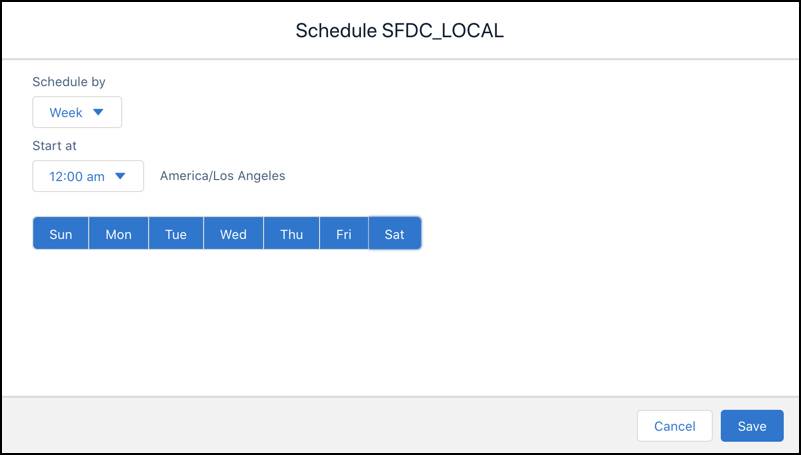
 to the far right of SFDC_LOCAL, which is the name of the connection your app uses. From the menu that appears, select Schedule.
 - Set a time for running the data sync. It’s best to select a time outside normal working hours so it doesn't interrupt business activities. Harryette schedules it to run every day at 12 AM. Then clicks Save.
- To schedule the dataflow, click Dataflows & Recipes.
- Search for Bloomington Analytics for Healthcare.
- Click beside Bloomington Analytics for Healthcare.
- Select Schedule.
- Select Schedule, then select Event-based. You’ll see a message telling you that the dataflow runs after the data sync, which is exactly what we want.
- Click Save.
Add Care to the Account Page Layout
Other than accessing the dashboards from the app in Analytics Studio, Harryette can also embed dashboards to Lightning Experience pages. When you’re looking at a Salesforce record, you’ll have analytics about that record in the same place, which makes for easy access to critical information. Say, for example, April wants to measure a patient’s adherence to their care plan tasks and see the status of their care requests.
Harryette uses Lightning App Builder to add Care dashboards to the Account page layout.
- From the App Launcher, find and select Accounts.
- Select any record. Harryette selects Charles Green.
- Click , and select Edit Page.
- Drag the CRM Analytics Dashboard component on to the page.
- On the right panel, select Care (Embedded) from the dashboard dropdown.
- Change Height to 600.
- Deselect Show Title and Show Header. (If Show Share Icon is selected, deselect it too.)
- Click Save.
- Click Activate.
- On the Org Default tab, click Assign as Org Default.
- Select Desktop and Phone, and click Next.
- Click Save.
- In Lightning App Builder, click Back in the upper right to return to the account page.
Harryette can similarly embed other dashboards to relevant page layouts.
- Converted Patient in the Opportunity (New Patient) page layout.
- Referral Patient in the Lead (Referral) page layout.
Harryette embeds the Healthcare Analytics Home dashboard on the Health Cloud Lightning Console Home page so April can easily access it when she logs into Salesforce Health Cloud.
Data-Rich Dashboards
The homepage now shows three data-rich cards: Care Plan Adherence, Utilization Analytics, and Referral Analytics. You can click Open Dashboard on the card to open the dashboard pages you’re interested in.
Harryette has successfully set up the CRM Analytics for Healthcare app for Bloomington Caregivers, which would help April deliver better care to patients and improve their health outcomes.