Maintain Your Tableau CRM Consultant Certification for Spring ’23
Learning Objectives
After completing this unit, you’ll be able to:
- Use multivalue data in your recipes.
- Get a clearer view of your data with data sampling.
- Convert dataflows to recipes.
- Make real-time decisions with the Input widget.
- Refresh templated analytics app data with one click.
- Create tooltips for repeater widgets.
Maintain Your Certification
If you hold the Tableau CRM and Einstein Discovery Consultant credential, keep in mind that you need to complete this module by the due date to maintain your certification. Another important part of maintaining your credential is ensuring your Trailhead and Webassessor accounts are linked.
Interested in learning more about getting certified? Check out the Tableau CRM Consultant credential.
Salesforce introduced a bunch of great feature enhancements over the past year. Let’s take a look at some of the more important ones.
Protect the Integrity of Your Certification
The quality of our certification exams and the value our credentials provide are our highest priority. Protecting the security and confidentiality of our exams is essential to providing our customers with credentials that are respected and industry-leading.
As a participant of the Salesforce Certification Program, you’re required to accept the terms of the Salesforce Credential and Certification Program Agreement. Please review the Salesforce certification exam-taking policies in the Salesforce Credential and Certification Program Agreement and Code of Conduct Trailhead Help article for more details.
Use Multivalue Data in Your Recipes
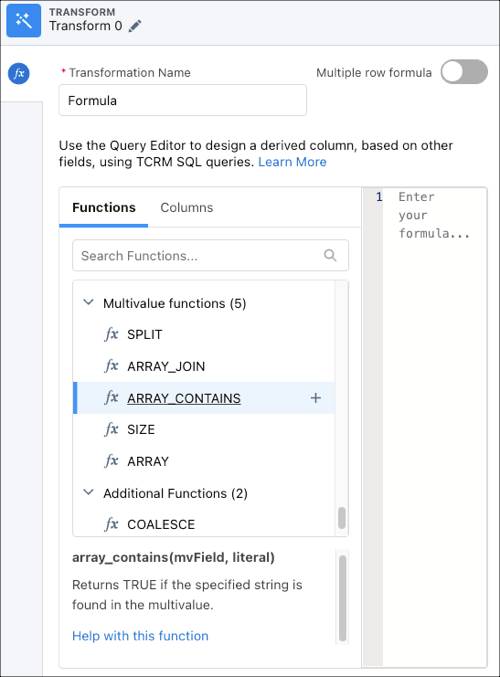
Use the new multivalue functions in Data Prep’s formula transformation to get the most out of your multivalue data. For example, look for a specific value, count how many values there are, create a new multivalue by combining other text, convert a multivalue to a string, or split a string and return a multivalue.
Where: This change applies to CRM Analytics in Lightning Experience and Salesforce Classic. CRM Analytics is available in Developer Edition and for an extra cost in Enterprise, Performance, and Unlimited editions. This change also applies to Salesforce Data Pipelines in Lightning Experience. Salesforce Data Pipelines is available for an extra cost in Enterprise, Performance, and Unlimited editions.
How: In a Data Prep recipe transform node, use the toolbar to select Formula (the fx dropdown), and then select Custom Formula.
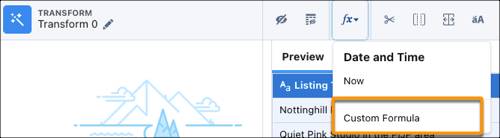
In the formula editor panel, choose a multivalue function.
Get a Clearer View of Your Data with Data Sampling
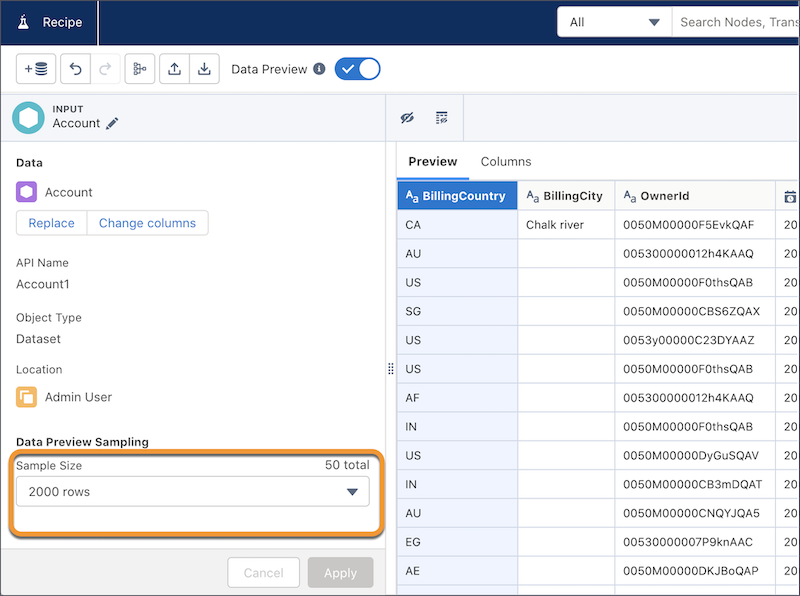
See a more complete preview of your data by selecting a sampling option most appropriate for your dataset. Previously, when working with recipes, you could view only the sample output of data operations based on the values in the top rows of the preview table. This change applies only to direct datasets.
Where: This change applies to CRM Analytics in Lightning Experience and Salesforce Classic. CRM Analytics is available in Developer Edition and for an extra cost in Enterprise, Performance, and Unlimited editions. This change also applies to Salesforce Data Pipelines in Lightning Experience. Salesforce Data Pipelines is available for an extra cost in Enterprise, Performance, and Unlimited editions.
How: In a Data Prep recipe input node, under Data Preview Sampling, select the number of rows to include in the preview.
Under Sampling Mode, select the mode that best fits the needs of your data. To populate a sample when you want to see all column values, such as when creating a bucket, select All Column Values. To isolate specific values, select Filtered Rows.

If you choose the Filtered Rows sampling mode, click the + under Filter and choose the column value to filter on. Select the values to include in your filtered results.
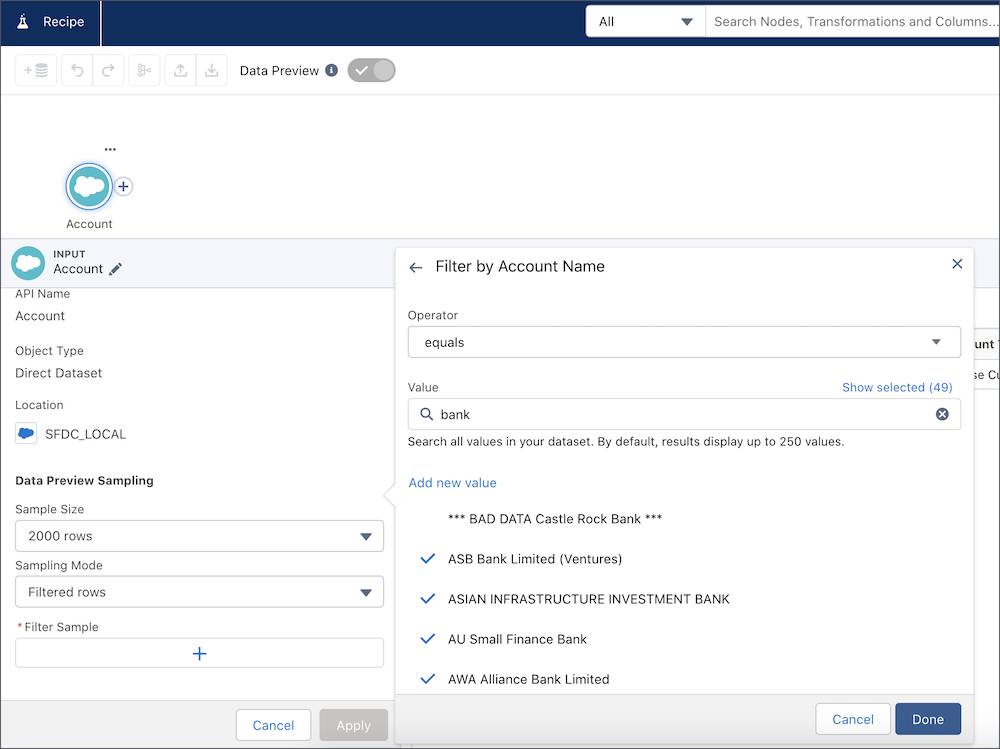
Click Done.
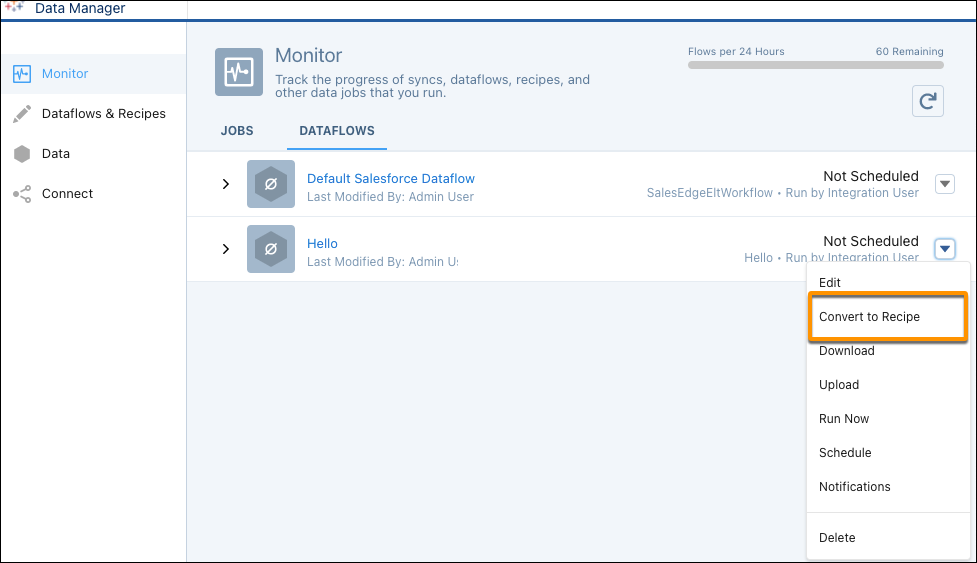
Convert Dataflows to Recipes
Turn dataflows into recipes with the click of a button. Upgrade your old dataflows to recipes to use the latest Data Prep features such as joins, aggregates, sentiment detection, and more within an improved user experience. With the new Convert to Recipe option, you can create recipes from dataflows. Your original dataflows are untouched when new recipes are generated.
Where: This change applies to CRM Analytics in Lightning Experience and Salesforce Classic. CRM Analytics is available in Developer Edition and for an extra cost in Enterprise, Performance, and Unlimited editions. This change also applies to Salesforce Data Pipelines in Lightning Experience. Salesforce Data Pipelines is available for an extra cost in Enterprise, Performance, and Unlimited editions.
How: In Data Manager (Legacy), from the dataflow menu, select Convert to Recipe.
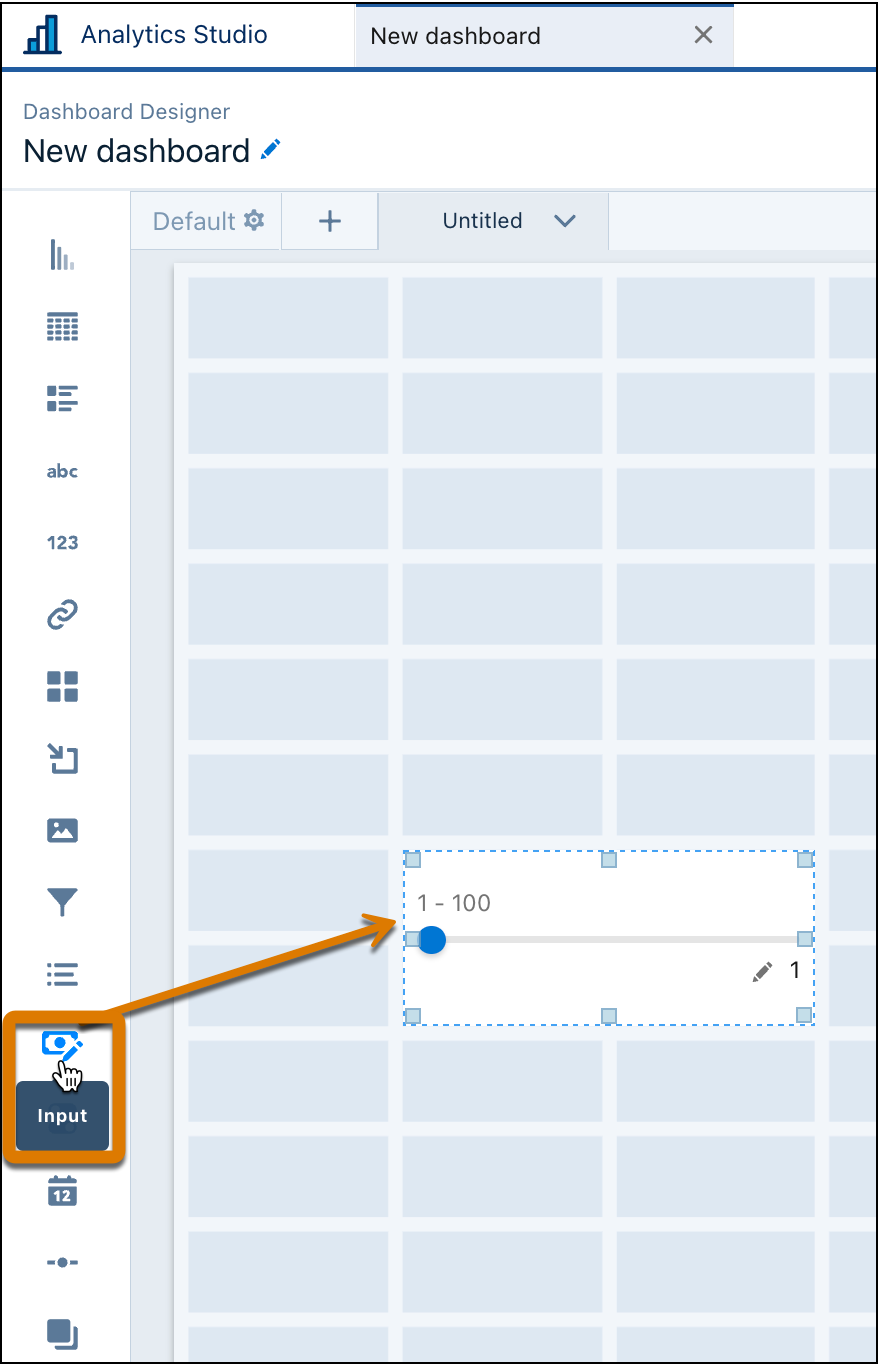
Make Real-Time Decisions with the Input Widget
The Input widget captures numeric values and uses them as a data source for use in other dashboard widgets and formula queries. For example, use values from the input widget to perform what-if calculations, such as the effect of inventory shortages on profit margins in real time.
Where: This change applies to CRM Analytics in Lightning Experience and Salesforce Classic. CRM Analytics is available in Developer Edition and for an extra cost in Enterprise, Performance, and Unlimited editions.
How: Drag the Input widget to the dashboard.
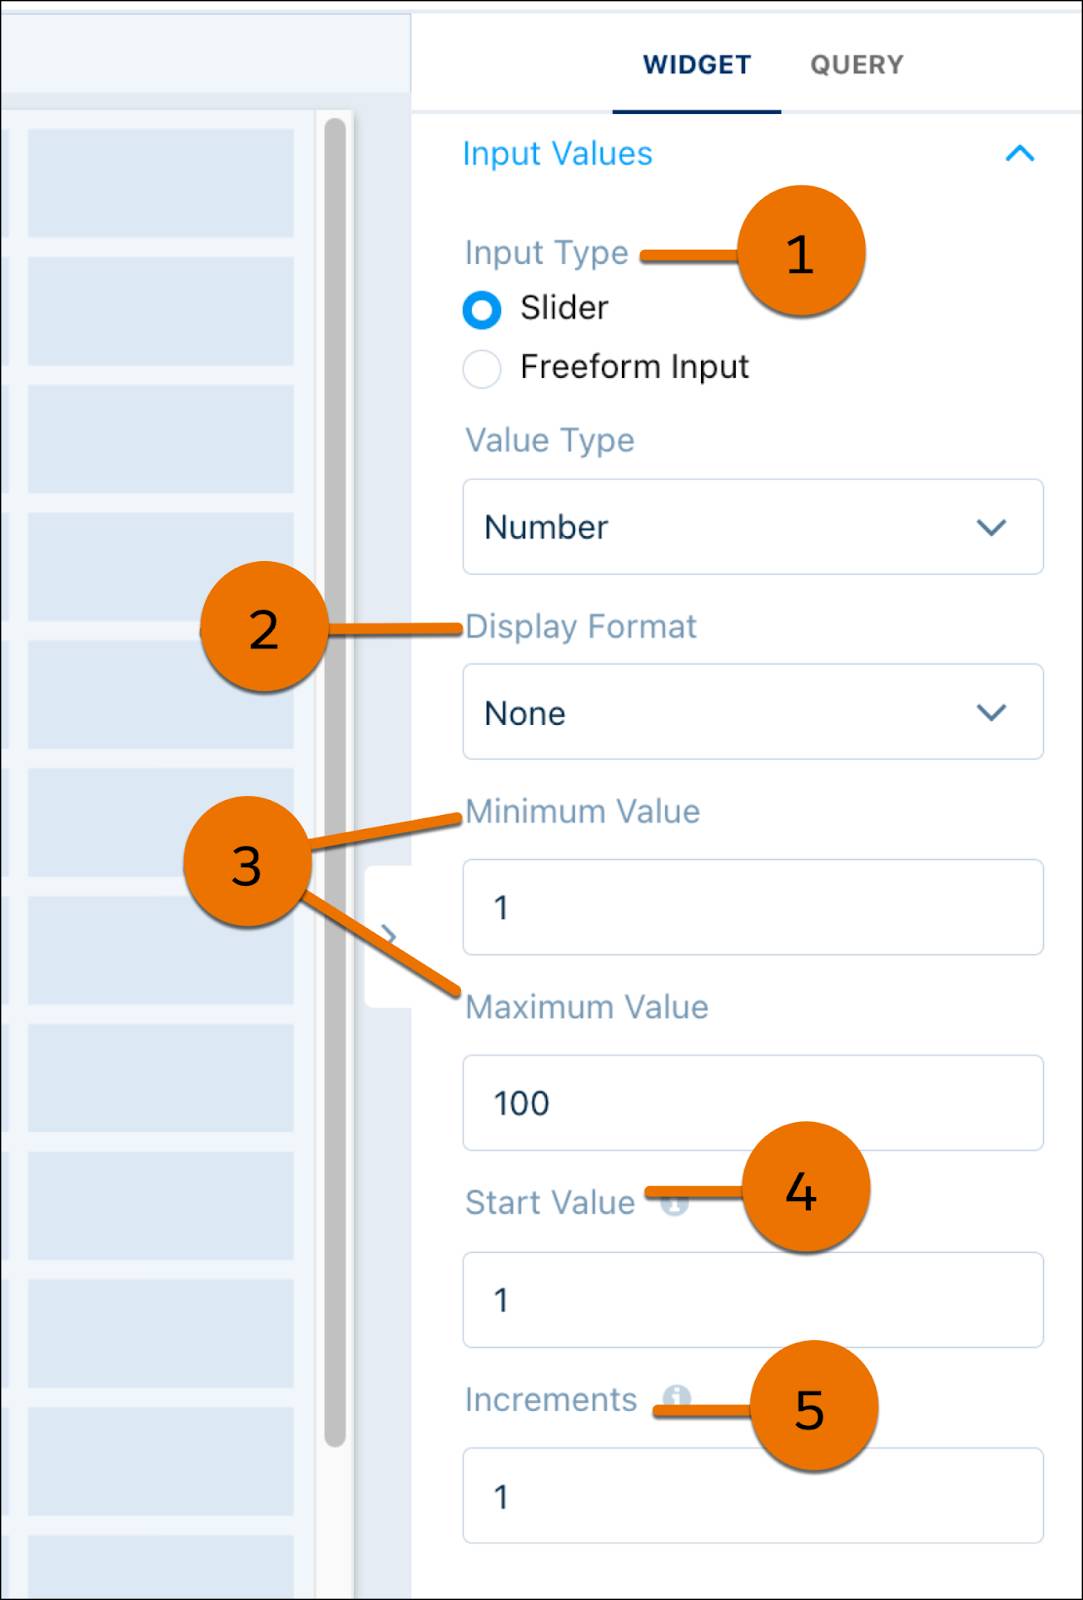
In the widget properties, click Input Type (1) to specify how to capture data. Select a display format (2), such as currency or percentage. Add minimum and maximum values (3) as the input range. Add a start value (4), and change increments (5).
Refresh Templated Analytics App Data with One Click
Ensure that your CRM Analytics templated apps are running with current data by refreshing an entire app with one click. You can also schedule automatic app refreshes. Gone are the days of finding individual app assets and working out how to schedule them in the right order. An app refresh runs all the data assets associated with the app in the required order, including recipes, dataflows, connectors, Einstein Discovery models, and prediction definitions.
Where: This change applies to CRM Analytics in Lightning Experience and Salesforce Classic. CRM Analytics is available in Developer Edition and for an extra cost in Enterprise, Performance, and Unlimited editions.
How: From Setup, in the Quick Find box, enter App Install History, then select App Install History. Look for the app you want to refresh or create a schedule for.

To run data-related assets for your app immediately, from the app's actions, select Refresh Now. The app template runs all the data syncs and refreshes all assets in the correct sequence. To schedule regular data refreshes, select Schedule. When you create a schedule, the refresh runs according to the time zone of the user who set the schedule.
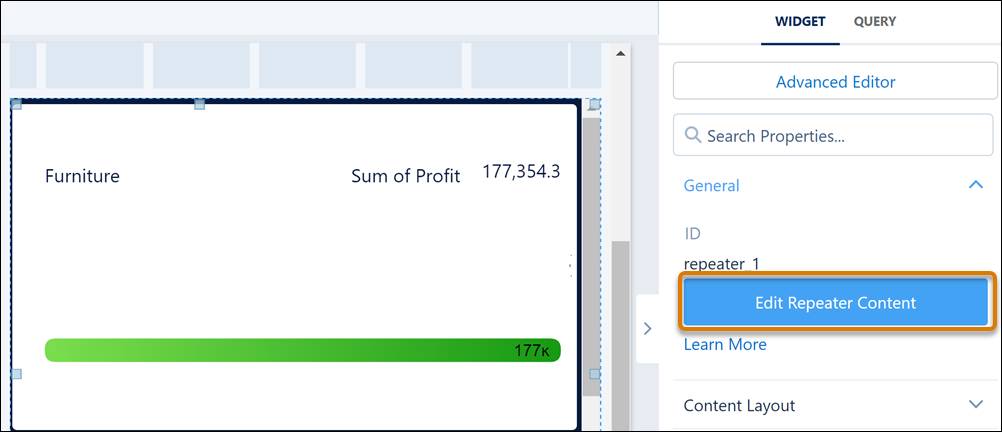
Create Tooltips for Repeater Widgets
For a quick review of related data while reviewing metrics in a scrollable layout, add tooltips to a repeater. Now you can design a separate tooltip for text, numbers, images, and polar gauge or flat gauge charts in the repeater. The options available vary depending on the widget type. For example, on a number widget, you can choose a default or custom tooltip, while you can include custom text, data point details, and visualizations in a chart widget’s tooltip.
Where: This change applies to CRM Analytics in Lightning Experience and Salesforce Classic. CRM Analytics is available in Developer Edition and for an extra cost in Enterprise, Performance, and Unlimited editions.
How: In the dashboard designer, with the repeater widget selected, click Edit Repeater Content in the Widget tab.
In the repeater, select the widget to which you want to add the tooltip, and then click Tooltip (1). Set tooltip content and its size (2). Preview the tooltip (3).
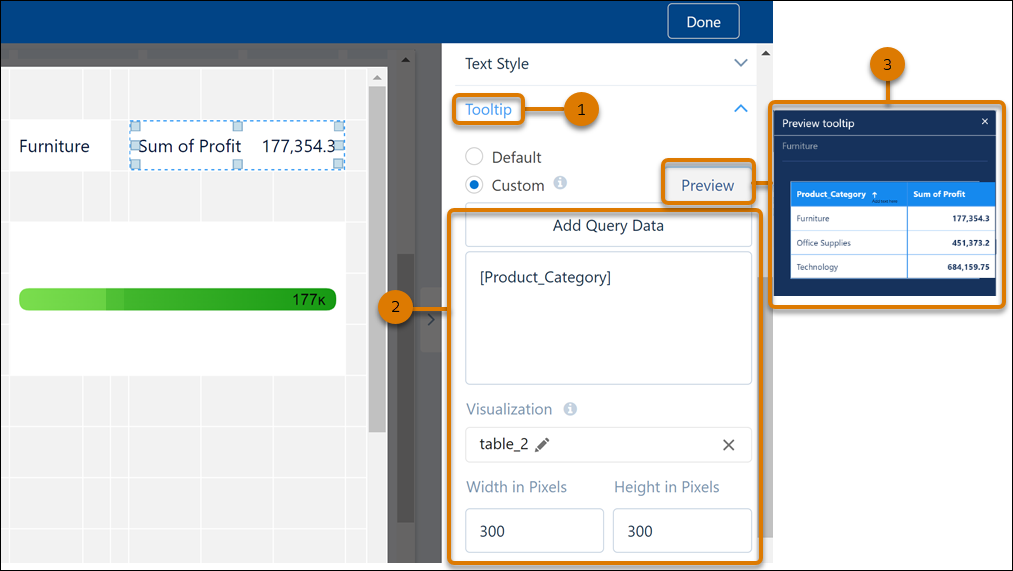
Click Done and save your changes to the dashboard.
Resources
- Salesforce Help: Use Multivalue Data in Your Recipes
- Salesforce Help: Multivalue Functions for Formulas
- Salesforce Help: Get a Clearer View of Your Data with Data Sampling
- Salesforce Help: Convert Dataflows to Recipes
- Salesforce Help: Dataflow Conversion to Recipe
- Salesforce Help: Make Real-Time Decisions with the Input Widget
- Salesforce Help: Refresh Templated Analytics App Data with One Click
- Salesforce Help: Create Tooltips for Repeater Widgets