Send Out and Track Your Survey
Learning Objectives
After completing this unit, you’ll be able to:
- Send out a survey.
- View survey results.
Send Your Survey Into the World
Erin is ready to send her survey out to her customers. Now, she has to decide how to send the survey.
- Does she want to generate a survey invitation link? Erin decides to use the option to post invitations on Ursa Major’s social media channels.
- Does she want to send out the survey invitation using an email? Erin decides to use this option to send the survey to multiple customers.
Now that Erin has decided to try her hand at both generating a survey invitation link and sending an email containing the survey invitation, she has to decide whether to send it to participants inside or outside her company. That’s an easy choice: Erin is only testing the survey now and wants to send it to her teammates inside the company. Next, she answers the following questions.
- Does she want to anonymize responses? An anonymized survey means that participants can take the survey without revealing their names or other identifying information.
- Can participants view their survey responses in Salesforce after completing the survey? That’s only possible with internal surveys, and Erin’s is external. One less decision to make.
- Does she want to authenticate participants? If she does, participants outside her company must log in to their Experience Cloud site to take the survey. If she doesn’t, they can take the survey without logging in.
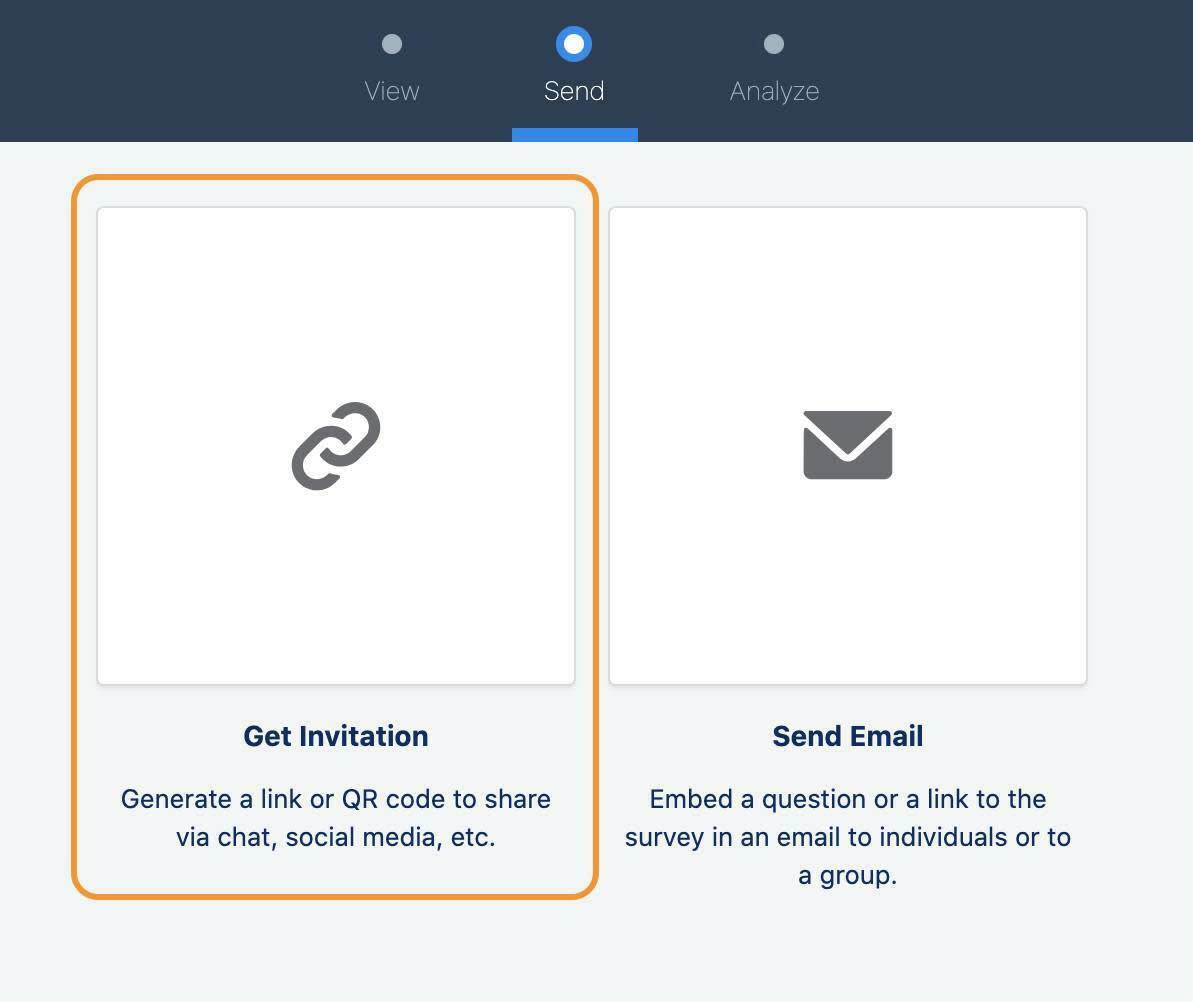
Generate Survey Invitation Link
Let’s see how Erin generates a survey invitation link.
- At the top of the Survey Builder, click Send.
- Click Get Invitation.
- Select the kind of participants for the survey: Participants in Your Company.
- Select Anonymize responses.
- Select Auto-Expires to have the survey automatically expire on a certain date.
- Click Copy Link.
- Send the link to participants. Erin shares the link with her teammates over her company’s internal communication channel and a survey invitation record is created.
Once Erin is confident that she wants to send the survey to participants outside her company, Maria must select the Experience Cloud site as the default site to create public survey invitations.
Send Survey Invitation by Email
Next, Erin sends the survey invitation by email. Before sending the invitation, she has to make a couple of decisions.
- Does she want the email to contain a link to a particular survey question or to launch a survey? Erin decides to send the link to launch the survey.

- Does she want to send the survey invitation to leads, contacts, or members of her company? That’s an easy one, she chooses members of her org because she wants to send the first email to herself to see how the email actually looks in her inbox.
Let’s see how Erin sends a survey invitation link.
- At the top of the Survey Builder, click Send.
- Click Send Email.
- Select Survey link.
- Click Next.
- Select Send to Individuals.
- Click Next.
- Enter the email IDs of the people you want to email the invitation to. For the purpose of this badge, enter your email ID. Note that the recipients must be saved in your org as Contacts, Leads, or Accounts.
- Edit the subject: Request feedback on the installation of your Ursa Major Solar solar panels.
- Add one line to the email body: Please provide your feedback on the installation of Ursa Major Solar’s solar panels.
- Click Next.
- Select Anonymize responses.
- Select Auto-expires and add the date of expiry.
- Click Send.
- When you receive the survey email, make sure you respond to it. We’ll need a response to view results.
View Results
Erin goes out to lunch and takes a quick hike in the desert. But she’s anxious to see her results so she rushes back to her desk. She has one survey response.
In Survey Builder, she clicks Analyze to see a quick summary of her survey result. It’s only one survey, so there’s not much to see. But she realizes that once responses really start coming in, she’ll need something else. She intends to share the results with her team. They want to track the results using dashboards and reports. Erin requests Maria to help create a report to track the responses.
Maria doesn’t need to create a report, she only needs to create a custom report type. Erin can use the report type to spin up her own reports.
A report type is a template that makes reporting easier. The report type determines which fields and records you can use when you create a report. The fields are based on the relationship between a primary object and its related objects. For example, the standard Survey Responses report type uses “Survey Responses” as the primary object and “Survey Question Responses” as the related object.
Once the report type has the information she needs, Erin uses it to create reports and dashboards for herself and her colleagues.
Maria creates a custom report type.
- Click
 and select Setup.
- Enter
Report Typesin the Quick Find box, then click Report Types.
- If prompted, click Continue.
- Click New Custom Report Type.
Now that she’s created one, Maria defines the custom report type, including its name, label, and category. She makes the name as descriptive as possible to make the report type easy to find and add to reports. The objects specified in the custom report type determine the fields used to create reports later. Maria uses the Survey Questions object as her primary object.
- For the Primary Object, select Survey Questions.
- Enter the report Display Label:
Survey Questions - Enter the API Name:
Survey_Questions - Enter a description:
Special reports for results by questions - Choose the Store in Category: Other Reports
- Click Next.
Define the report records set. Maria relates the Survey Questions object to the Survey Question Responses objects. The only records returned are those where the primary object has at least one related object record, that is, each survey has at least one invitation. In Maria’s example, the only records displayed on the report are “Survey Questions” with at least one related “Survey Question Response” record.
- Under the Survey Questions object, click Click to relate another object.
- Select Survey Question Responses as the related object.
- Click Save.
Maria passes on the information about the new custom report type to Erin. Erin uses the new report type to quickly whip up a report.
- From the App Launcher, find and select Reports.
- Click New Report.
- From the Other Reports section, select Survey Questions.
- Click Start Report.
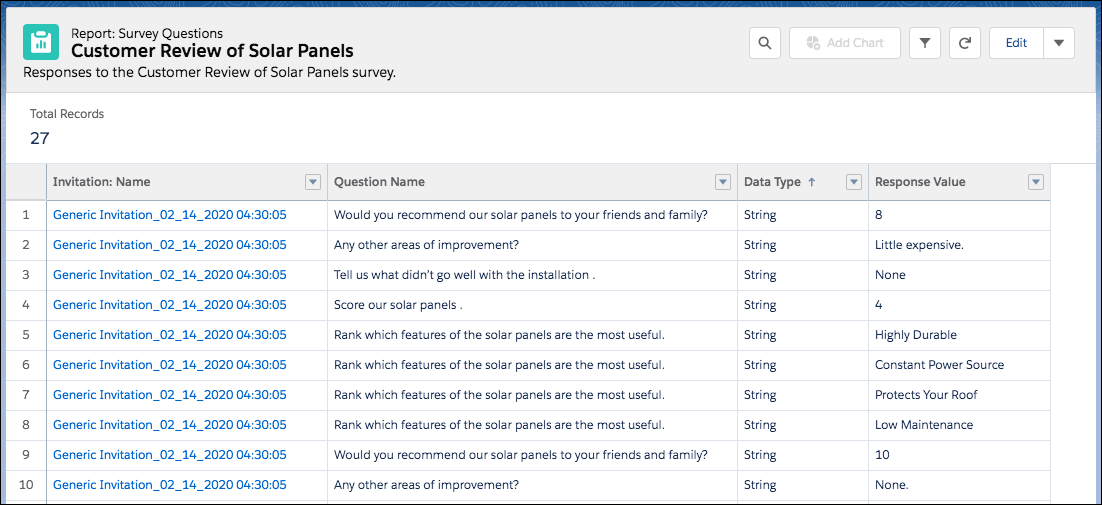
- Name the report:
Customer Review of Solar Panels - Click the Outline tab.
- On the Columns field, remove the two Name fields and add the following fields:
- Invitation: Name
- Question Name
- Data Type
- Response Value
- Click the Filters tab.
- On the Filters field, add the Survey Version: Name filter and provide the following filter by conditions:
- Operator: Equals
- In the next field, enter the survey name:
Customer Review of Solar Panels
- Click Apply.
- Click Refresh to preview the report.
- Click Save & Run.
- Add a description for the report:
Responses to the Customer Review of Solar Panels survey - Click Select Folder.
- Select the folder where you want to save the report: Public Reports.
- Click Save.
Erin created her first customer satisfaction survey, sent it off to her customers, and got back some really useful results. She even made it easier to share the results with her team. Erin’s pretty excited about her future surveys. How about you?
Resources
- Salesforce Help: Send Survey Invitation Links
- Salesforce Help: Create a Survey Version
- Trailhead: Reports & Dashboards for Lightning Experience