Navigate Rep Statements
Learning Objectives
After completing this unit, you’ll be able to:
- Explain the purpose and importance of commission statements for reps and admins.
- Describe how to use the Commission Period Selector and the dropdown menu to navigate between time periods and statements.
- Identify and explain the key metric cards on a rep’s commission statement.
- Customize rule details on a rep statement.
Salesforce Spiff Commission Statements
Commission statements are vital tools that provide reps with a clear and detailed breakdown of their earnings. They include key metrics such as total commissions, a breakdown of earnings by payout rules, and trends over time. These statements help reps understand their performance, track their earnings, and identify areas for improvement. For admins, commission statements ensure transparency, accuracy, and efficiency in managing and communicating compensation details.

Commission Period Selector
Similar to the main admin commission page, the commision period selector is located at the top of the screen. Your instance may have periods set to weekly, biweekly, monthly, quarterly, or other custom cadences, determined during implementation. Use the arrows to navigate incrementally between periods, or click the dropdown to easily jump to periods farther back in time.
Navigating to Other Statements
Instead of returning to the main commission page to access a different rep’s statement, use the dropdown menu next to the rep’s name at the top left. This allows you to search or scroll through rep names and navigate directly to the desired statement.
Top-Level Statement Metrics
At the top of a rep’s statement, you typically see three default metric cards: Total Commissions This Period, Commission Breakdown, and Commission Trend.
Total Commissions This Period
The total commission amount for the period is calculated by summing the commission totals of each payout rule on the statement, including any manual adjustments or manual draws. The statement also indicates when it was last calculated, which is helpful for both reps and admins.
For reps who frequently check their statements, this timestamp ensures they know how up to date the information is, eliminating the need to contact an admin for updates. For admins, if the Last Calculated timestamp isn’t as recent as expected, you can manually recalculate the individual statement or initiate a global resync to recalculate all unfrozen statements.
For a precise recalculation time, refer to the timestamp located beneath the rep’s name. This time is based on the company time zone defined in Admin | Settings. Additionally, there is a View User Profile link that directs you to the rep’s details in Admin | Users, where you can update their plan, team, quota, and other information.
Commission Breakdown
The Commission Breakdown metric card is particularly useful for plans with multiple payout rules. Both reps and admins can visualize the percentage each payout rule contributes to the total commission amount for the period. Hovering over any section provides a link that directs the viewer to the corresponding rule in the Payout Rules section of the statement, allowing for quick and detailed insights.
Commission Trend
This metric is ideal for customers with monthly statement periods, as it cannot be customized to reflect other statement cadences. If your statement periods don’t follow a standard monthly cadence, we recommend removing this metric to avoid confusion for reps. Note that the past 12 months’ commission amount is a rolling total, not a year-to-date or fiscal year-to-date total.
Exporting Individual Statements
To export an individual rep’s statement, click the export icon on that rep’s statement page. This functionality is also available to the rep, allowing them to download their statement information at any time. This action exports only the selected rep’s information. If you need to export statements for all reps, you must use the export icon on the main commission page.
You can choose to export statements for Year to Date, Last Period, Last Year, or select a custom date range. By default, the export covers only the current period unless you adjust the date range.
Note: The content of the exported statement may vary based on customer-specific metrics and details visible on the statement.
Payout Rules
At the bottom of the statement, you find the Payout Rules section. This section displays all relevant payout rules for the selected representative and period. Here you see the payout rule name, the total statement amount, and detailed information associated with each payout rule. The details include important metrics and fields that are associated with the rule. This customization ensures that all relevant information is clearly presented, making it easier for reps to understand how their payouts are calculated.
Customizing Rule Details
By clicking Edit, you can modify rule-specific metrics on the rep statement. To make changes to a Payout Rule, click the rule’s name to expand it. You can then drag the arrow icon  next to the rule name to reorder the rules.
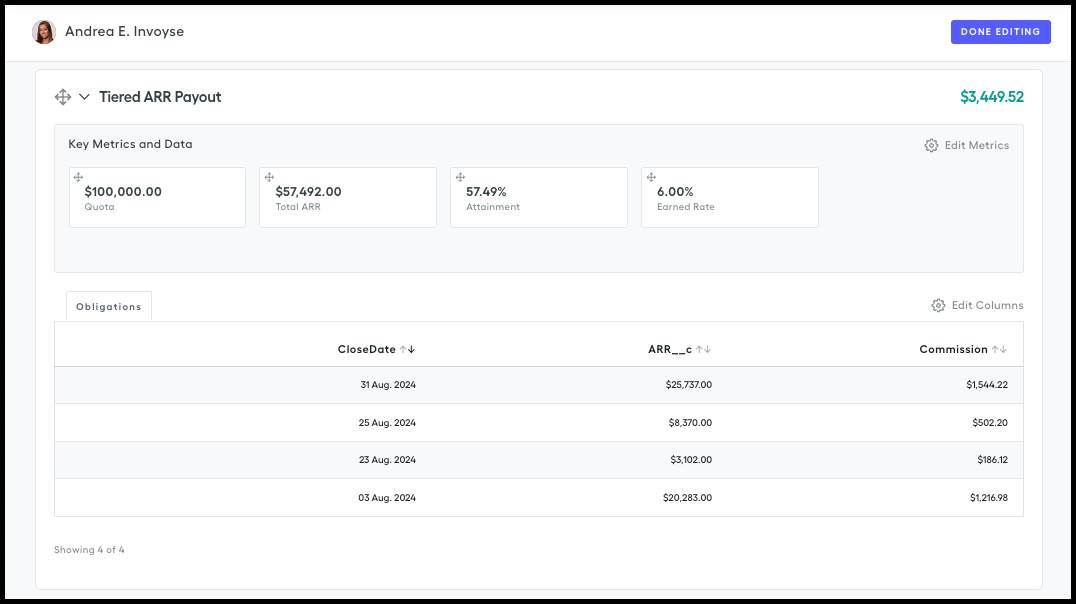
Click Edit Metrics to add rule-specific data points from Worksheet calculations. Once added, you can reorder the metric cards by dragging and dropping them while in Edit Mode.
You can also edit the fields displayed for each rule by using the Edit function. Click Edit Columns to toggle on the Datasheet Fields you want to show as columns in the Payout Rule. Once toggled on, you can drag and drop the field names to reorder them within the modal.
After making all changes, click Done Editing in the top right corner to apply them. If a field wasn’t used in your commission logic, it may initially appear blank. Recalculate the statement and refresh the page to bring in the data.
Note: Keep in mind that any changes made to a rep statement apply to all rep statements on the same plan.
Next, you learn how to access and navigate the Obligations Details page, manage comments and changes, use tools like trace and ticket, and more!