Build a Standard Cadence
Learning Objectives
After completing this unit, you’ll be able to:
- Describe the benefits of building responsive standard cadences with Cadence Builder 2.0.
- Explain how to access the cadence builder interface.
- Create a standard cadence using Cadence Builder 2.0.
Use Tracks to Build Cadences
Sales cadences involving user engagement are often described as having branches with a yes/no decision path. For example, when a recipient expresses interest, they go down a positive branch, but a separate branch is used for targets who decline an invitation or aren’t qualified. You might assume this is the way to build your cadences, with branches after nearly every step, but this structure can rapidly become complex and repetitive. Salesforce uses a different approach to save time and simplify the process, letting you build cadences that can respond to your target’s engagement after any step.
In Cadence Builder 2.0, cadence creators use three separate tracks to build a cadence: main, positive, and negative. The creator determines when a target enters and leaves each track based on how the target engages with the outreach steps. Creators add individual steps to the cadence using drag-and-drop elements and then add the details, such as call scripts, email templates, and step timing. For a quick video overview of the process, check out Cadence Builder for Sales Engagement.
Access Cadence Builder 2.0
Before you begin working with cadences in your own org, be sure you have the Sales Engagement app installed and the Sales Engagement Cadence Creator permission enabled. Note that the options for LinkedIn InMail and Connection Requests will appear in the cadence builder if your Salesforce admin has enabled those features. To learn more about integrating LinkedIn with Salesforce, see Add LinkedIn Sales Navigator to Sales Cloud in Salesforce Help.

Select the Sales Engagement app from the App Launcher, then choose Cadences from the navigation menu. Click New Cadence to open the new Cadence screen, and click Open Cadence Builder 2.0.

Create a Standard Cadence
Let’s dig into the details of the Cadence Builder screen.

When the Cadence Builder opens, the screen has a left-side panel with options for Cadence Tracks and Actions (1), a central work area called the canvas (2), and a right-side panel with options to name the Cadence (3). Give your cadence a name and description to start.
Build a Main Track
To create a cadence in the builder, your cadence must have at least a main track with one action step in it. You begin by building the main track. Three types of tracks are shown in the left panel.
- Main: Targets follow the steps in this track unless track entry rules move them to the positive or negative track.
- Positive: Targets move to this track when they show signs of interest.
- Negative: Targets move to this track when they show a lack of interest.
On the left side panel, select Main in Cadence Tracks. On the right panel, you can add cadence exit rules, but it’s not required. We come back to those later.

Next, select an action step to add to the main track. Under Actions, click and drag the action to the center canvas. In the example shown, the creator added Make a Call. The right-side configuration panel shows the Make a Call action step and default settings.
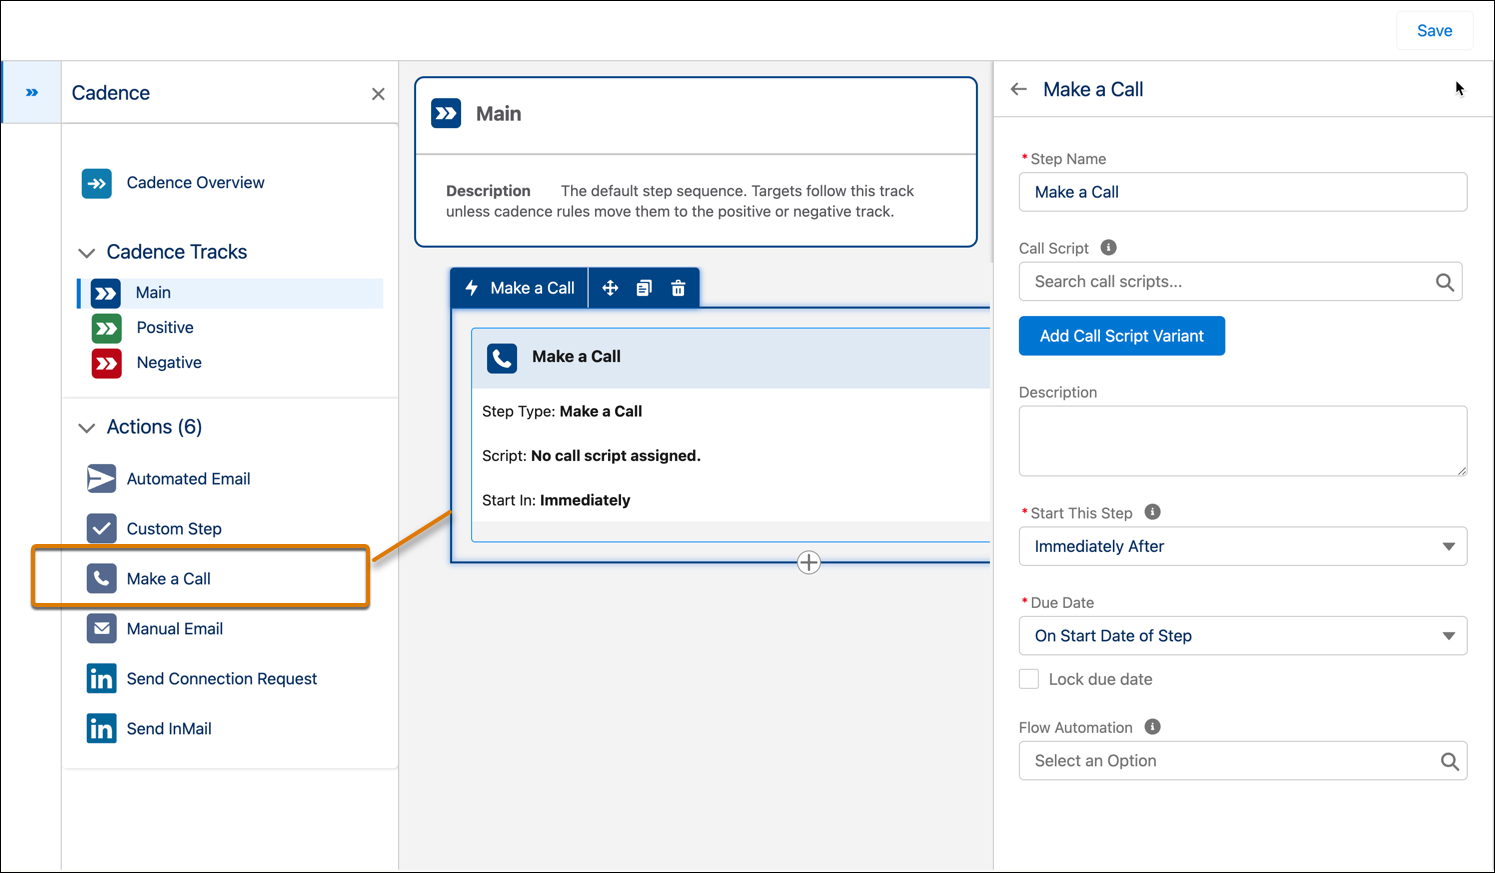
This is now considered a complete cadence because it meets the requirement of at least one step in a main track. You can save your cadence, which is then stored as a draft so you can continue to work on it. (Once you finish building the complete cadence, you activate it, making it available for users to add targets.)
From the Actions list, you can keep adding steps to the main track. Sales cadences usually have multiple steps in the main track, since not every target will engage with you on your first outreach. In the example shown, the cadence has these steps.
- Make a Call (Day 1 Introductory Phone Call)
- Automated Email Step (Day 1 Follow-up Email)
- Make a Call (Day 2 Follow-up Call)
- LinkedIn InMail (LinkedIn Follow-up)

Targets added to this main track proceed through each action step in order. On each step, you determine whether it starts immediately after the previous step is completed, or hours or days later. When the action step is highlighted in the canvas, the right panel reveals the options for that step. Here’s an example showing an action step and the configuration settings available.
- Action: Make a Call
- Configuration settings:
- Step Name
- Call Script (Optional)
- Description
- Start This Step
- Due Date
- Flow Automation (Optional. Flows are covered in a later unit.)

Each action you drag to the center canvas has its own configuration options. Click an action to reveal its options in the right panel.
This main track example shows how easy it is to build a simple cadence with multiple steps. Once you understand the process, you can add more details and customizations to action steps to meet the needs of your organization’s sales process.
When does a target exit the main track?
- When all the steps in the main track are completed.
Or
- When a cadence exit rule is met, if one was selected.

Or
- When the target meets the requirements to enter another track. You can add a positive and negative track to this cadence with specific entry rules. When an entry rule is met, the target moves immediately to the first step of the positive or negative track.
Your main track for this cadence is complete. Now, let’s discuss what happens when you add another track.
Build a Positive Track
In the introduction to this unit, you learned that Builder 2.0 uses a track system, instead of branches, to build a multistep cadence.
First, let’s describe a positive track and why you need one. When a target expresses interest, there’s no time to lose. If a sales rep’s first call to a target results in a meaningful connection, you’ll have a set of steps ready in a positive track to help the rep move the target engagement forward.
You create a positive track by selecting it on the left panel, which reveals it in the central canvas. Then, in the configuration panel on the right, you set the Track Entry Rules.
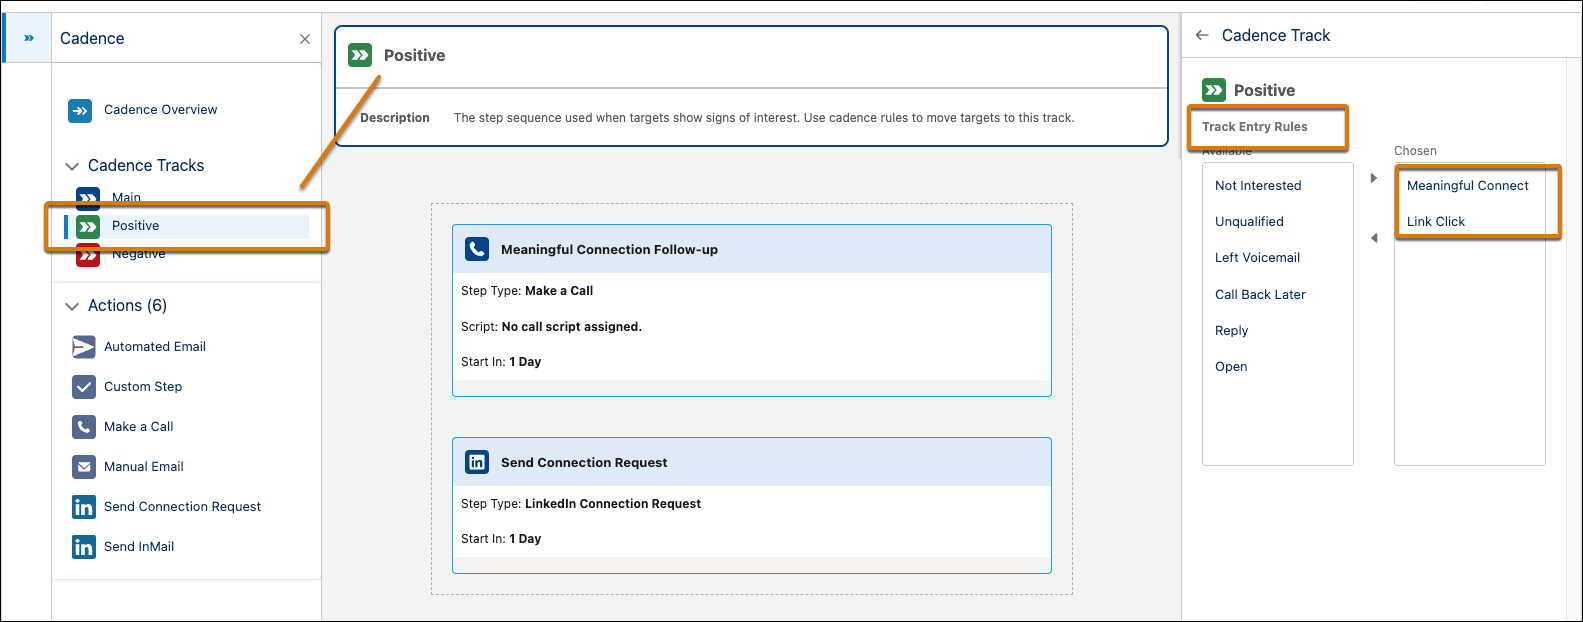
What is a track entry rule? Simply put, it’s the reason you want a target to begin these steps. In this example, the track entry rules are Meaningful Connect and Link Click.
- Meaningful Connect is a call result logged when a rep has a promising conversation in a Make a Call step.
- Link Click is an engagement logged when a target opens a link in an email sent by an email step, either Automated or Manual.
Track entry rules correlate with their action type. Let’s break that down.
Action Step |
Track Entry Rule |
Description |
|---|---|---|
Make a Call |
Meaningful Connect |
The sales rep has a promising conversation during a call. |
Not Interested |
The target indicates they are not interested in your offering. |
|
Unqualified |
The phone call makes it clear the target isn’t a good fit for your offering. |
|
Left Voicemail |
The sales rep leaves a message. |
|
Call Back Later |
The target asks for another call. |
|
|
Automated Email or Manual Email |
Open |
The target opens the email. |
Reply |
The target replies to the email. |
|
Link Click |
The target opens a link in the email. |
These action steps don’t have corresponding track entry rules:
- LinkedIn Send InMail
- LinkedIn Send Connection Request
- Custom Step
When you set track entry rules, they’re based on how a target responds to any of your previous track steps. In this case, if either of the Make a Call steps in the main track results in a Meaningful Connection, the target moves to the positive track. Plus, if a main track email step results in a Link Click, the target moves to the positive track. In this example, different types of positive engagement have been addressed with the Positive track, simply by setting the Track Entry Rules.
What steps were built in this positive track? In the example shown above, they are:
- Make a Call (Meaningful Connection Follow-up)
- LinkedIn Connection Request
To sum up, a positive condition is like a prospect raising their hand to show interest. As a manager, you determine what sales reps should do as soon as a prospect raises their hand. When a track entry rule is met, the next step begins using your timing preference, such as immediately or the next day. Reps are notified in their To Do List that there’s a step they need to take as soon as it’s due.
This is the power of building with tracks. When a positive condition is met, the target moves. Next, let’s examine a negative track.
Build a Negative Track
Why build a negative track? Suppose a prospect engages with a main step in a way that indicates they’re not right for your company’s offer. It’s time for a different approach.
Here’s an example.
- Negative Track Entry Rules: Not Interested, Unqualified
- Track steps:
- Manual Email (Day 20 Nurture Email)
- Automated Email (Day 40 Nurture Email)
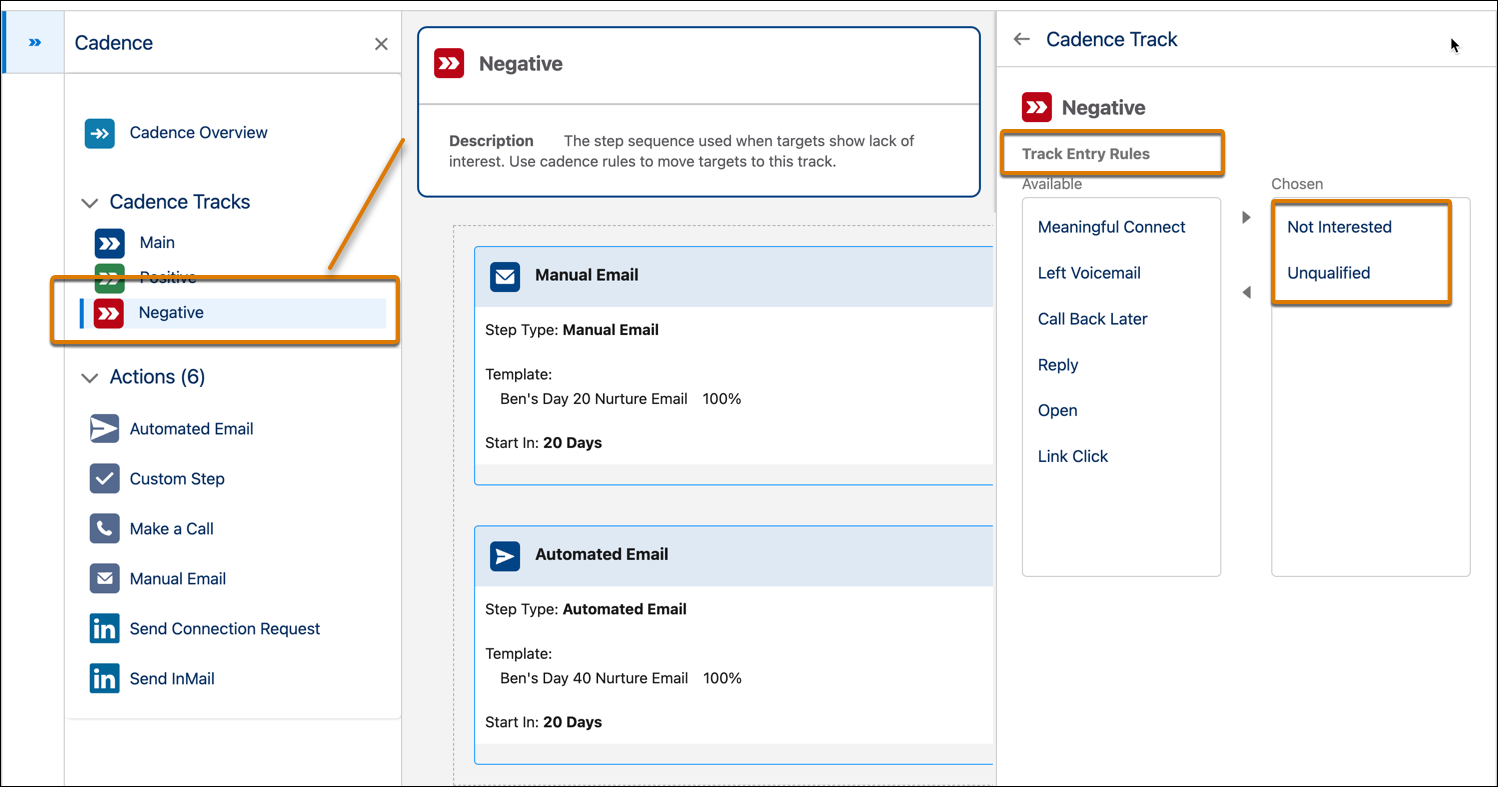
First, choose the track entry rules Not Interested and Unqualified on the right side panel. Either entry rule could be the result of a Make a Call step. Here are a few definitions used in this example.
- Not Interested
- The target indicates they aren’t interested in your offering.
- Target is not interested currently, but may be in the future.
- Target is not interested in the product or offer, but may be interested in an alternative product or offer.
- The target indicates they aren’t interested in your offering.
- Unqualified
- The phone call makes it clear the target isn’t a good fit for your offering.
- Target can be interested, but has no budget now.
- Target isn't qualified now, but will be added to a nurture campaign to see if interest increases over time.
- The phone call makes it clear the target isn’t a good fit for your offering.
You determine the definition of an entrance rule for your organization.
Next, add steps to the negative track. From the Actions menu, click and drag a Manual Email to the center canvas and then add an Automated Email below it. In the example, a manual email is sent out 20 days after the target enters the negative track. An automated email is sent 20 days after the manual email. The template used for the automated email is a 40-day nurture email.
Now that you have more context around building cadences, let’s take another look at cadence exit rules.
Cadence Exit Rules
As mentioned earlier, a cadence exit rule removes the target from the cadence when specific conditions are met. Cadence Exit Rules are chosen in the main track. When you choose an exit rule, a target anywhere in the cadence who meets the rule will exit the cadence. For a target’s movement through a cadence, the exit rule takes precedence over movement to any other track. Choose from the available rules, then define its detailed meaning for your organization.
Cadence Exit Rules include:
- Meaningful Connect
- Not Interested
- Unqualified
- Left Voicemail
- Call Back later
- Reply
- Bounce—refers to an email bounce and is only available as an exit rule.

Activate Your Cadence
Click Save to add the cadence to the Public folder. Click Cadence Overview to review the cadence while in the canvas. Click Activate to make it available for Sales Engagement users in your org to add targets. Here’s a summary of the cadence tracks and steps used for the example in this unit.
Main Track
- Make a Call (Day 1 Introductory Phone Call)
- Automated Email Step (Day 1 Follow-up Email)
- Make a Call (Day 2 Follow-up Call)
- LinkedIn InMail (LinkedIn Follow-up)
Positive Track (Entry Rules: Meaningful Connect, Link Click)
- Make a Call (Meaningful Connection Follow-up)
- LinkedIn Connection Request
Negative Track (Entry Rules: Not Interested, Unqualified)
- Manual Email (Day 20 Nurture Email)
- Automated Email (Day 40 Nurture Email)
You’ve just seen an example of how to use the track system to build a cadence that includes a main, positive, and negative track. Managers can create tracks that make sense for their team and set rules to control when a target moves from one track to another. Targets can move from one track to another at any time based on the track entry rules you set. However, a target can only enter each track once. Otherwise, the cadence ends when all steps on the target’s current track are completed.
Now it’s time to test your knowledge by completing the Hands-on Challenge.
Get Ready for the Hands-on Challenge
Sign Up for a Developer Edition Org with Sales Engagement
To complete the challenge in this unit, you need to sign up for a special Developer Edition org that contains Sales Engagement and our sample data. We provide the link below. Note that this Developer Edition is designed to work with the challenges in this badge, and might not work for other badges.
-
Sign up for a free Developer Edition org with Sales Engagement by clicking here. Make sure you’re using this org to complete the challenge.
- Fill out the form:
- For Email, enter an active email address.
- For Username, enter a username that looks like an email address and is unique, but it doesn't need to be a valid email account (for example, yourname@example.com).
- For Email, enter an active email address.
- After you fill out the form, click Sign me up. A confirmation message appears.
- When you receive the activation email (this might take a few minutes), open it and click Verify Account.
- Complete your registration by setting your password and challenge question. Tip: Save your username, password, and login URL in a secure place—such as a password manager—for easy access later.
- You are logged in to your Developer Edition.
Now connect your new Developer Edition org with Sales Engagement to Trailhead.
- Make sure you're logged in to your Trailhead account.
- In the Challenge section at the bottom of this page, click the org name and then click Connect Org.
- On the login screen, enter the username and password for the Developer Edition with Sales Engagement that you just set up.
- On the Allow Access? screen, click Allow.
- On the Want to connect this org for hands-on challenges? screen, click Yes! Save it. You are redirected back to the challenge page and ready to use your new Developer Edition to earn this badge.