Manage Relationships Between People and Organizations
Learning Objectives
After completing this unit, you’ll be able to:
- Explain how the Party Role Relationship object defines contact-contact and account-account relationships.
- Create a party role relationship.
- Create a contact-contact relationship.
- Track a relationship between two households or organizations in Agentforce Nonprofit.
- Describe how to use the Actionable Relationship Center to visualize relationships between people and organizations.
Map Relationships Between Individuals or Groups
The final records to map stakeholder relationships in Agentforce Nonprofit connect two individuals or two groups to each other: contact-contact relationships and account-account relationships.
The Contact Contact Relationship object tracks relationships between two contacts or person accounts. Earlier in this module, you learned how contact-contact relationships map the relationship between spouses. You can also use contact-contact relationships to map relationships such as:
- A friendship between a board member and a major donor
- A mentorship between a program participant and a volunteer
- A relationship between neighbors
The Account Account Relationship object tracks relationships between two business accounts, including households or organizations. In the first unit, you learned how account-account relationships connected a household to an advisory firm. You could also use account-account relationships to track the relationship between two neighboring households, two grantmaking organizations that collaborate on programs, and any other connection between groups of people.
Related party role relationships define both contact-contact and account-account relationships. Each party role relationship describes a connection between two entities, with a role and related role. For example, party role relationships can define the relationships between a grantmaker and grantee, program participant and sponsor, and spouses.
To fully map an inverse relationship, you need four records: two relationship records, each with a related party role relationship record. Think about our contact-contact relationship example from the first unit with spouses Leah and Sam Mason.

Sam has a contact-contact relationship connecting him to Leah, and Leah has a contact-contact relationship connecting her to Sam. Both contact-contact relationships were related to a spouse-spouse party role relationship.
This system can seem a little complicated, so it’s best to get hands-on to learn how it works. In this unit, you create relationship records starting with a new party role relationship.
Create a Party Role Relationship
Imagine your nonprofit is starting a new mentorship program that assigns program participants to volunteer mentors.
You first need a new party role relationship to describe the relationship. This relationship is between two person accounts, so it describes a contact-contact relationship. Here’s how you create the party role relationship.
- From the App Launcher (
 ), find and select Party Role Relationships.
- Click New.
- In the Role Name field, enter
Mentor, the primary role in the relationship.
- In the Related Role Name field, enter
Mentee, the secondary role in the relationship.
- In the Relationship Object Name field, select Contact Contact Relationship.
- Select Create Inverse Role Automatically to create the mentee-mentor relationship at the same time.
- Save your work.
On the record, check that the inverse party role relationship was created in the Related Inverse Record field.

The Party Role Relationship Id for this record ends with -CCR, which means it's for use on contact-contact relationships. Party role relationships for account-account relationships end with -AAR.
After you create these records, they’re available whenever you create a relationship record, including in the New Group guided flow.
Create Relationships Between People
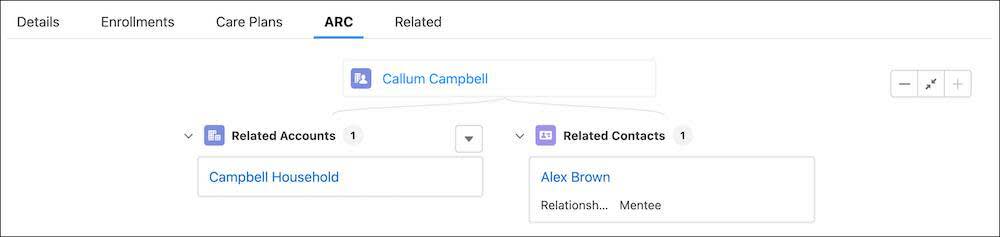
Callum Campbell signs up to be a volunteer mentor and is assigned to program participant Alex Brown. Create a contact-contact relationship to track the relationship and connect Callum and Alex’s person accounts.
- From the App Launcher (
 ), find and select Contact Contact Relationships.
- Click New Relationship.
- In the Contact field, find and select Callum Campbell.
- In the Related Contact field, find and select Alex Brown.
- In the Party Role Relationship field, find and select Mentor-Mentee-CCR.
- Select Active.
- Save your work.
The relationship between Callum and Alex is stored in a contact-contact relationship. When you create the inverse mentee-mentor relationship, you can find and select this record in the Related Inverse Record field. You can also automate the creation of the inverse record using Flow Builder or other Salesforce automation tools.

There are better ways to review this relationship, though, like using Actionable Relationship Center (ARC). ARC visualizes your stakeholders’ relationships in an easy-to-navigate graph that includes interactive components.
This graph is highly configurable and, depending on your settings, you can use ARC to create relationships and other records directly from the graph. Work with your admin or implementation partner to display only what you need in the context of different objects and records. See Visualize Stakeholder Relationships with Actionable Relationship Center for details.
Create Relationships Between Households or Organizations
To relate two households, two organizations, or a household and an organization, use the Account Account Relationship object. Account-account relationships are similar to contact-contact relationships and use party role relationships in the same way.
From the App Launcher ( ), find and select Account Account Relationships, then create an account-account relationship following the steps in the previous section. There’s one important difference when you create an account-account relationship: You must select a party role relationship that ends in -AAR.
For example, you can create an account-account relationship between two household business accounts and use a party role relationship called Neighbor-Neighbor-AAR. Account-account party role relationship names follow the same pattern as for contact-contact relationships: the first word is assigned to the Account, the second word is assigned to the Related Account, and AAR indicates it’s for account-account relationship records.
The account-account relationship connects the two households. That connection can be visualized on an ARC graph, as well.

Build the Relationships That Build Change
In this module, you reviewed person accounts, business accounts, party relationship groups, and relationships in Agentforce Nonprofit. For training purposes, you took the most common, or default, path through the data model to demonstrate how these pieces fit together.
These objects, records, and processes are the building blocks for your program and fundraising processes, though. With what you learned about the data model, work with your Salesforce admin or implementation partner to make Salesforce and Agentforce Nonprofit work best for your organization and stakeholders. For more ideas, see How Agentforce Nonprofit Models Groups and Relationships in Salesforce Help.
With these tools, it’s time for you to build—and track—the relationships that build change.
Resources
- Salesforce Help: Group Membership and Households
- Salesforce Help: Define Groups and Relationships Between Individuals and Groups
- Salesforce Help: Create Groups and Relationships
- Salesforce Help: Visualize Stakeholder Relationships with Actionable Relationship Center
- Salesforce Help: Actionable Relationship Center
- Salesforce Help: How Agentforce Nonprofit Models Groups and Relationships