Create Relationship Queries with Custom Objects
Learning Objectives
After completing this unit, you'll be able to:
- Interpret diagrams in the Schema Builder to identify object relationships.
- Identify the custom relationship name to use in queries of custom objects.
- Create a child-to-parent query for custom objects.
- Create a parent-to-child query for custom objects.
Follow Along with Trail Together
Want to follow along with an expert as you work through this step? Take a look at this video, part of the Trail Together series on Trailhead Live.
(This clip starts at the 51:38 minute mark, in case you want to rewind and watch the beginning of the step again.)
Launch Your Trailhead Playground and Install a Package
The examples and hands-on activities in the rest of this module use a sample real estate application called DreamHouse. Let's install the app in your Trailhead Playground and import sample data.
If it's not already open, launch your Trailhead Playground. If you see a tab in your org labeled Install a Package, great! Skip ahead to step 1. If not, from the App Launcher ( ), find and open Playground Starter and follow the steps. If you don't see the Playground Starter app, copy this link to the DreamHouse Package and check out Install a Package or App to Complete a Trailhead Challenge on Salesforce Help.
- Click the Install a Package tab.
- Paste
04t3h000004mBpiAAEinto the field.
- Click Install.
- Select Install for Admins Only, then click Install.
- If prompted to approve third-party access, select Yes, grant access… and then click Continue.
When the package is finished installing, you see a confirmation page and get an email to the address associated with your playground.
Import DreamHouse Data
- Click
 , type
 Dreamin the Search box, and then select the DreamHouse app.
- Click the Settings tab. (If you don't see the Settings tab, expand the More list.)
- Click Import Data.
- Click the Properties tab, and familiarize yourself with the sample data.
Explore the DreamHouse Schema
Until now, we've queried only standard objects. Now we discuss how to query custom objects. We use objects in the DreamHouse app, so first let's examine the DreamHouse schema (data model) to understand how the data is structured.
Open the Schema Builder
- In your Trailhead Playground, click
 and select Setup.
- Click Object Manager.
- Click Schema Builder.
- In the Objects tab, click Clear All.
- If you see Broker rather than Broker__c, click View Options and then select Display Element Names.
- Remember that in code we use field API names. Display Element Names shows us field API names instead of field labels. (The API name for a custom object is the custom object name with __c [underscore underscore c] added at the end.)
- In the Select from list, choose Custom Objects.
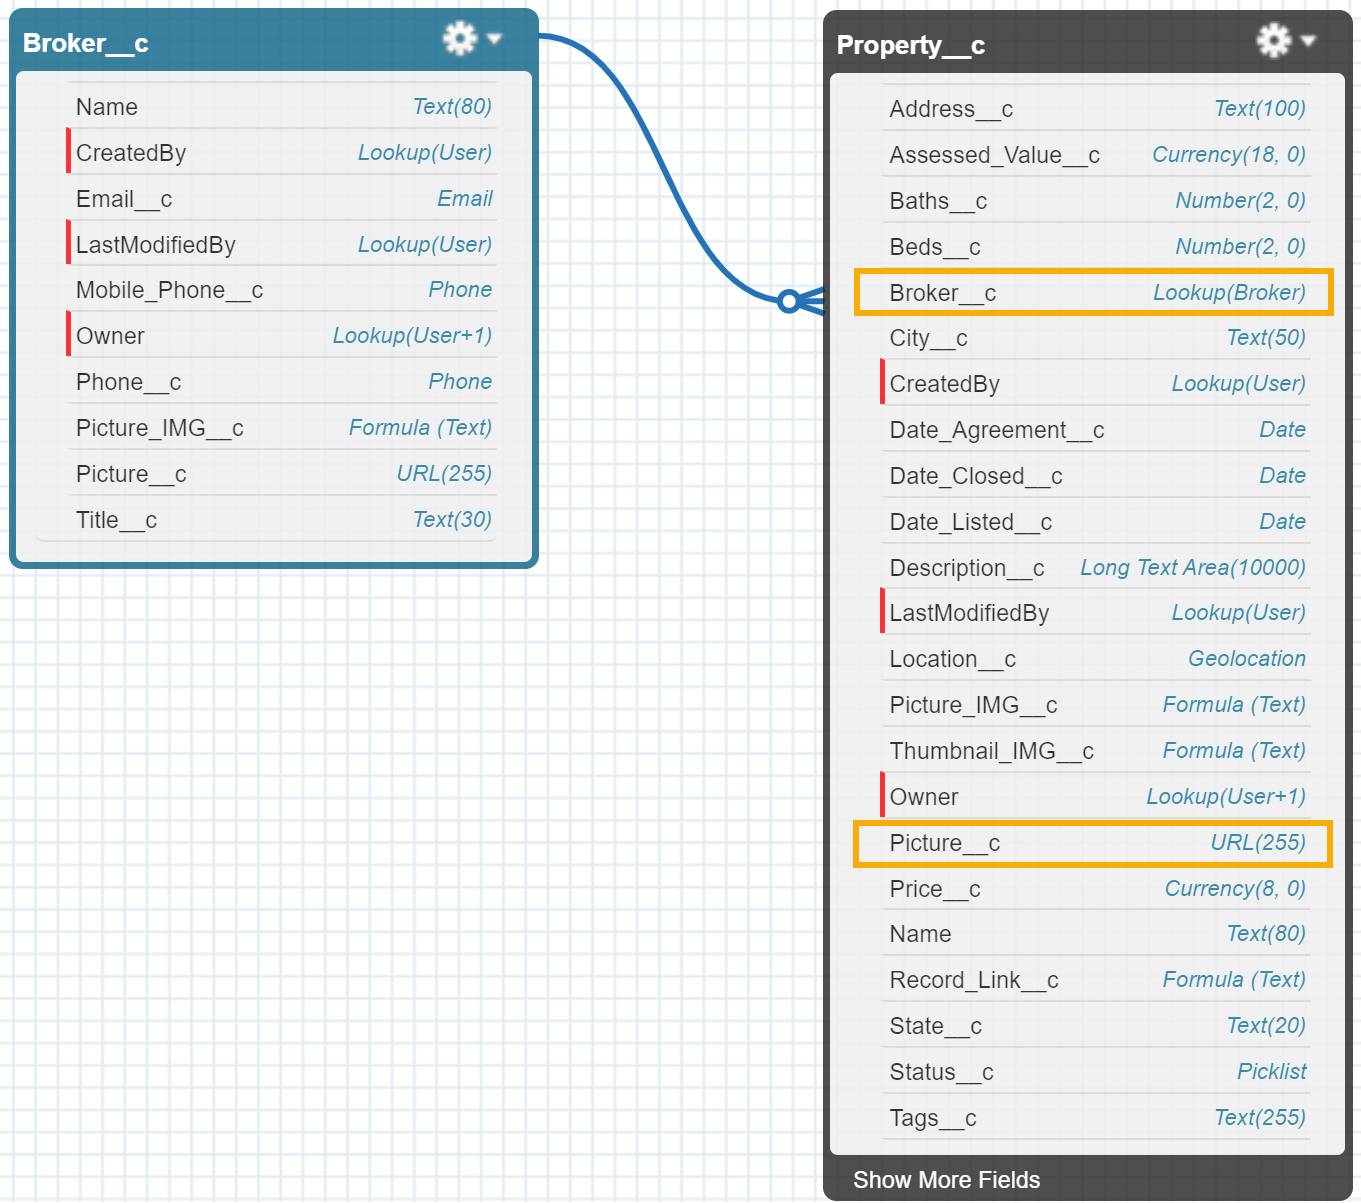
- Select Broker__c and Property__c. These are the custom objects we use in this unit.
- Click Auto-Layout.
- Examine the property fields.
- The Property__c custom object has two custom fields: Picture__c and Broker__c. (The API name for a custom field is the custom field name with __c [underscore underscore c] added at the end.)

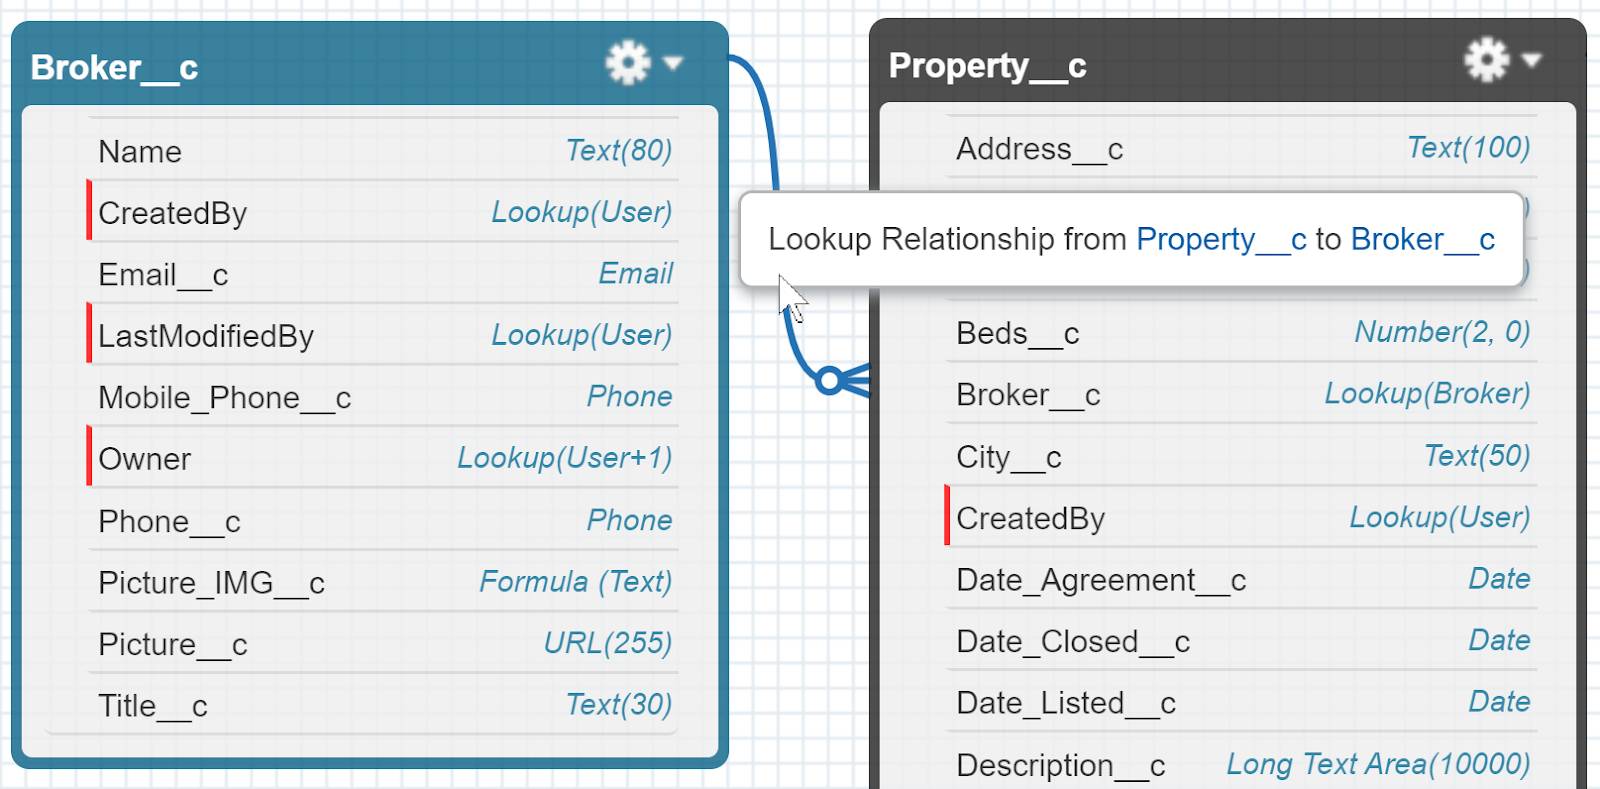
- Hover over the relationship line that connects Property__c to Broker__c.
- There is a lookup relationship from the Broker__c custom field on the Property__c custom object to the Broker__c custom object.

- On the Property__c element, click the gear icon and then select View Object.
The Object Manager opens displaying the Property__c object.
- Click Fields & Relationships.
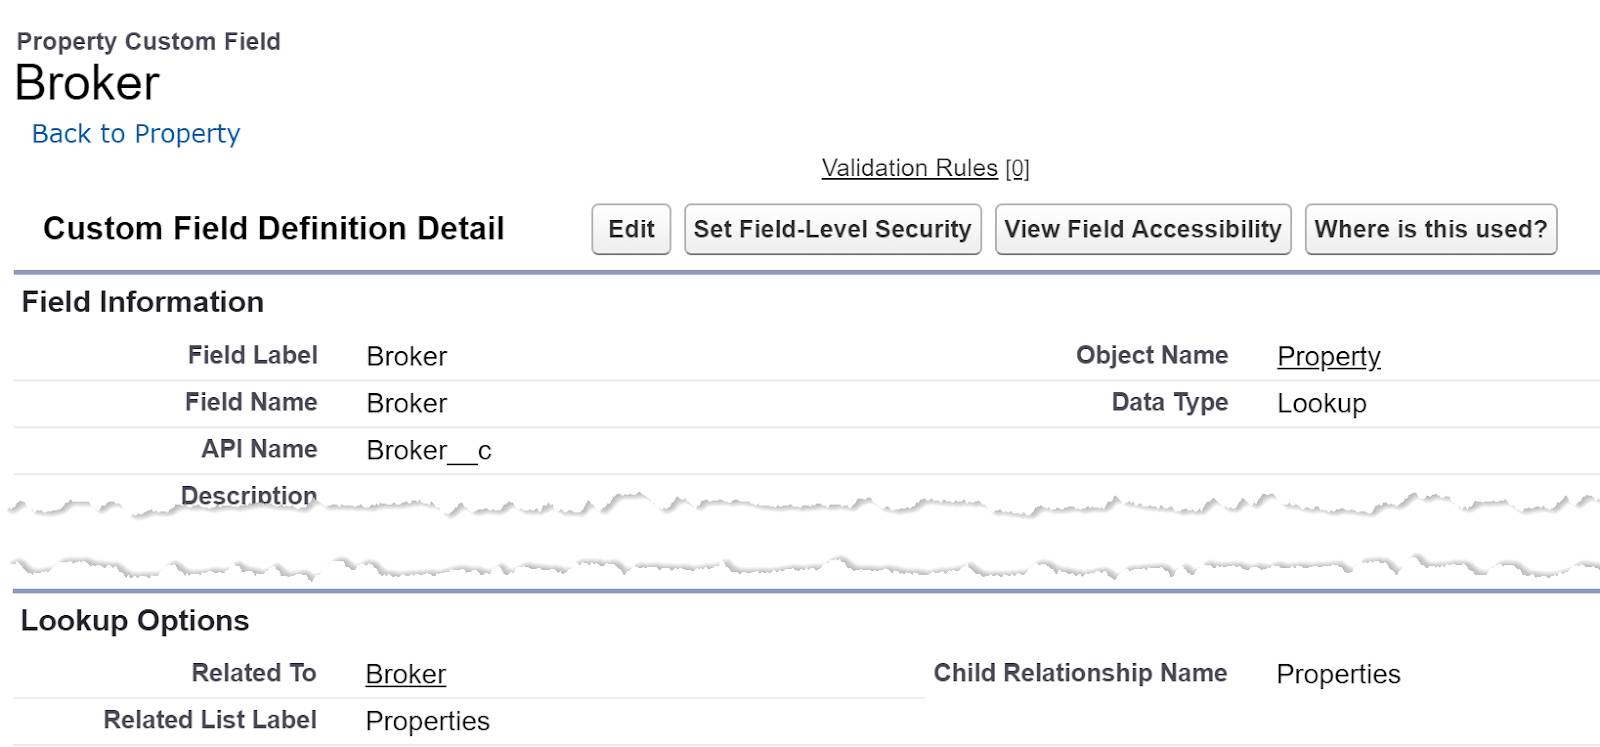
- Click the Broker field label.
- In the Lookup Options section, find the Child Relationship Name.
Now we know that Property__c is a child of Broker__c and that the name of the relationship between a property and a broker is Properties. (Remember, the relationship name is typically the plural form of the child object name.)
Query Custom Objects
Querying a custom object is a lot like querying a standard object but there are a few differences.
Consider this requirement:
“Get a list of all properties with the property address, picture, and assigned broker.”
Pretty straightforward, right? We query the Property__c custom object, and get the Address__c, Picture__c, and Broker__c custom fields. Let's try it.
Create a Query
- In the Query Editor, type:
SELECT Address__c, Picture__c, Broker__c FROM Property__c
- Click Execute.
The first six rows of your results should be:
Query Results - Total Rows: 12
Address__c
Picture__c
Broker__c
18 Henry st
https://s3-us-west-2.amazonaws.com...
a016g000007Yxfn...
24 Pearl st
https://s3-us-west-2.amazonaws.com...
a016g000007Yxfn...
72 Francis st
https://s3-us-west-2.amazonaws.com...
a016g000007Yxfn...
32 Prince st
https://s3-us-west-2.amazonaws.com...
a016g000007Yxfn...
110 Baxter st
https://s3-us-west-2.amazonaws.com...
a016g000007Yxfn...
448 Hannover St
https://s3-us-west-2.amazonaws.com...
a016g000007Yxfn...
Notice that the contents of the Broker__c column are not very useful. That's because the Broker__c field in the Property__c object is a lookup to the Broker object. Fields with lookup relationships contain the related object's Id. To get the name of the Broker, we need a relationship query.
Create a Child-to-Parent Query
Because Broker__c is the parent of Property__c, we need a child-to-parent query. We use the relationship name and dot-notation to get the Broker__c object's Name field.
- In the Query Editor, change Broker__c to Broker__c.Name, like this:
SELECT Address__c, Picture__c, Broker__c.Name FROM Property__c
- Click Execute. (You get an error message.)
Error message
Didn't understand relationship 'Broker__c' in field path. If you're attempting to use a custom relationship, be sure to append the '__r' after the custom relationship name.
Whoops! What happened? Remember that Broker__c is a custom field on the Property object. What we want is the Broker__c related object.
Use the Custom Relationship Name in the Query
To specify the Broker__c related object (not the Broker__c field), we change __c to __r (underscore-underscore-r). Broker__r is the custom relationship name. It indicates that we want to traverse the relationship from Property__c to the Broker__c object. This portion of the query says, “Get the Name field from the related Broker__c custom object.” Let's update our query.
- In the Query Editor, change
Broker__ctoBroker__r, like this:SELECT Address__c, Picture__c, Broker__r.Name FROM Property__c
- Click Execute.
The first six rows of results should be:
Query Results - Total Rows: 12
Address__c
Picture__c
Broker__r.Name
18 Henry st
https://s3-us-west-2.amazonaws.com...
Caroline Kingsley
24 Pearl st
https://s3-us-west-2.amazonaws.com...
Michael Jones
72 Francis st
https://s3-us-west-2.amazonaws.com...
Jonathan Bradley
32 Prince st
https://s3-us-west-2.amazonaws.com...
Jennifer Wu
110 Baxter st
https://s3-us-west-2.amazonaws.com...
Olivia Green
448 Hannover St
https://s3-us-west-2.amazonaws.com...
Miriam Aupont
Much better. Instead of the Id, now we have the Name field from the Broker custom object.
Create a Parent-to-Child Query
We've successfully returned each property with its related broker. What if we want the opposite?
Requirement:
“Get the names of all brokers with the address and price of all properties assigned to each broker.”
Because we want a list of brokers, in our main query, we query the Broker__c object:
SELECT Name FROM Broker__c
Broker is the parent so the parent-to-child query needs a subquery of the child object. We use the child relationship name in the subquery.
What's the relationship name for a subquery of the Property__c object? Check the details for the Broker field on the Property object.

The Child Relationship Name is Properties. Because this is a custom relationship, when we use it in a query, we append __r (Properties__r). So our subquery (in parentheses) is:
(SELECT Address__c, Price__c FROM Properties__r)
When we insert the subquery into the main query, our full query is:
SELECT Name, (SELECT Address__c, Price__c FROM Properties__r) FROM Broker__c
Run the Query
- In the Query Editor, type:
SELECT Name, (SELECT Address__c, Price__c FROM Properties__r) FROM Broker__c
- Click Execute.
The first eight rows of your results should look like this:
Perfect! Now we have a list of all brokers and a comma separated list of each broker's properties. When you're developing queries, remember that the Developer Console's Query Editor provides an easy way to test and tweak your SOQL queries.
Resources
- Salesforce Developer Documentation: Relationship Names and Custom Objects
- Blog: SOQL How I Query with Thee Let Me Count the Ways