Explore the Bolt Development Framework
Learning Objectives
After completing this unit, you’ll be able to:
- Explain what Bolt is.
- Explain the most common APIs used by Slack apps.
- Identify the scopes that allow Slack apps to read and write messages.
Before You Get Started
In this module, we show you the steps to build a simple Slack app using the Bolt for JavaScript development framework. Completing these steps is optional and there are no hands-on challenges. But if you want to follow along and try out the steps, you need the following.
- A personal Slack workspace. You can set up a personal Slack workspace if you haven’t already. Check with your company’s policies if you want to use an employer provided workspace or assets.
-
Glitch, ngrok, or another hosting environment for developing and testing Slack apps. This module uses Glitch. If you don’t have a Glitch account, you can create an account for free.
Get to Know Bolt
Bolt is a development framework that makes it easier to build Slack apps with Slack’s latest platform features. It uses a listener interface that enables common patterns when handling requests coming from Slack, regardless of the type.
Bolt also has a number of built-in defaults like OAuth support, verification of events, and a simplified interface for features like workflow steps from apps. This module provides an overview of Slack’s APIs, Bolt’s listener patterns, and the creation of a Bolt for JavaScript app.
Slack APIs at a Glance
Before building with Bolt, it’s helpful to have a high-level understanding of application programming interfaces (APIs). If you aren’t familiar with APIs, check out the API basics module.
Slack apps have access to a range of APIs that provide access to read, write, and update data in Slack. The two most commonly-used APIs for apps are the Web API and Events API. They work like a game of ping-pong. Slack uses the Events API to send your app an event. Your app uses the Web API to send an interaction back.
Events API
The Events API uses event subscriptions to send JSON payloads to your app via HTTP. When your app receives an event, it acknowledges the payload and decides what action to take. Events can be anything happening inside of a workspace—a message posted in a channel, a user opening your app’s home tab, or a new user joining the workspace. The full list of events with sample payloads can be found on the Slack API site.
Bolt includes built-in helpers to receive and route events to your app’s listeners, and expose helpful information like the workspace and relevant users or channels. Listeners are covered later in this module.
Web API
The Web API is a collection of HTTP methods with similar calling conventions to interact with objects in Slack, like channels, conversations, events, and more. These interactions include sending rich, interactive messages to a channel or other surface, or querying for workspace information like a list of users. The full list of Web API methods can be found on the API site. Bolt includes a built-in client with features like rate limit handling and retry logic to simplify calling and handling responses of Web API requests.
And for niche use cases like administering a workspace or performing security audits, additional APIs can be found in the documentation.
Are you ready to use Bolt with your app? Let’s go!
Create a Slack App
To get started, you need to create a new Slack app. You can either create an app from scratch or use a manifest template. For this module you use a manifest that’s already configured with the permissions and events. You can modify the app later if you wish.
-
Create a new Slack app using our manifest template. The link opens a dropdown to select the development workspace where you build and test your app.
- Select your workspace, and click Next. In this example, the SeaMoss workspace is selected.

- After you’ve selected your workspace, you see another popup, Review summary & create your app. This has information about the permissions and events your app will contain. We cover these in more detail later. Go ahead and click Create.
- You automatically go to the Basic Information page of your app, called Sample app. Click Got It on the welcome message.
The Basic Information page contains an overview of your app in addition to important credentials you need to use the Events and Web APIs, like the Signing Secret under the App Credentials header.
Feel free to look around, add an app icon and description, then we start exploring other configuration options.
Request Scopes and Install Your App
Scopes give your app permission to make Web API calls in the installed workspace (post a message, for example). You can select the scopes to add to your app by navigating to the OAuth & Permissions page on the sidebar.
- From your app’s page, select OAuth & Permissions from the sidebar.

- Scroll down to Scopes. Here you see the Bot Token Scopes
channels:historyandchat:write, which were included as part of creating your app from the manifest. These scopes grant your app the permission to read and post messages in public channels it’s a member of. To listen to messages in private channels and direct messages (DMs) your app is a member of, you'll need to subscribe additional*:historyscopes corresponding to the channel type.
- Head back to the top of the OAuth & Permissions page and click Install to Workspace.
- Then, click Allow.
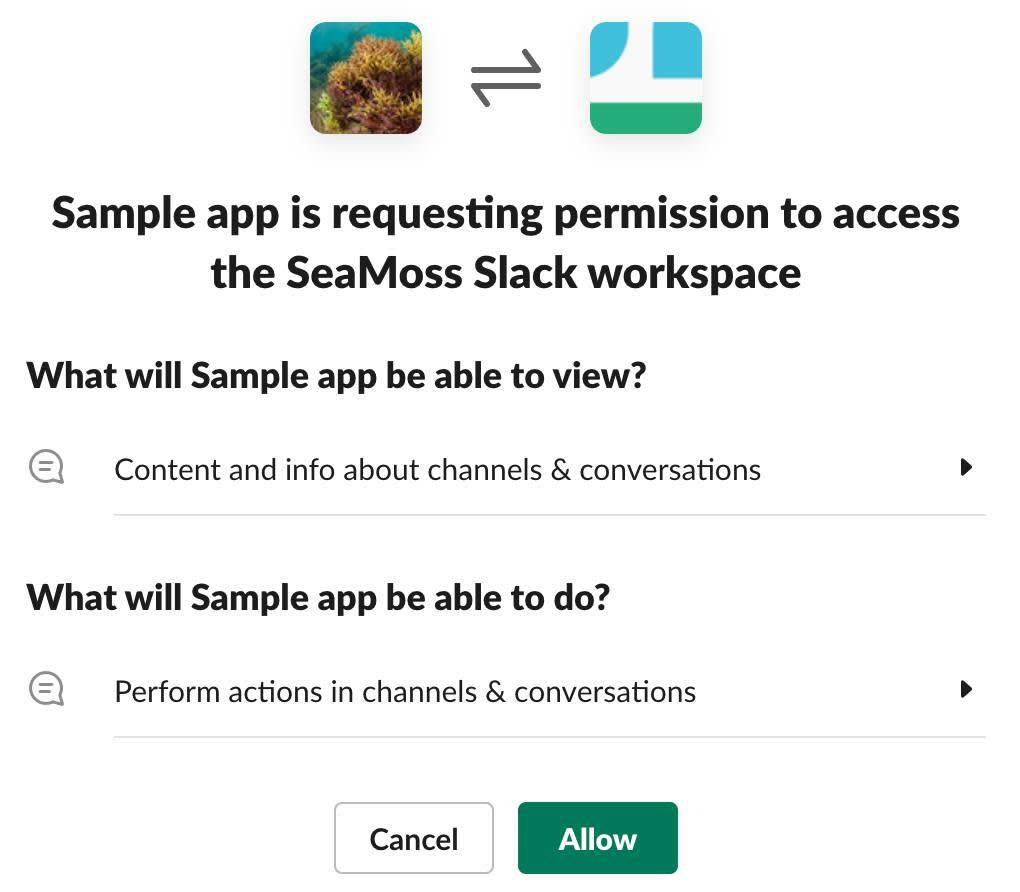
Upon installation, you’ll land back on the OAuth & Permissions page where you’ll see a new Bot User OAuth Access Token.
Access tokens are imbued with power. They represent the permissions granted to your app by the installing user (in this case yourself).
Remember to keep your access token a secret. At a minimum you should avoid checking your access token into public version control, and access it via an environment variable. The API documentation also contains a list of best practices for app security.
Add Your App to a Channel
Before you host, develop, and test your app, which we cover in the next unit, you need to add your app to a public channel. In this example, the SeaMoss Sample app is added to the #general channel.
- Open your Slack workspace.
- Right-click on the channel in your personal workspace.
- Click, Open channel details.

- Then, click on the Integrations tab.
- Click Add an App.

- If you don't see your app right away, search for it using the search field. Then click Add next to your app.
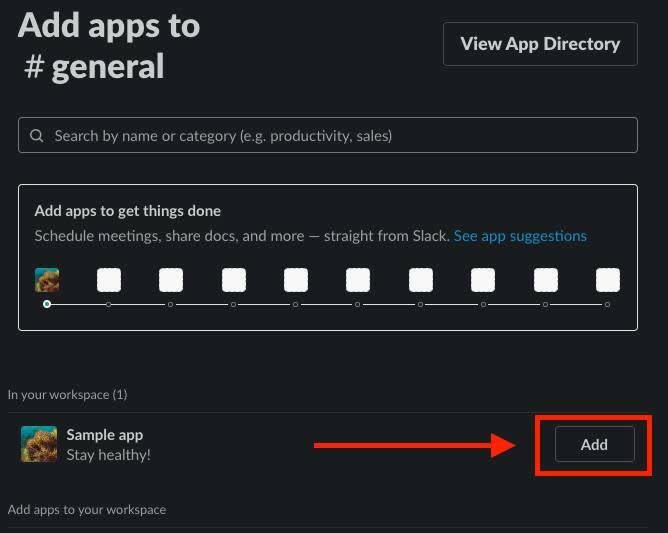
Back in the #general channel, you should see that your app was added. You're now ready to host and develop your app!

Resources
-
Slack: Create a Slack workspace
-
Trailhead: API Basics
-
Slack API: Using the Slack Web API
-
Slack API: Using the Slack Events API
-
Slack API: Web API methods
-
Slack API: Permission scopes
-
Slack API: Retrieving messages
-
Slack API: Best practices for security