Build the Account Map Display And Put It All Together
Learning Objectives
After completing this unit, you’ll be able to:
- Describe the Salesforce CLI commands used to sync your project with your scratch orgs.
- Describe the Salesforce CLI command to create a permission set.
- Understand how to build an app using Aura components.
What Are We Building?
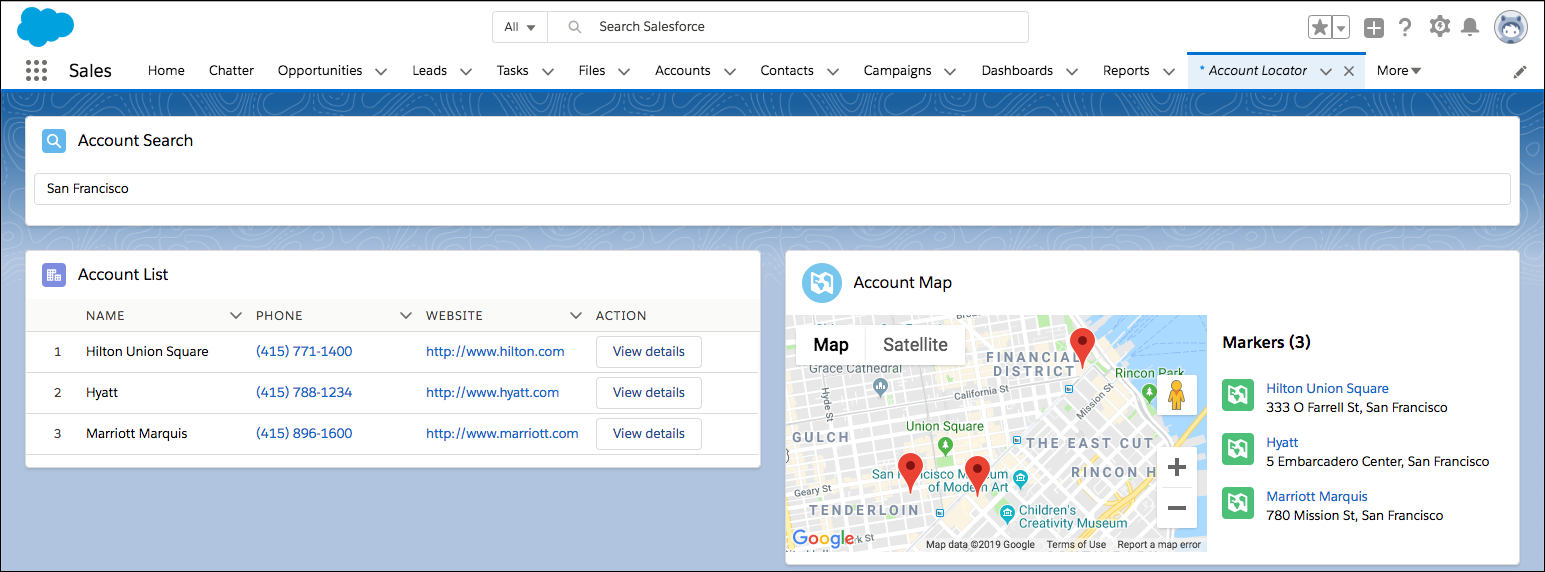
In this step, we’ll build the final components of our geolocation app, which bring all the features together. We’ll create an Aura component that visualizes account addresses as markers on a map, and create a custom tab so we can navigate to our app. We’ll use a permission set to grant users access to our app, too.
Create the Account Map Aura Component
This component uses the <lightning:map> component to display accounts on a map.
- Create the AccountMap component in the
aurafolder.sf lightning generate component --name AccountMap --output-dir force-app/main/default/aura
- Open
force-app/main/default/aura/AccountMap/AccountMap.cmpand replace its contents with the following code, then save the file.<aura:component> <aura:handler event="c:AccountsLoaded" action="{!c.onAccountsLoaded}"/> <aura:attribute name="mapMarkers" type="Map[]"/> <lightning:card title="Account Map" iconName="action:map"> <lightning:map mapMarkers="{!v.mapMarkers}"/> </lightning:card> </aura:component>This component listens for the AccountsLoaded event and displays the event data as map markers.
- Open
force-app/main/default/aura/AccountMap/AccountMapController.jsand replace its contents with the following code, then save the file.({ onAccountsLoaded: function( component, event, helper ) { var mapMarkers = []; var accounts = event.getParam( 'accounts' ); for ( var i = 0; i < accounts.length; i++ ) { var account = accounts[i]; var marker = { 'location': { 'Street': account.BillingStreet, 'City': account.BillingCity, 'PostalCode': account.BillingPostalCode }, 'title': account.Name, 'description': ( 'Phone: ' + account.Phone + 'Website: ' + account.Website ), 'icon': 'standard:location' }; mapMarkers.push( marker ); } component.set( 'v.mapMarkers', mapMarkers ); } })The client-side controller’sonAccountsLoadedfunction transforms the event data into the format expected by the<lightning:map>component.
- Deploy your new code to the scratch org.
sf project deploy start
Create the Account Locator Aura Component
This is our main component, which we use to display our app to end users in Lightning pages, Salesforce mobile, and custom tabs. It’s also the last component you create for this project!
- Create the AccountLocator component in the
aurafolder.sf lightning generate component --name AccountLocator --output-dir force-app/main/default/aura
- Open
force-app/main/default/aura/AccountLocator/AccountLocator.cmpand replace its contents with the following code, then save the file.<aura:component implements="force:appHostable,flexipage:availableForAllPageTypes"> <lightning:layout horizontalAlign="space" multipleRows="true"> <lightning:layoutItem size="12" mediumDeviceSize="12" padding="around-small"> <c:AccountSearch/> </lightning:layoutItem> <lightning:layoutItem size="12" mediumDeviceSize="6" padding="around-small"> <c:AccountList/> </lightning:layoutItem> <lightning:layoutItem size="12" mediumDeviceSize="6" padding="around-small"> <c:AccountMap/> </lightning:layoutItem> </lightning:layout> </aura:component>This component is composed of the other components you created throughout this project. Two powerful features of the Lightning Component Framework are component encapsulation and component reusability. Composing fine-grained components in a larger component enables you to build more interesting components and applications.
- Deploy your new code to the scratch org.
sf project deploy start
Create the Account Locator Custom Tab
An easy way to display Aura components in both Lightning Experience desktop and Salesforce mobile is with a custom tab. After this step, you access your app by navigating to this custom tab.
- Open your scratch org.
sf org open
- From Setup, enter
Tabsin the Quick Find box, then click Tabs. - In the Lightning Component Tabs section, click New and enter the details:
- Lightning Component: c:AccountLocator
- Tab Label:
Account Locator - Tab Name:
Account_Locator - Tab Style: Click the magnifier icon and select Map as the tab icon.
- Description:
Custom tab for Account Locator.
- Click Next.
- For Apply one tab visibility to all profiles, choose Tab Hidden.
- Click Save.
Create the Geolocation Permission Set
To control who has access to your geolocation app, create a permission set and grant it visibility to the Account Locator tab.
- From Setup, enter
Permission Setsin the Quick Find box, then click Permission Sets. - Click New and enter the details:
- Label:
Geolocation - API Name:
Geolocation - Description:
Grants access to the Account Geolocation app
- Label:
- Click Save.
- Under Apps, click Object Settings.
- Click Account Locator.
- Click Edit.
- For Tab Settings, select both Available and Visible, then click Save.
Next, assign the permission set to yourself. We’ll see in a later step how to automate assigning permission sets using Salesforce CLI.
- From Setup, enter
Usersin the Quick Find box, then click Users. - Click the user with full name
User, Userin the table. - Click Permission Set Assignments.
- In the Permission Set Assignments section, click Edit Assignments.
- Add the
Geolocationpermission set to the Enabled Permission Sets box. - Click Save.
In case you were wondering, User User is the default full name given to the system administrator in a scratch org. Go ahead and change it in Setup if you want a more exciting name.
Metadata Magic: Retrieve Changes into Your Project
Until now in this module, you’ve been working in your local project and pushing metadata into your scratch org. In this step, you made some changes directly in that scratch org. Now the magic happens. With one single command, you retrieve all the metadata that you changed in the scratch org to your local project.
Before we do that, though, we want to configure our .forceignore file to ignore syncing some metadata. When you created the Account Locator tab and assigned its visibility to all the profiles, the automatic change-tracking in the scratch org noted that the profiles have changed. Naturally, the next time you pull metadata from the scratch org to sync with your local project, the CLI will want to pull down profile metadata. Since the profiles are not pertinent to your geolocation app and not something to track in your source control repository for this project, we need to tell Salesforce CLI to ignore the profile changes.
In the root directory of your geolocation project, open the .forceignore file and add **/profiles as a new line to the file, then save the file. Your .forceignore file should look something like this:
# List files or directories below to ignore them when running force:source:push, force:source:pull, and force:source:status
# More information: https://developer.salesforce.com/docs/atlas.en-us.sfdx_dev.meta/sfdx_dev/sfdx_dev_exclude_source.htm
#
package.xml
# LWC configuration files
**/jsconfig.json
**/.eslintrc.json
# LWC Jest
**/__tests__/**
# Profiles
**/profiles
Now you’re ready to retrieve metadata. In the command window, retrieve the changes you made in the scratch org with your local project.
sf project retrieve start
The output of the project retrieve start command looks something like this:
Retrieving v58.0 metadata from test-t7e5za@example.com using the v58.0 SOAP API
Preparing retrieve request... Succeeded
Retrieved Source
================================================================================================================
| State   Name            Type          Path
| ─────── ─────────────── ───────────── ────────────────────────────────────────────────────────────────────────
| Created Account_Locator CustomTab     force-app/main/default/tabs/Account_Locator.tab-meta.xml
| Created Geolocation     PermissionSet force-app/main/default/permissionsets/Geolocation.permissionset-meta.xml
Note that none of the profile changes were retrieved because they're ignored in .forceignore.
Validate Your App
While you can absolutely use the same scratch org you’ve used during development to perform your testing, we recommend that you always start with a fresh scratch org. A fresh scratch org ensures you've properly externalized all your source from the org.
- Create a new scratch org.
sf org create scratch --set-default --definition-file config/project-scratch-def.json --alias GeoTestOrg
- Deploy your local source and metadata to the scratch org.
sf project deploy start --target-org GeoTestOrg
- Assign your permission set.
sf org assign permset --name Geolocation --target-org GeoTestOrg
- Load your sample data into the org. This is the data you exported from a different scratch org in a previous unit.
sf data import tree --files data/Account.json --target-org GeoTestOrg
- Open your org.
sf org open --target-org GeoTestOrg
- Test the Account Locator tab, and verify that it works as expected. From the App Launcher, find and select Account Locator.
Congratulations! You’ve successfully built and tested a new app with scratch orgs and Salesforce CLI. Don’t forget to add everything to your source control repository!