Configure Donation Settings
Learning Objectives
After completing this unit, you’ll be able to:
- Configure donation frequencies.
- Set default donation ask amounts and descriptions.
- Connect donations from your Giving Pages with specific general accounting units (GAUs).
- Give your donors the option to increase their donation to cover processing fees or other needs.
Making Your Ask
Let’s get to the main event: asking your donors to give.
Elevate gives you tools to personalize the ask ladder for each of your Giving Pages and even each donor. With Elevate you can:
- Set your default donation frequency and suggest donation amounts, or giving levels on an ask ladder.
- Add descriptive text for what each donation amount provides through your programs and services.
-
Designate gifts made through the Giving Page for one purpose or let the donors decide from a picklist you set.
- Give donors the option to pitch in a little bit more to cover processing fees or other needs.
- Enable donors to mark that their gift is being made in tribute of someone.
With all that flexibility, it’s especially important to keep a few best practices in mind:
-
Limit your suggested ask amounts. Elevate Giving Pages can have up to eight ask amounts, but limiting donors' choices to three or four per frequency minimizes the work it takes to give.
-
Set default ask amounts to your benchmarks and the situation. We’d all love a million-dollar monthly recurring donation, but remember to set your default ask amounts based on where first-time and repeat donors usually give—or slightly above those amounts.
-
Personalize the Giving Page to each donor when possible. Whether your Giving Page is embedded in your website or you share the link to the stand-alone donation form, customize your frequencies, ask amounts, and more using URL parameters at the end of the URL. We cover URL parameters and personalization strategies later in this module.
Let’s follow along with Sofia, Development Associate at the (fictional) nonprofit No More Homelessness (NMH), as she configures donation settings.
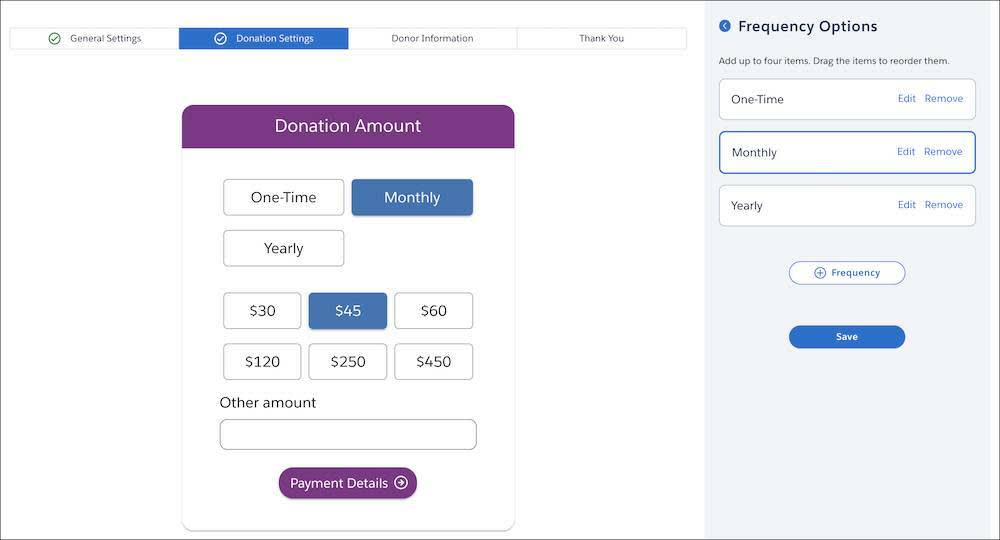
Customize Donation Frequencies
NMH wants to configure this Giving Page for three different donation frequencies: one-time, monthly, and annually. The focus will be on recurring donations, with monthly gifts as the default.
- Click Frequency Options. Giving Pages, by default, are configured with one-time and monthly donation frequencies.
- Let’s start by customizing the Monthly frequency option. Click Edit in the Monthly box.
- Select Selected by default, because Sofia wants this option to be the first option when donors get to the Giving Page. The preview area should now show Monthly highlighted.
- Click the back arrow (
 ) next to the Frequency Details title.
- Now, let’s add the annual frequency option. Click + Frequency.
- In the Frequency picklist, select Yearly.
- Click the back arrow (
 ) next to the Frequency Details title.
- Click the back arrow (
 ) next to the Frequency Options title.
Set Default Donation Ask Amounts
Now let’s set our default ask amounts and our descriptions of each.
NMH wants to follow best practice by giving donors only a limited number of suggested giving levels. They decided to use three for each frequency option.
Plus, they want to show descriptive text associated with each giving level to give donors a clear indication of program benefits and what their donation is funding. Remember: This Giving Page is going to be embedded on NMH’s website so visitors will be able to navigate to it. That means prospective and first-time donors will find this Giving Page, so NMH wants to make a solid case for support.
Let’s get to work.
- Click Ask Amounts.
- In the Ask Amount Method picklist, select Custom. Select Calculated if you want to enter base amounts and let Elevate incrementally increase your ask ladder.
- Under Custom Amount Settings, click Monthly.
- Click Remove on the last three giving level boxes. NMH wants only three giving levels to keep with best practice.
- Click Edit in the first ask amount box, then enter these details:
- Amount:
$10
- Description:
Provides 60 meals a year
- Click the back arrow (
 ) next to Amount Details.
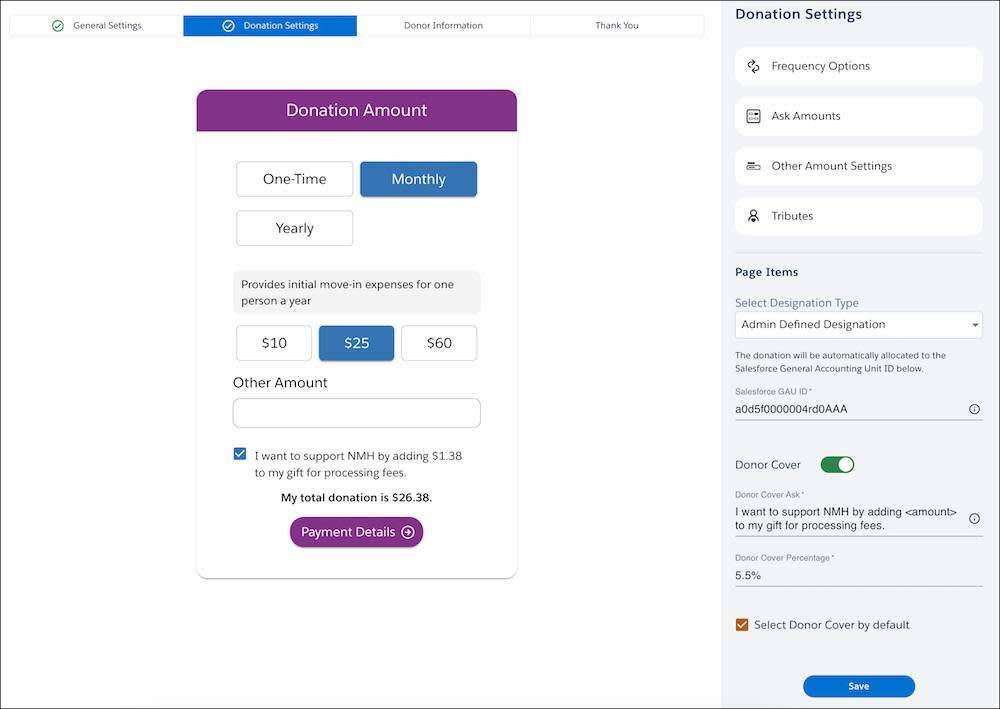
- Click Edit in the second ask amount box, then enter these details:
- Amount:
$25
- Description:
Provides initial move-in expenses for one person a year
- Select Selected by default.
- Click the back arrow (
 ) next to Amount Details.
- Click Edit in the third ask amount box, then enter these details:
- Amount:
$50
- Description:
Provides new furniture, food, and essentials for one person moving into a new home each year
- Click the back arrow (
 ) next to Amount Details.

Next, Sofia turns to the one-time and yearly amount settings, doing the same work for those frequencies. We won’t include the detailed instructions here. If you want to change the order of ask amounts, drag them in the Custom Amount Settings area.
Notice in the preview pane that the Other amount field is available by default. It can be removed, however, in the Other Amount Settings menu in Donation Settings. We'll leave it now, though, because we don’t want to limit donors too much. What if someone wants to give $100 a month?
Click the back arrow ( ) next to Ask Amounts.

Add Tributes
Optionally, you can give donors a way to mark their gift as a tribute, either in honor of someone or as a memorial.
By clicking Tributes in the Donation Settings menu, you can set which types of tribute gifts you want to accept, what information you want to collect about the honoree, and if you want to allow notifications to the honoree or another contact who should be notified about a memorial gift.
We won't turn this on now—it's not one of NMH's goals—but check out the Add Honor or Memorial Tributes section of the Create or Edit a Giving Page documentation linked in Resources to learn about the settings and some work your Salesforce admin needs to do to set up default values.
Add Designations
Back on the Donation Settings page, let’s move on to our next setting: the designation type.
NMH wants all donations made through this page to go to their annual fund general accounting unit (GAU) in Nonprofit Success Pack (NPSP).
- Under Select Designation Type, select Admin Defined Designation to apply all donations made through this Giving Page to one designation. This won’t be displayed to the donor. If we wanted to give the donor the option of picking from a list of designations we define, we would select Donor Selected Designation.
- In the Salesforce GAU ID field, enter the record ID of the GAU from Salesforce. (It’s the character string after /npsp__General_Accounting_Unit__c/ in the URL of a GAU record.) Sofia enters her Annual Fund GAU ID.
Add Donor Cover Fees
NMH also would like donors to have the option to cover the 5.5% processing and platform fees for gifts. Research has shown half of donors pitch in a little more to help cover these fees, so cumulatively it can go a long way to help an organization reduce their online fundraising costs.
- Click Donor Cover to toggle it on.
- In Donor Cover Ask, enter
I want to support NMH by adding <amount> to my gift for processing fees.(You can customize this if you like, just remember to include the<amount>merge field in your copy to include the calculated amount.)
- In Donor Cover Percentage, enter
5.5%.
- Optionally, you can select Select Donor Cover by default so that users have to opt-out of covering fees. Select that now.
- Click Save.
If a donor chooses to cover your costs, that additional amount of their total donation is listed on the payment record in Salesforce in the Donor Cover Amount field to allow for accounting allocations and processing.
Now it’s time to move on to the next step: collecting information from your donor to complete the transaction.
Resources
-
Salesforce Help: Create or Edit a Giving Page
-
Salesforce.org Blog Post: How to Boost Digital Fundraising With Personalized Ask Ladders
-
Salesforce Help: Populate a Giving Page with URL Parameters