Add Donor Information Fields and Customize Confirmation
Learning Objectives
After completing this unit, you’ll be able to:
- Describe best practices for collecting donor information to maximize conversion.
- Enable standard fields on an Elevate Giving Page.
- Add custom fields to your Giving Page.
- Customize your Thank You message.
- Explain Elevate receipt settings.
Collect Donor Information
Now that Sofia, Development Associate at the (fictional) nonprofit No More Homelessness (NMH), has configured her Donation Settings, she clicks Donor Information in the preview pane to move on to the next group of settings.
Before we dive in, though, a word of caution: Elevate is flexible enough to add any field you need to meet your organization’s goals, but remember to keep your donation forms simple. Just ask for what you need to process the gift.
Asking for too much information right away can scare a donor off. One frightening example: 50% of donors abandon a donation form that asks for their cell phone number. So keep the donor form simple and quick to complete. You can always collect more information for your donors’ records later.

Now, let’s follow along with Sofia as she configures the fields in the Donor Information settings.
Enable Standard Fields
By default, Giving Pages include the fields you need to process a gift, like first name, last name, email, and payment information. If you want to add additional fields, you can add either standard fields or custom fields.
Let’s start with standard fields. Make sure that the Standard subtab is selected in the settings pane to review these fields.
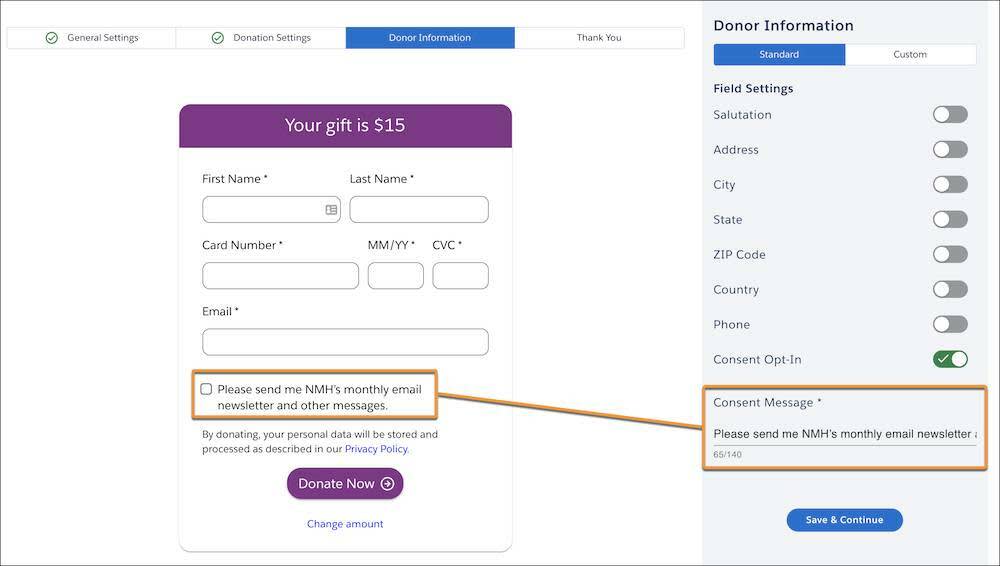
Standard fields are included or excluded with a toggle: on to add them to the form, off to remove them. Any standard field you add to the form is required (with the exception of the Consent Opt-In checkbox.)
How do you decide? Every organization has different goals, but here are some situations where you may want to include some of the standard fields:
- If you send a lot of direct mail, a print newsletter, or annual report, you may want to turn on Address, City, State, and ZIP Code.
- If your organization’s style calls for a more formal tone in communications, you may want to include the Salutation field.
- If you have many donors outside the United States, add the Country field, but remember that all gifts are processed in U.S. dollars. (Elevate is currently only available for U.S.-based Salesforce customers.)
For example, NMH’s most important strategic goal is building its email marketing list, so they add only Consent Opt-In, a checkbox that collects donor consent for email marketing or another ask.
- Turn on Consent Opt-In.
- A 140-character Consent Message field appears. Enter
Please send me NMH’s monthly email newsletter and other messages.
Now if a donor checks the box, NMH knows they can send them other email communications.
Add Custom Fields
NMH has another, late-breaking requirement for their donation form. Aniyah, NMH’s Development Director, just learned that the organization is facing a shortage of volunteers for its mentorship program! Aniyah talks with her program counterpart, and they agree to place a volunteer interest field on the form because they’ve learned that their donors are a great pool of potential mentorship volunteers. (But she also plans to monitor whether the additional field has a negative effect on giving. She’ll run an A/B test and measure it in Google Analytics.)
Sofia adds a custom field to the form to capture the volunteer interest information. A custom field allows NMH—or any Elevate customer—to send data directly to Salesforce from their donation forms. For example, NMH can use the contact record volunteer data it collects on this Giving Page with its Salesforce volunteer app to manage its volunteer needs.
Let’s follow along as Sofia adds the custom field.
- Click the Custom subtab in the settings pane. This is where you can add any other standard or custom Salesforce field to the Giving Page. One important requirement, first: Your Salesforce Admin needs to map any custom fields using NPSP Advanced Mapping before they’re available for Elevate Giving Pages. (You won’t be able to follow along with this part unless you set up a similar Volunteer Status field. Just read along.)
- Click Contact.
- Under Select a Field, click on the field you would like to include. Sofia clicks Volunteer Status, which her Salesforce Admin set up.

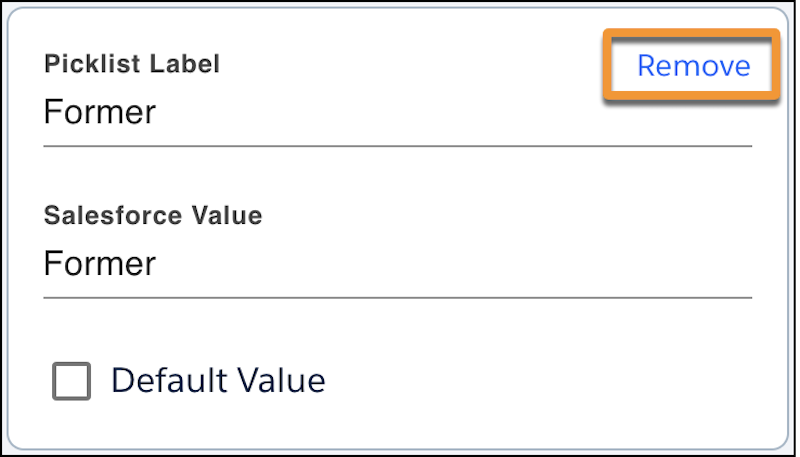
- Custom Fields appear in Elevate exactly like they would in Salesforce—with the same labels, picklist values, and more. Modify those labels and values so the fields make sense to the donor in the context of your Giving Page. Here’s what Sofia does to change the field:
- Label: She changes the Salesforce field label, Volunteer Status, to
Would you like to learn about volunteering with NMH?
- This is a picklist field, and there are several picklist options that don’t apply here. Each has its own box in the settings pane. Sofia clicks Remove on the values she doesn’t want to include.
- Sofia leaves two values, Interested and Not Interested. These picklist labels don’t necessarily make sense to our donors, though, so Sofia changes the label that shows on the Giving Page.
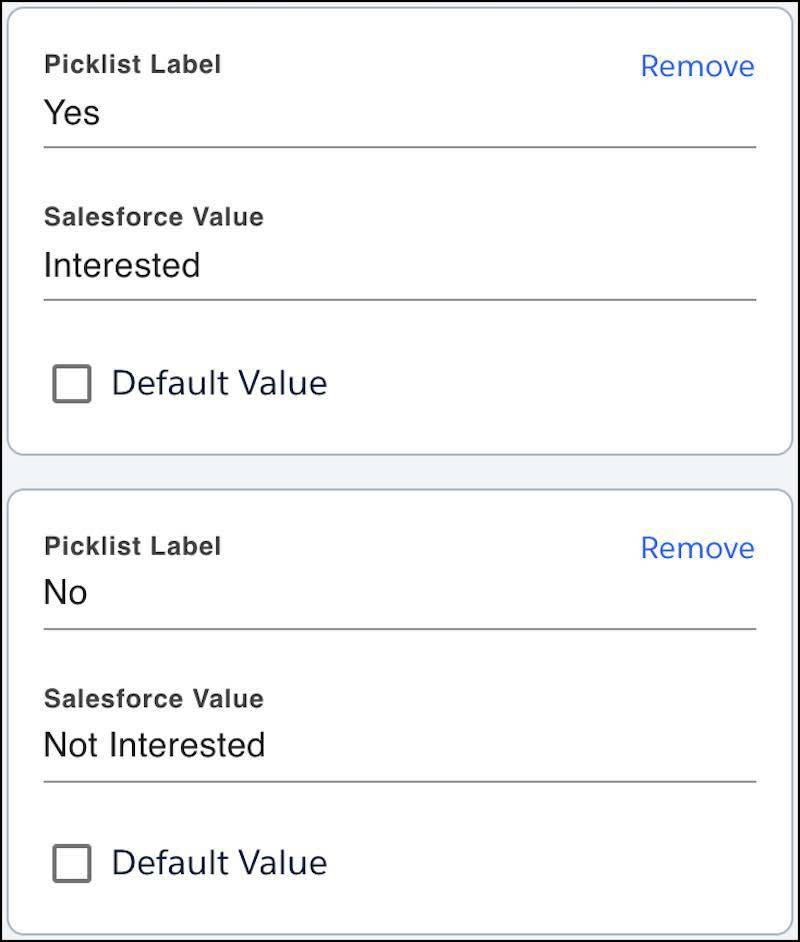
- In the Interested box, change the Picklist Label to
Yes. Leave the Salesforce Value as it appears so that it maps directly back to the field as it appears in Salesforce. (If you change a Salesforce Value, be sure to update the picklist values in Salesforce so they get to the target picklist properly.)
- In the Not Interested Box, change the Picklist Label to
No. Again, leave the Salesforce Value as it is.
- We could pick a Default Value, but Sofia would rather this field be blank than populated with a default, so don’t select one value over the other.
- Click Save & Continue.
Customize Your Thank You Message
Our last stop is the final page of Giving Page settings, where we’ll customize the thank you message to donors. This is a 100-character message that defaults to Thank you for your donation. But because NMH is using this page specifically for their annual fund, they want to mention that fund, in particular.
- Under Custom Message, enter
Thank you for supporting NMH’s ongoing work through our annual fund.
- Optionally, you can choose to redirect the donor to a custom URL. We'll leave this deselected now.

- Click Save.
Our page configuration is now saved! We’re sent back to General Settings, where we can review the Donation, Payment, and Confirmation Pages in the preview pane.
We’ll check out that preview soon, but first let’s review one more setting that lives outside of Giving Page configuration.
Receipt Settings
Elevate comes with optional automated receipts. These receipts apply to all transactions and aren’t custom to just one Giving Page. Your Salesforce Admin may have enabled these receipts during the initial Elevate set-up and configured them to come from your email domain. (If not, talk with your admin about enabling receipts and setting up a custom email domain.)
Keep in mind that these are very simple receipts. If you have more complex needs you can use workflow and email automation in Salesforce or another tool from the AppExchange.
Let’s check out the settings.
- To see your receipt settings, click Receipt & Alert Settings in the Elevate Admin Console navigation. It’s the receipt icon (
 ).
).
- On the Receipt Information tab, set the basic information for the email template: who it’s from, the reply address, your mailing address, phone number, website, and tax ID.

- Click Save.
- Click the Email Receipts tab. Here you can customize your receipts with a subject line, your logo, and your message. Click Preview to see what it looks like. This is also where you can turn receipts on or off.
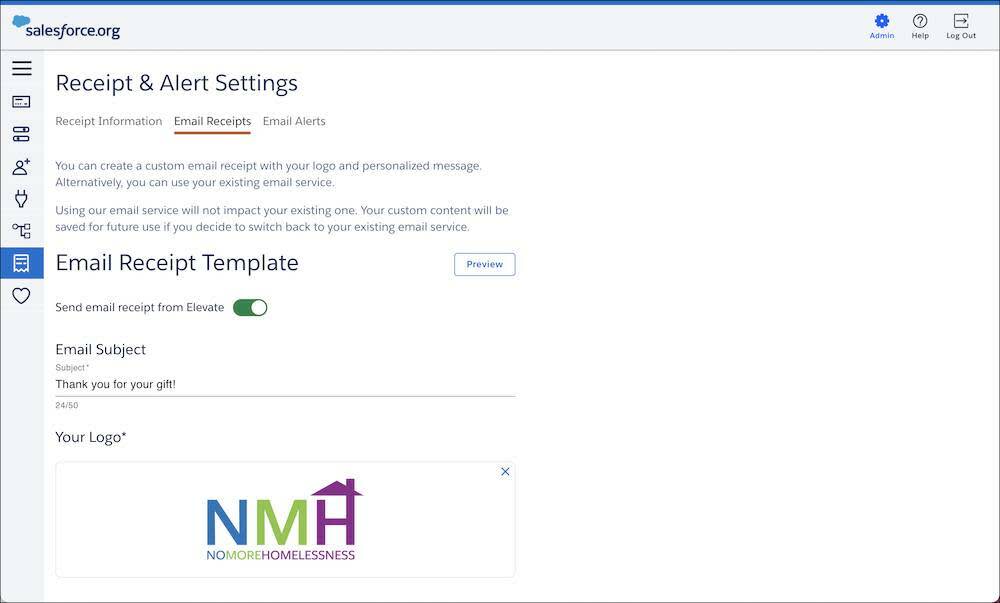
- Click Save.
Remember that these receipts apply to all gifts made through Elevate on any Giving Page or processed via Elevate’s Payments API. Before you activate this feature, consider Elevate receipts in context with all other acknowledgements and receipts you already send.
In the next unit we’ll pick up here to deploy our page and start collecting donations.
Resources
-
Salesforce Help: Create or Edit a Giving Page
-
Salesforce Help: Elevate Custom Fields Considerations and Guidelines
-
Salesforce Help: Customize Advanced Mapping
-
Trailhead: Extend NPSP Data Importer with Advanced Mapping
-
Salesforce Help: Evaluate Donor Receipt Automation
-
Salesforce Help: Configure Receipt and Alert Settings
-
Salesforce Help: Configure a Custom Email Domain