Convert Currency in Salesforce Spiff
Learning Objectives
After completing this unit, you’ll be able to:
- Explain each required field of the currency rate template.
- Import currency rates to Salesforce Spiff.
- Convert currency calculations in commission payout rules.
- Describe how to prevent currency mismatch errors.
Import Currency Rates
You can do currency calculations in commission payout rules if you have your currency rates in Spiff. Do a sync to get the rates from your Salesforce CRM into Spiff. If you don’t have the rates in a Salesforce CRM, import them by uploading Spiff’s currency rate template.
You can add any currency to the template file as long as you fill in the required fields.
-
external_id: This is the way Spiff uniquely identifies each record. Instead of overwriting a record when the rate needs to be updated, upload a new record with its own unique external_id, with its corresponding effective_as_of date and rate.

-
currency_code: This is the three-character ISO code for that currency.
-
effective_as_of: This is the date that represents when this rate begins to apply.
-
rate: This is the conversion rate from the corporate currency to the currency identified in the currency_code field. All conversions are relative to the corporate currency identified in Admin | Settings.
Make sure that the file type is CSV and that the tab name of the file you upload is conversion_rates. You can import conversion rates as often as needed: daily, weekly, monthly, and so on. But keep these two facts in mind.
- Every new conversion rate record you import must have a unique external_id.
- The names of the field and the tab can’t change.
There are two locations in Spiff where you can import currency rates: Data Sources | Data Imports and Admin | Users. Let’s review both the options.
In this module, we assume you're a Spiff admin with the proper permissions to perform calculations and conversions. If you’re not an administrator for Spiff, that’s OK. Read along to learn how your admin would take the steps in a production org. Don't try to follow these steps in your Trailhead Playground. Spiff isn't available in the Trailhead Playground.
Import in Data Sources | Data Imports
- Go to Data Sources.
- Click + in the Data Imports menu and select the file.

When you first upload the template to Salesforce Spiff, it creates a new object. With each successive upload, upload to the same object as previous conversion rates uploads.
Set the primary key of the table to external_id. And set the data type for these fields.
- currency_code: string
- effective_as_of: date
- rate: decimal
At the last step of the upload process, Spiff asks what you want to do if there are duplicate records in your file. If the file contains only new records, select Skip duplicate records.

After your import is processed, you’ll find the Conversion Rates object in Data Sources. For each conversion rate record, there are details of when the record was created, if it was updated, as well as the code, effective date, and rate.
Import in Admin | Users
Select Currency Rates in Admin | Users to bring up the currency rates table.
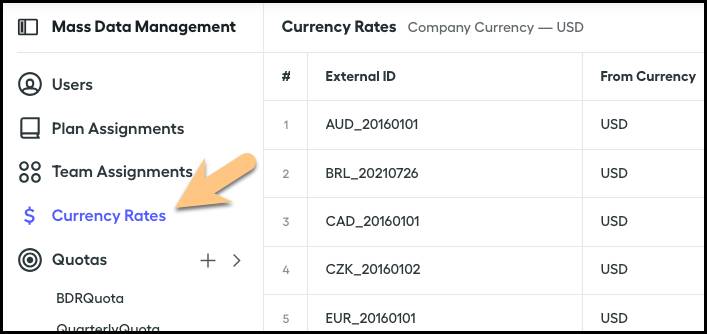
To edit the rate and effective date for any existing currency record, click Edit. Click  to add additional currency records to the table. You can either copy and paste rows from your file into the provided table or upload a CSV file. Here’s more about each option.
- Copy and paste rows into table: The From Currency value must be the corporate currency. Remember that all currency conversions are relative to the corporate currency set in Admin | Settings. You don't need to select or enter a Rate Type.
- Upload a CSV file: Click Upload data from file, then identify the column headers and map the columns in your file to the columns required for upload. Once your columns are mapped, click Review, and then Continue.
You should now have your records in the table! They'll also be visible in Data Sources | Data Imports. After syncing in conversion rates, you can:
- Set currency-related options in Spiff Designer.
- Specify each rep’s preferred currency in Admin | Users.
- Update quote tables to reflect correct currency. How? Click Edit on the quota table, click the cell you would like to edit, and select
 to choose a currency.
Explore Currency Conversion
After you have currency rates in Spiff, you can convert currency in your payout rules. Typically, if a company deals in multiple currencies, they use a field to track what deal a currency closed in. For example, for companies that use Salesforce, there's a field called CurrencyISOCode on the Opportunities object, which tracks this information.
Why convert currency? Imagine your company currency is USD and a deal closes in EUR. Chances are you will need to convert this deal to the company currency during your payout rule calculations. Or your organization is based in the US, but the reps live in a different country. In that case, you convert their payout to the preferred currency that’s specified in their user profile.
Let’s find out how to convert currency. In datasheets or worksheets, click a field or calculation to bring up the Settings sidebar. You’ll notice these two currency-related options.
-
Convert to Currency tells Spiff that a given field is a currency.
-
Convert to another Currency converts the field to another currency using the conversion rates that have been synced or uploaded.
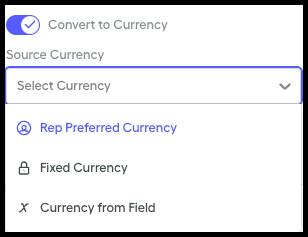
If the field has been set up as a currency, Spiff recognizes that and tells you it is ✔︎ Already Currency; the Convert to Currency toggle isn’t visible. If the field isn't recognized as currency, you have three options when you turn on Convert to Currency.
-
Rep Preferred Currency references the currency that’s set on the User profile for each individual user. Go to Admin | Users and click the user to access their User profile.

-
Fixed Currency gives you the option to set a specific currency from a list of available currencies previously set in Spiff. Notice that the first currency available is the corporate currency designated in Spiff. All other currencies are listed alphabetically.
-
Currency from Field gives you the option to select a currency code from an existing calculated field within Spiff. Connector fields aren’t available.
If the field is already recognized as a currency, or after turning on Convert to Currency, enabling Convert to another Currency presents you with these two options.
-
Destination Currency gives you the same three options as Convert to Currency, but helps you take the original currency and convert it to another.
-
Conversion Date gives you two options to select.
- Use Calendar Date to pick a specific date from which to begin converting currency.
- Use Date from Field to select a specific date field to designate the currency conversion start date.
- Use Calendar Date to pick a specific date from which to begin converting currency.
Each day—or even minute or hour—there's a different currency rate. Spiff needs to know which rate to apply. The conversion date you choose is used to match the currency rate that was in effect at the time of the chosen date. Common choices include CloseDate or statement_period.end_date. Use CloseDate if you need to convert ARR or deal amount to another currency using the conversion rate that was effective when the deal was closed. If you plan to convert a rule to rep preferred currency, choose a statement period start or end date to use the conversion rate that was effective at the start or end of the particular statement period.
After both selections are complete, the output of your rule or calculation is displayed in the designated currency.
Currency Mismatch Errors
When working with different currencies, be mindful of currency mismatch errors. Often this error occurs when one rule is in one currency, such as USD, while another is converted to the rep’s preferred currency, such as EUR. To avoid these errors, make sure that all rules are calculated in the same currency.
Now that you’re familiar with currency conversion, you can move on to the next unit, where you learn how to handle null-value errors.