Manage Plans in Bulk
Learning Objectives
After completing this unit, you’ll be able to:
- Add and remove plan assignments for sales reps in bulk.
- Manage plan assignment dates and custom fields.
Introduction
Sometimes making individual updates to plans and users can feel like a never-ending task. That’s where Salesforce Spiff makes life easier by helping you manage plans in bulk—quickly and effortlessly. Whether you need to add new plan assignments or tweak existing ones, Spiff streamlines the process so you can handle multiple updates at once, saving time and keeping things running smoothly. It's all about making your workflow faster and more efficient.
Add New Plan Assignments
Adding new plan assignments in bulk is a three-step process. Of course, the starting point is the Plan Assignments page. To access this page, select Users in the Admin menu. Here’s how to add new plan assignments in Spiff.
Download the Example Template
- On the Plan Assignments page, click Upload.
- On the Upload Your Plans to Spiff window, click Download the example file.

The example plan assignment template contains these five fields, two required for import. Do not edit the field headers on the template, as sometimes it causes errors or incomplete entries during data import.
Field Header |
Description |
|---|---|
user_id |
This required field specifies the external ID of the user assigned to a plan. You can find this ID by navigating to Users under the Admin dropdown. |
effective_as_of |
This field specifies the start date for the plan assignment. Use the format YYYY-MM-DD. You can also update this field after file upload. |
effective_until |
This field specifies the end date for the plan assignment. Use the format YYYY-MM-DD. Similar to the start date, you can update this field after file upload. |
external_id |
This field specifies a unique ID for each plan assignment, as a user can be assigned to multiple plans. Duplicate entries overwrite existing plan assignments. To update an existing assignment, use the same ID, otherwise, a new record is created. You can also edit this field. |
plan_name |
This required field specifies the name of the plan assigned to the user. The plan must already exist in the system, otherwise the record results in an error. |
Check out this example template file. It’s a CSV file, and the best way to view it accurately is by using a text editor such as Notepad or TextEdit. This ensures the formatting remains consistent and meets the required standards. This image highlights the correct formatting for each column, including both the headers and the data.

Add New Plan Assignment Records to the File
With the example template file on hand, start by removing the sample records already included as placeholders. Then, fill in the two required fields for each record. While the external_id field is optional, we strongly recommend creating one for every plan assignment. Without it, making bulk changes can be difficult, especially when users have multiple team assignments. If a plan assignment lacks an external_id, Spiff sometimes defaults to updating one assignment, but not necessarily the correct one. This makes bulk updates easy because you can reuse the same external_id to modify any records later.
If you're using a spreadsheet program such as Excel to add your plan assignment details, double-check that your effective dates are in the YYYY-MM-DD format.

Upload the File
The final step is uploading your file after filling in all the required information for the bulk upload.
- On the Plan Assignments page, click
 .
.
- Click Browse your computer or drag and drop the file.

- A notification appears confirming that the upload is in progress. Click the link in the notification to navigate to the File Import Status page. Alternatively, you can access it by clicking
 in the table settings.
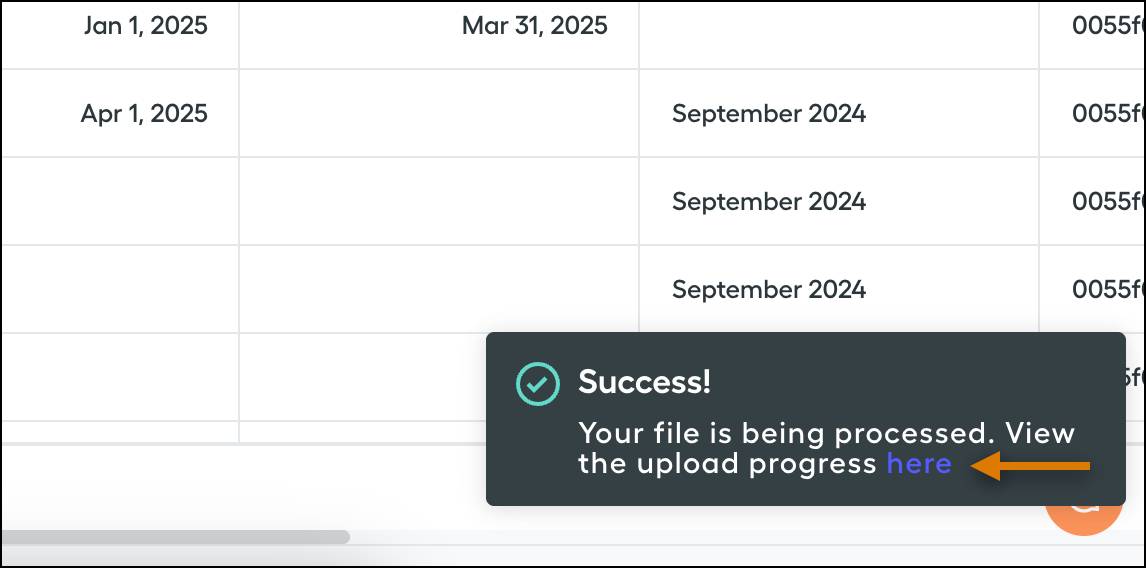
- Review the Mass Data Management File Import Status table for upload details. These details include the status, such as Complete or Imported with Errors, validation alerts linked to error messages, and time stamps of imports.

That’s it! It’s a simple three-step process, and you have added your plan assignments in bulk in no time.
Edit Plan Assignment Records in Bulk
Editing existing plan assignment records with the Uploader is pretty much the same as uploading new ones. Here’s how to do it.
Apply Plan Assignment IDs
Make sure to add a Plan Assignment External ID to any lines that don’t already have one. If you created a plan assignment in Spiff and not through an upload, its External ID is blank. Adding an External ID ensures your updates apply to the appropriate plan assignment. You can use any unique ID you like.
In the Mass Data Management (MDM) table, turn on the Edit mode on to assign a unique External ID to each blank plan assignment. You use these IDs when making updates through the Uploader.
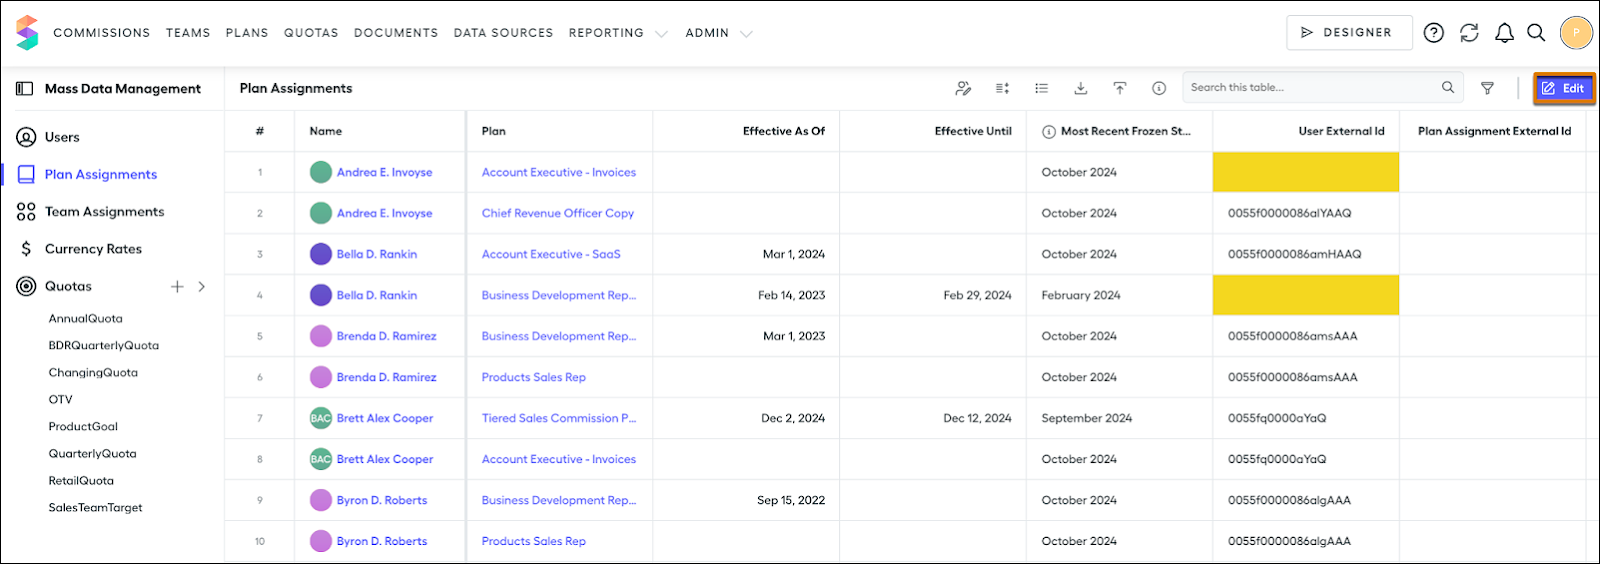
Download the Plan Assignment Table
Click  . This step exports a CSV of all existing plan assignment records in the system.

Edit the Records
For any record that needs changes, make edits to the Effective As Of, Effective Until, or any custom field entries.
Prepare the File for Import
For the best results, take these precautions to make sure that your import file matches the format of the example file as closely as possible.
- Delete any unnecessary columns from the table export that aren’t part of the example file. Specifically, remove User Name and User Email.
- Make sure the remaining columns match the headers in the example file.
- Rename User ID to user_id.
- Rename Plan Name to plan_name.
- Rename External ID to external_id.
- Rename Effective As Of to effective_as_of.
- Rename Effective Until to effective_until.
- Use the YYYY-MM-DD format for all date fields.
Alternatively, you can copy the rows from your table and paste them directly into the example file instead of renaming headers. If you have custom fields, you can leave the names unchanged.
- Rename User ID to user_id.
When you’re done, check if your file looks similar to the examples in this image.

Upload the File
The process of uploading your file is the same as we covered in the last unit—feel free to refer back for a refresher.
And that’s it! You’ve learned how to manage Spiff plans for both individual users and in bulk, giving you the tools to handle plan assignments with ease and efficiency. Whether you’re working with a handful of users or a larger group, you’re now equipped to keep everything organized and running smoothly.