Interact with Salesforce Maps on Mobile
Learning Objectives
After completing this unit, you’ll be able to:
- Execute routes on mobile.
- Find accounts based on GPS location.
- Execute schedule on mobile.
- Prospect and add records to Salesforce Maps using Click2Create®.
You’ve learned how to use Salesforce Maps to plan and save efficient routes and schedules. Now, let’s look at how you can execute your plans on a mobile device and use location intelligence to save time and increase revenue while on the go.
Salesforce Maps can be accessed on a mobile device in a number of ways, including:
- Salesforce mobile Lightning app (recommended)
- Salesforce Maps mobile app
- Salesforce browser
If this is your first time using Salesforce Maps on a mobile device, we recommend installing the Salesforce mobile Lightning app from Apple’s App Store or the Google Play Store. As the recommended app, users have access to advanced user settings and customizations, such as navigation preferences.
Routes
In the previous unit, Candace Evans used Salesforce Maps on a computer to create routes and schedules.
Now let’s look at how she executes these routes or schedules using Salesforce Maps on her smartphone. Imagine it’s Monday morning and she’s ready to start her work day. She selects the Salesforce mobile Lightning app on her smartphone, logs in using her Salesforce credentials, and navigates to the Maps mobile tab. She taps the Routes icon and selects the saved route for Monday. Once the route has loaded, she taps the map icon at the bottom of the phone to view her route on the map.

Candace selects the first stop on her route and taps Take Me There. Because this is the first time she’s using Salesforce Maps on her mobile device, she chooses the mapping application she wants to use for turn-by-turn directions and saves it for future times as her preferred application.

Anxious to get started, Candace jumps in her car and follows the directions to her first destination. When she arrives, she opens the Maps mobile tab from her Salesforce mobile Lightning app and taps Check In to log this client visit in Salesforce so that it’s tracked without her manually doing so later.

During the meeting, Candace reviews inventory and discusses a new product line with the store manager. Before leaving, she schedules a follow-up meeting with the manager for next month. Her meeting was a success! Now she can enter notes and log her next steps in Salesforce.
Sitting in her car, Candace opens Maps mobile via the Salesforce mobile Lightning app. She taps Check Out to mark her meeting task as complete, and then uses talk to text to enter her meeting notes quickly and without worrying about forgetting an important detail by the time she gets back to the office.


Since she scheduled a follow-up meeting to continue nurturing the customer relationship, she taps Log an Event and creates an event in her Salesforce calendar. She then taps the second stop on her route, gets turn by turn directions, checks in and out, and logs her activity. She follows this process as she visits each stop on her route. She completes her final visit 2 hours before the end of her work day.
Prior to Salesforce Maps, she’d drive to the closest coffee shop and enter notes about each visit in Salesforce. She also searched for accounts or opportunities in the area and hopefully have enough time to visit at least one before heading home for the day. With Salesforce Maps, she’s already saved a lot of time by logging her activity in Salesforce after each visit. Let’s see how else she can also save time and increase her productivity by searching for nearby accounts.
Find Surrounding Accounts
From her mobile device, Candace uses marker layers to plot nearby accounts and opportunities. She then limits her search results to a 10-mile radius from her current location.

Once she determines which accounts to visit, she could add them to her route. But instead, she selects each marker, taps Take Me There for turn-by-turn directions, checks in and out, and logs her activity all from within the Salesforce Maps mobile experience.
By the end of the day, Candace added three additional stops to her previously planned route. Using location intelligence to find nearby accounts increases her number of visits and saves her valuable time.
Schedule
The schedule tab can be selected to execute routes for scheduled events in your Salesforce calendar.
Remember the key differences between routes and schedules? Let’s list them.
- Schedules sync with the Salesforce calendar to display calendar events and let users add new events. Routes do not create Salesforce calendar events.
- Schedules require all appointments to have a start and end time. Routes don’t require records to have a scheduled start and end time, but appointment times and duration can be added.
- Schedules allow users to optimize up to a week of appointments at a time. Routes let users optimize up to a day of appointments at a time.
By default, Schedule shows the events for the current day, but you can change the date by using the left/right arrows. Tap Map My Schedule to display the events on the map view.

Candace uses routes and schedules with Salesforce Maps. The schedule pulls in any upcoming meetings on the map. It also lets Candace take advantage of the same features previously discussed, such as turn-by-turn directions; logging activity; and adding, removing, or updating appointments as needed. When she encounters a cancellation or change in schedule, she plots a marker layer to find and visit accounts within a specific radius.
Click2Create
At this point, Candace is proficient when using Salesforce Maps on her mobile device. She’s successfully found nearby accounts within her Salesforce org’s data, but now she would like to extend the mobile functionality by prospecting with Salesforce Maps. Candace asks her manager if she can use Salesforce Maps to prospect and add leads to Salesforce using the Maps mobile experience.
It helps to ask questions! Her manager explains that this can in fact be done by using a Salesforce Maps feature called Click2Create.
Excited about this additional feature, she decides to test Click2Create. The next day, a scheduled appointment takes less time than expected, so Candace has time before her next appointment. She uses the search bar to conduct a point of interest (POI) search of all shoe stores in the area. After tapping the Maps icon, her search results appear on the map with corresponding images, for example, a shopping bag.

Next, she plots the “All Accounts” and “All Leads” markers layers to see if the POI search results match records already in Salesforce. Records in Salesforce appear as pins on the map.
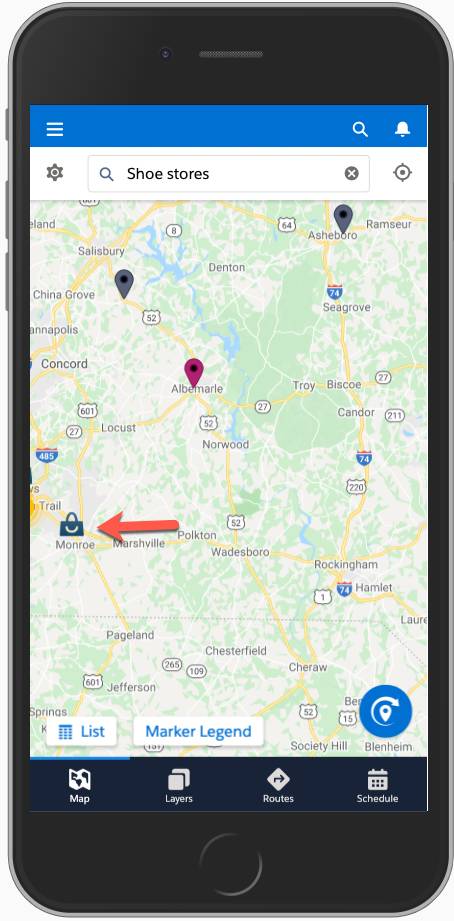
She taps on a shoe store that is not showing as a record in Salesforce and calls the store to schedule a meeting. After collecting information about the store, she taps the Click2Create button and adds this new store as a lead in Salesforce.


Once entered as a lead, Candace follows her company’s sales process to convert these leads into opportunities.

Summary
Throughout this badge, you followed Candace as she used Salesforce Maps to plan effective routes and schedules, then executed those plans in the field. She saved time by logging activity directly from the Maps interface. She also increased her potential to close deals by using location intelligence to find nearby records and prospects for leads with Click2Create.
Now you can apply these use cases to your business and use location intelligence to increase your productivity and meet or exceed business expectations.