Connect ArcGIS Online Data to Salesforce Maps with Click2Create
Learning Objectives
After completing this unit you will be able to
- Create records in Salesforce using Click2Create.
- Interact with ArcGIS Online data.
In the previous unit, you reviewed common use cases for using ArcGIS Online with Salesforce Maps. Now, let’s go a step further and demonstrate how to connect data from ArcGIS Online to data in Salesforce using Click2Create® (C2C).
With Click2Create, users create records in Salesforce directly from the map view. Click2Create captures the location of a record and populates fields with the exact information from ArcGIS Online. Here’s an example that demonstrates the power of Click2Create with ArcGIS Online.

Use Case: Adding Pipelines
An oil and gas utility provider is extending pipe lines for a new residential development. They use Salesforce Maps to geographically visualize existing pipelines and parcel data. Parcels of land in the path of the pipe line extension are added as account records in Salesforce using Click2Create. Once added, users then contact landowners and follow their organization’s business process to acquire or request permission for right of way access.
This example assumes an All Accounts marker layer has been created in Salesforce Maps as outlined in the Salesforce Maps Layers badge. Plot the All Accounts marker layer to create travel routes when visiting landowners. All activity will be logged in Salesforce.
ArcGIS Web Map
- First, log in to ArcGIS Online, and select the My Content button. A list of web maps appear.
- Select the Pipeline and Parcel web map and save the selected URL. This URL will be used later, when creating an ArcGIS Layer in Salesforce Maps.
- In the Salesforce setup menu, add the feature service and base map URL as a remote site.

Configure Click2Create
Next, configure Click2Create so users can accurately add records to Salesforce directly from Salesforce Maps.
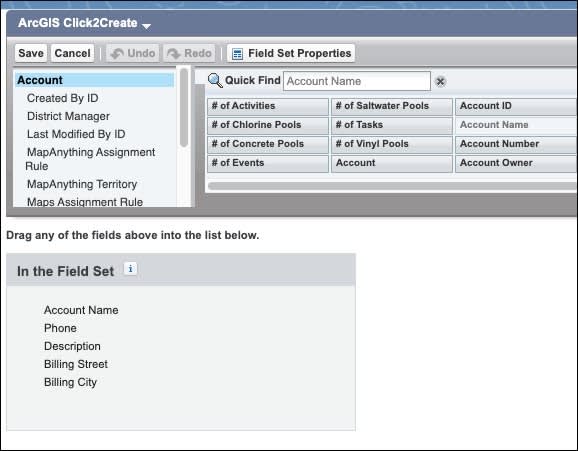
- Create a Field Set for the Account object in Salesforce.
- Name the field set
ArcGIS Click2Create.
- Define the fields in Salesforce that must be populated when creating an account record. Some fields like company name, phone number, and address will automatically be populated with data from ArcGIS Online.
- Navigate to the Salesforce Maps configuration menu.
- Select Click2Create.
- Select the Account object from the dropdown menu.
- Map the required fields. Complete field mapping for all three field mapping options.
- POI: Users can create a record using the Point of Interest Search bar in Salesforce Maps.
- My Position: Users can create a record from their GPS position on a mobile device.
-
Map Click: Users can create a record from plotted ArcGIS Online data in Salesforce Maps.
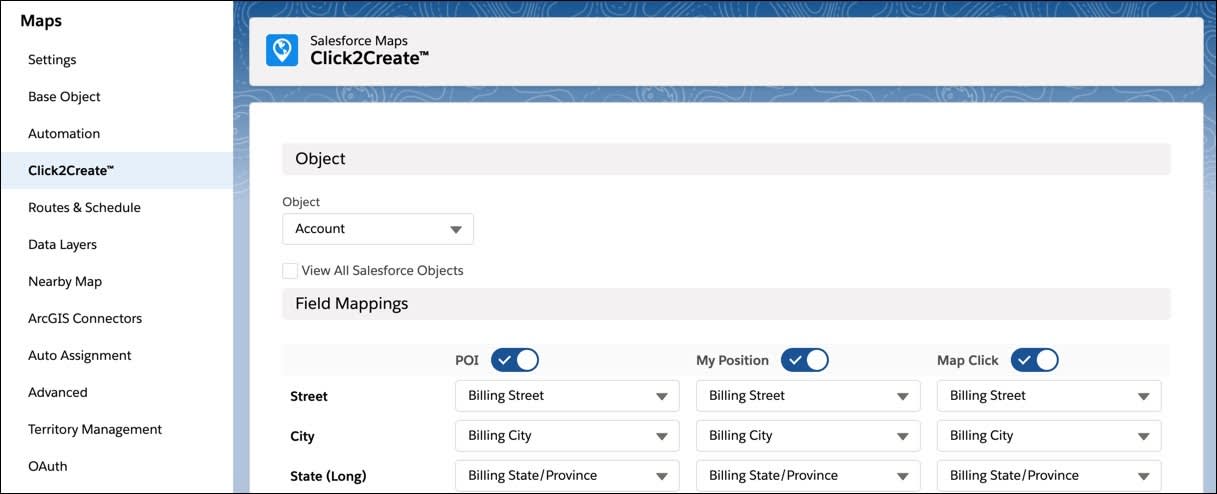
- Select the ArcGIS C2C Field Set Mapping for POI. Optionally select My Position and Map Clicks.

- Add the Click2Create button to a button set.
- Grant access using permissions groups as explained in the Salesforce Maps Configuration Badge.
Now users are ready to plot pipeline and parcel data from ArcGIS online in Salesforce Maps and add parcel records to Salesforce using Click2Create.
ArcGIS Layer
Now, in Salesforce Maps, users with permission to create an ArcGIS Layer take the following steps.
- Select a folder to store the ArcGIS layer.
- Select New | ArcGIS Layer.

- Name the layer:
Pipeline and Land Management - Enter the URL you previously saved as the ArcGIS Layer URL.

- Select the Click2Create Setup tab and complete the following:
-
Template Name:
C2C Pipeline and Land Management - Web Map Layer: Pipeline and Land Management
- Salesforce Object: Account
-
Template Name:
- Enter values for the following:
- Record Type: Select a record type associated with the Pipeline extension business process, such as Master.
- Latitude: Select the field Salesforce Maps will use to populate the latitude coordinates, such as Billing Latitude.
- Longitude: Select the field Salesforce Maps will use to populate the latitude coordinates, such as Billing Longitude.
-
Field Set: Select the field set previously created for Click2Create, ArcGIS Click2Create.

- Map Salesforce fields to ArcGIS Online fields.

- Save the ArcGIS layer and plot it on the map. Parcels of land display as boundaries and gas lines display as lines on the map.

Now, users can zoom in to the path for the pipeline extension and click any parcel of land in the pipeline extension right of way. When clicked, information from ArcGIS Online about the parcel, like the land owner and land description, will display.

At this point, select the actions tab and select Click2Create to create an account record for each parcel of land in the pipeline’s right of way. Click anywhere in the parcel boundary to create a record based on the latitude and longitude location of that point.

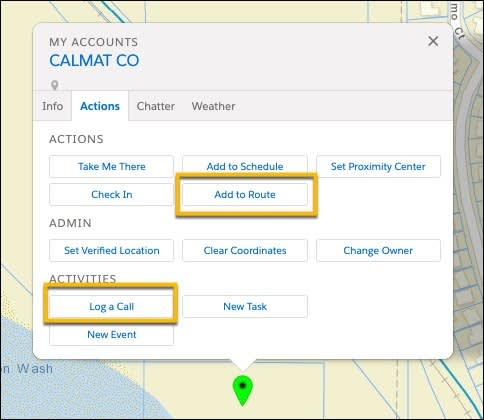
Imagine three parcels of land are added as records in Salesforce. Sales operations follows the company’s business process to negotiate access for right of way. When plotting accounts in Salesforce Maps, these three land parcels will display. Sales operations can then take actions like calling land owners, entering call notes using the Log a Call button, and planning in-person visits by creating an optimized route using the Add to Route button.
With Salesforce Maps, users gain the data visibility they need to complete the pipeline extension. While this is a specific use case, its broad principles apply to any organization looking to integrate data from ArcGIS Online with Salesforce data.
Now let’s help users as they work through the business process outlined by their organization. Read through the quiz scenario and answer quiz questions to help users meet their requirements.
Resources
- Salesforce Help: Create Field Sets for Click2Create
- Salesforce Help: Configure Remote Site Settings
- Trailhead: Salesforce Maps Layers
- Trailhead: Salesforce Maps Configuration
Quiz Scenario
A sales rep at the oil and gas utility provider is required to visit land parcels in the right of way of the pipeline extension. Each visit must be added to Salesforce as a related task or event. During the initial visit, pictures of the land must be added to Salesforce as an attachment.